Your organisation adds you, and you get an email to activate your account. This guide goes through every screen, from that email to your first login.
Your invite emailSubject: “Activate Your [organisation] Account”
Your mobile phoneWe text a 6-digit code to it
About 5 minutesFinish all the steps in one go
1
Open your invite email
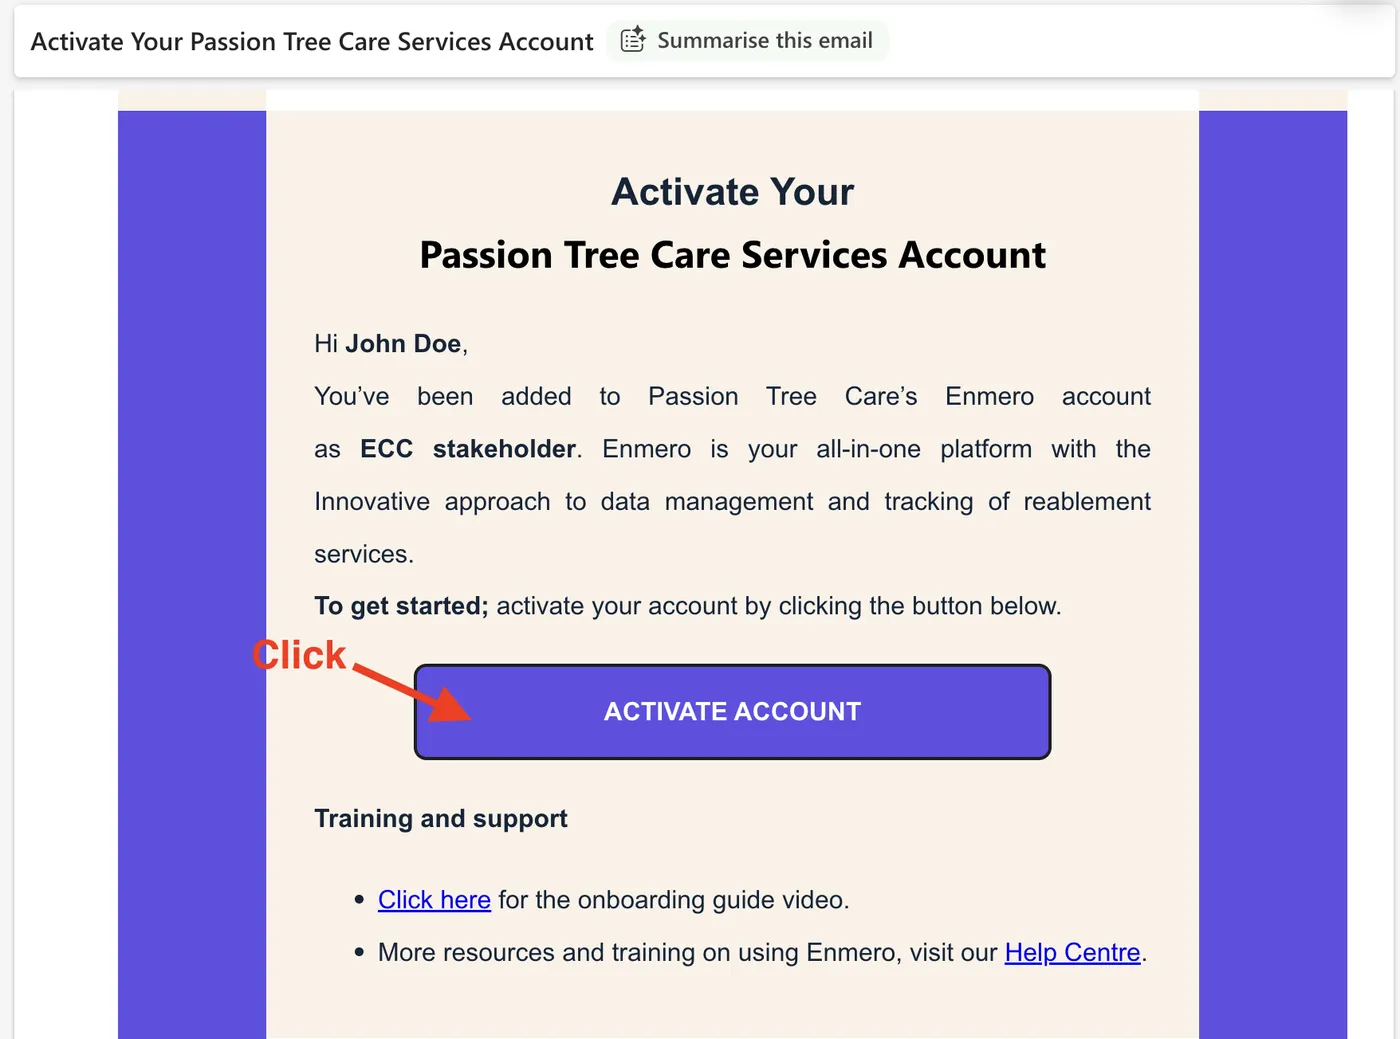
When your organisation adds you to Enmero, you get an email called “Activate Your [organisation name] Account”. It shows your name and the role you’ve been given, for example ECC stakeholder.
Open the email.
Click ACTIVATE ACCOUNT. The Enmero setup page opens in your browser.
TipUnder “Training and support” there’s a link to the onboarding guide video and a link to the Help Centre.
The invite email. Click Activate Account to begin.
2
Click Get Started
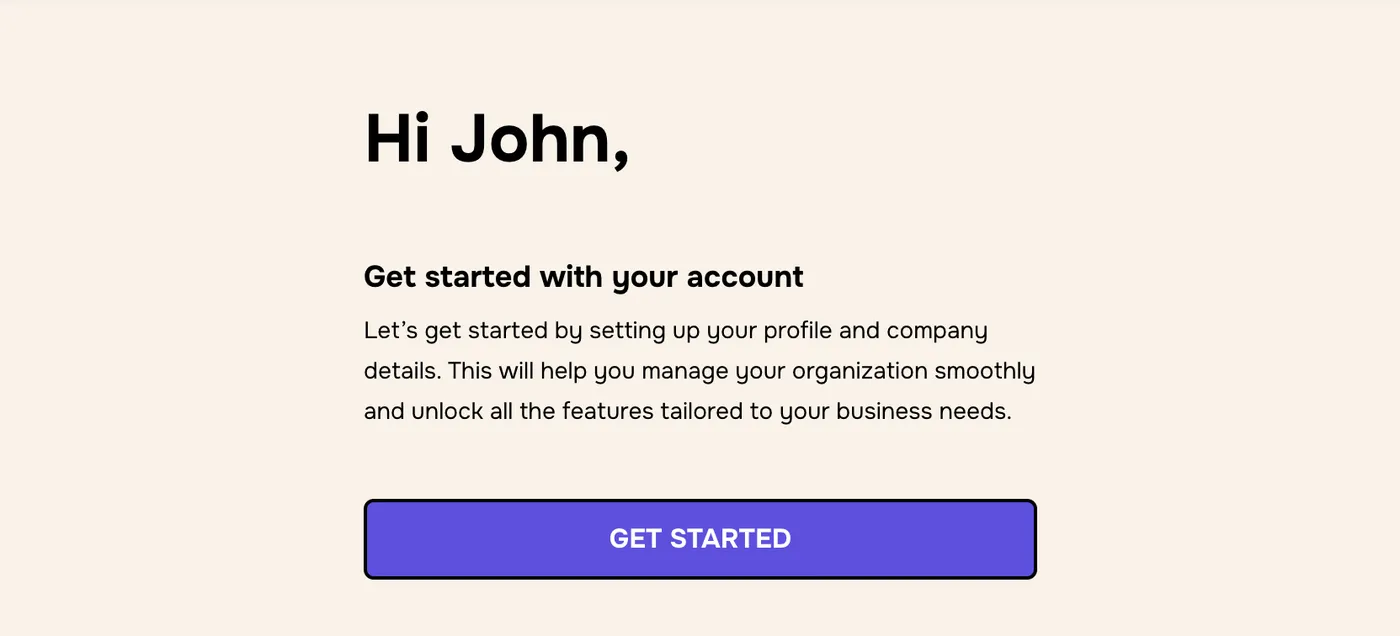
A welcome screen greets you by your first name.
Check that the name is yours.
Click GET STARTED.
The welcome screen.
3
Confirm your details and add your phone number
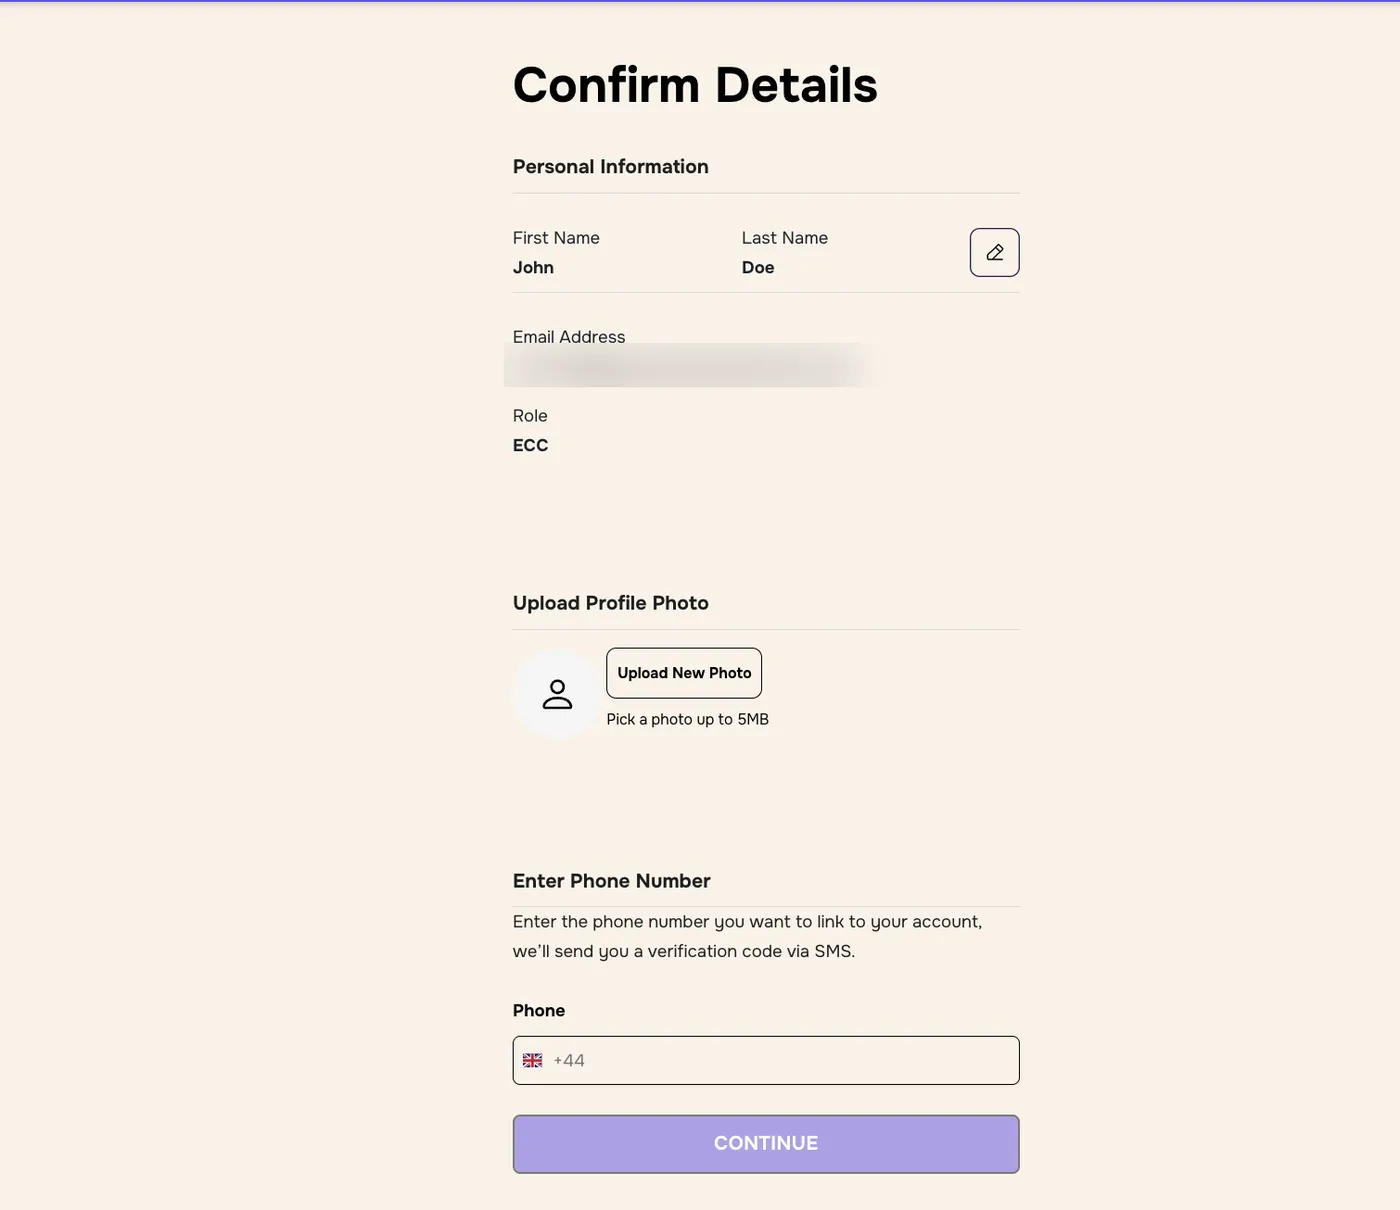
The Confirm Details screen shows the information your organisation entered when it invited you.
Check your first name, last name, email address and role. To fix your name, click the pencil icon next to it.
Optional: click Upload New Photo to add a profile photo. It must be 5MB or smaller.
Scroll down to Enter Phone Number and enter your mobile number. The UK code (+44) is already filled in.
Click CONTINUE. The button turns dark purple once you’ve entered a phone number.
Is your email or role wrong?You can’t change them here. Ask the person who invited you to correct them.
Confirm Details. We’ve blurred the email address in this example.
4
Verify your phone and turn on two-factor authentication
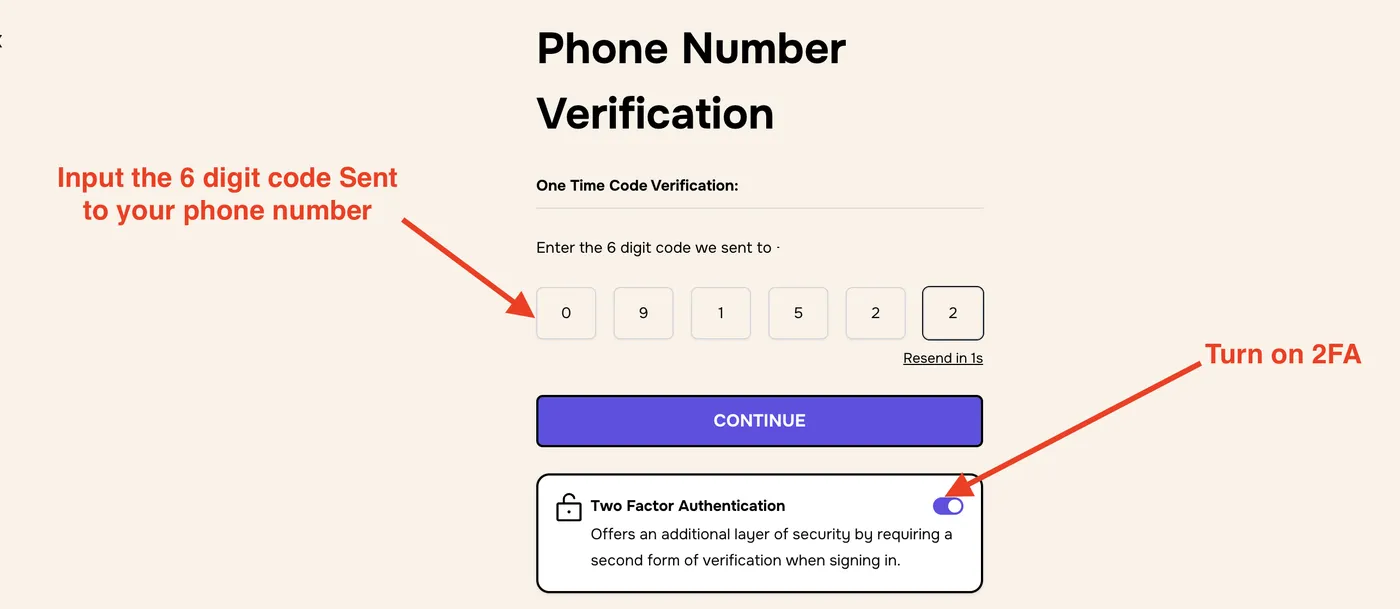
We text a 6-digit code to the number you entered.
Enter the code in the six boxes.
Switch on the Two Factor Authentication toggle. With it on, you’ll enter a one-time code each time you log in, which keeps your account safer. We recommend turning it on.
Click CONTINUE.
No code?Wait for the timer under the boxes to finish, then click Resend. If it still doesn’t arrive, click BACK and check your phone number.
Enter the code from your text message, then turn on 2FA.
5
Create your password
Choose a password you haven’t used anywhere else. It must include all of these:
An uppercase letter
A lowercase letter
A number
At least 8 characters
A special character, such as @
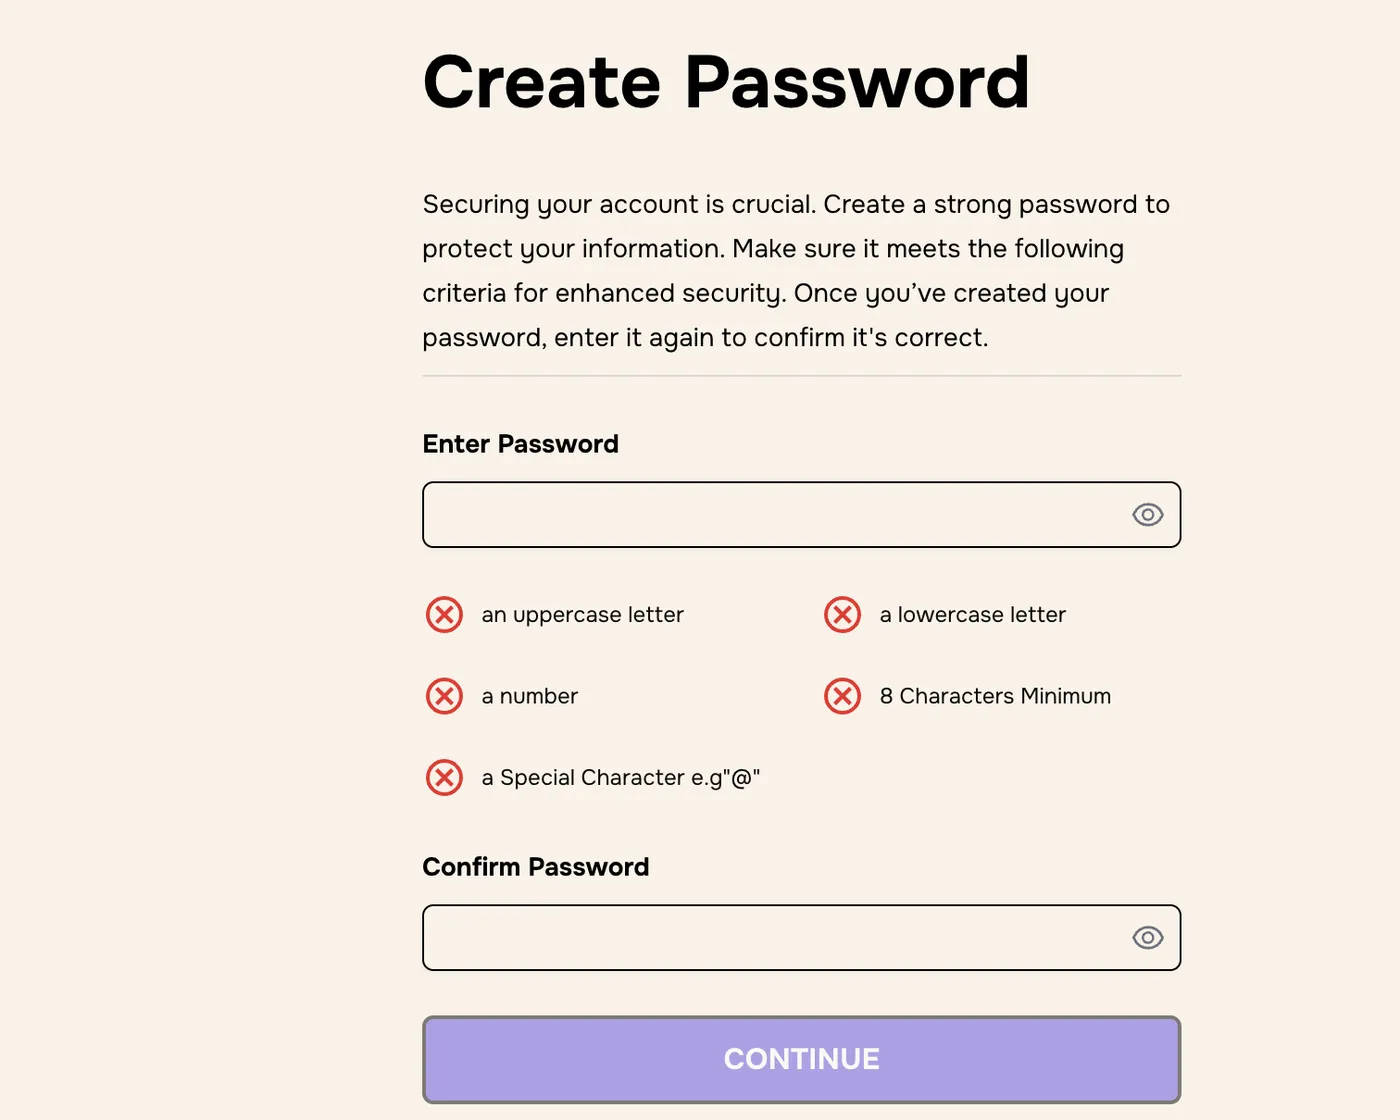
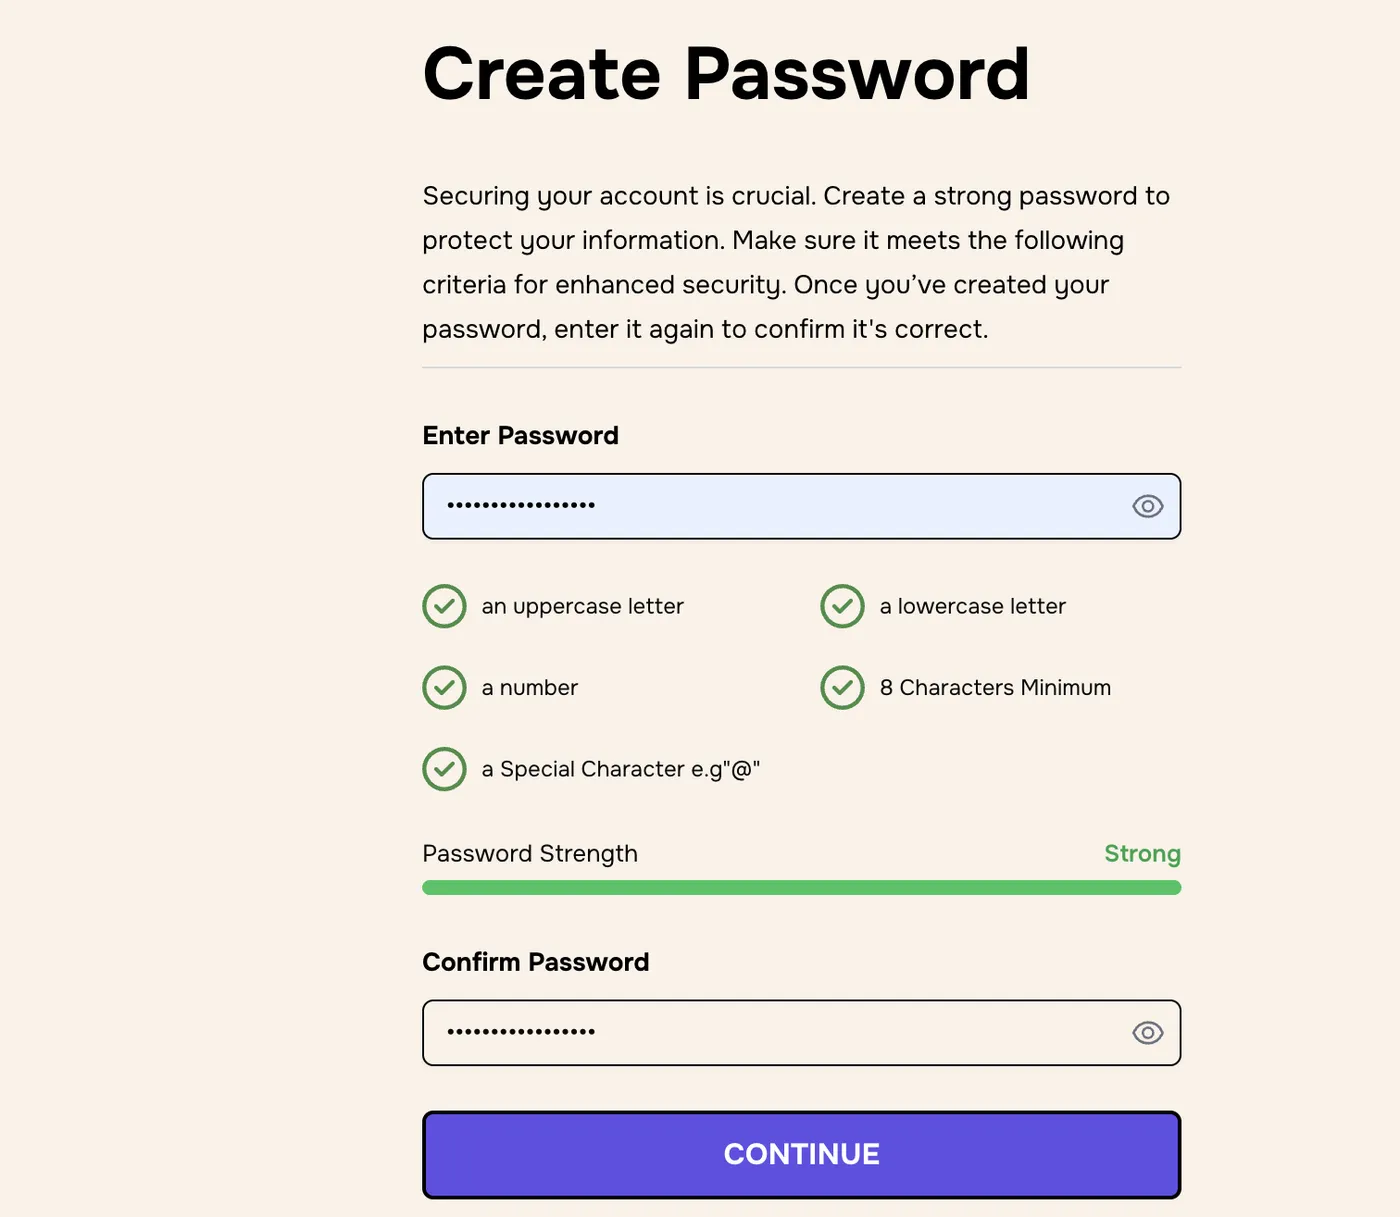
Type your password in Enter Password. Each rule changes from a red cross to a green tick once your password meets it.
Type the same password again in Confirm Password.
Click CONTINUE. It only works when every rule is ticked and both passwords match.
TipClick the eye icon in the password field to see what you’ve typed.
Before: red crosses, and Continue is greyed out.After: every rule is ticked and the strength bar says Strong.
6
Your account is active. Go to login
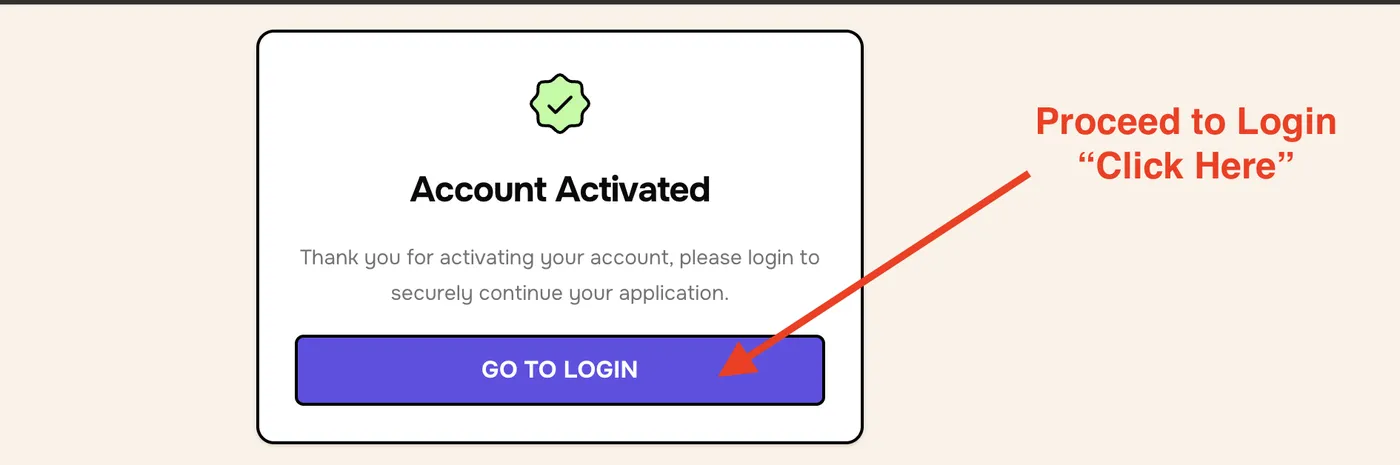
A pop-up confirms Account Activated.
Click GO TO LOGIN.
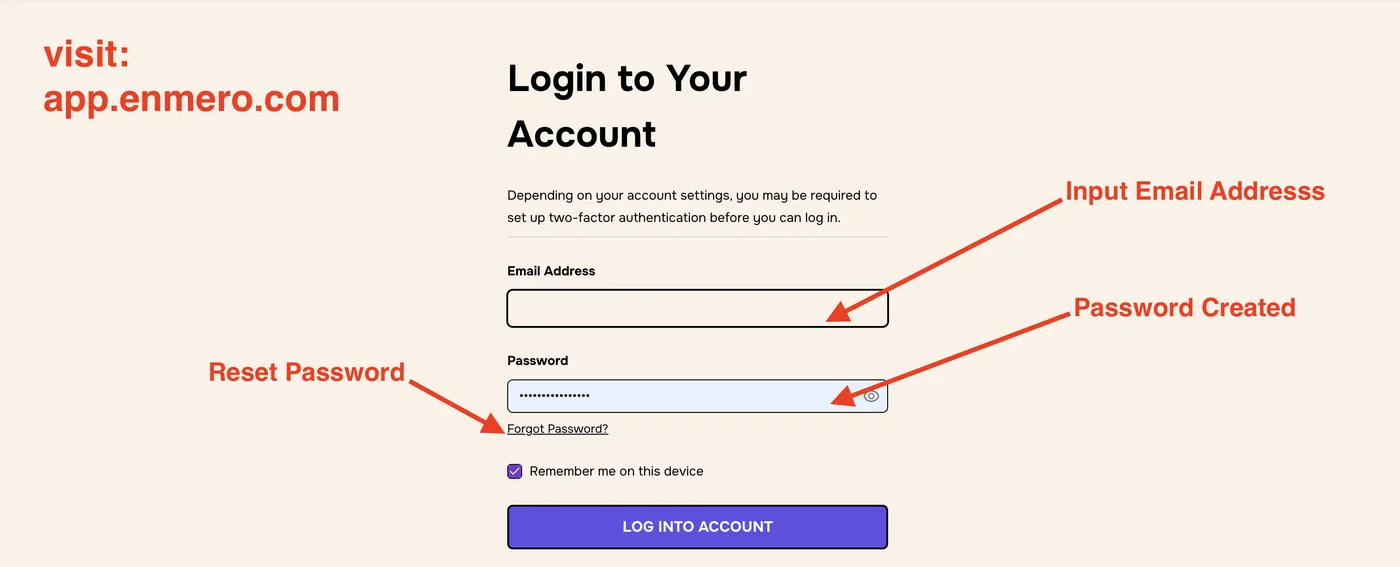
Log in with your email address and new password. The Logging in guide shows how.
Click Go To Login.
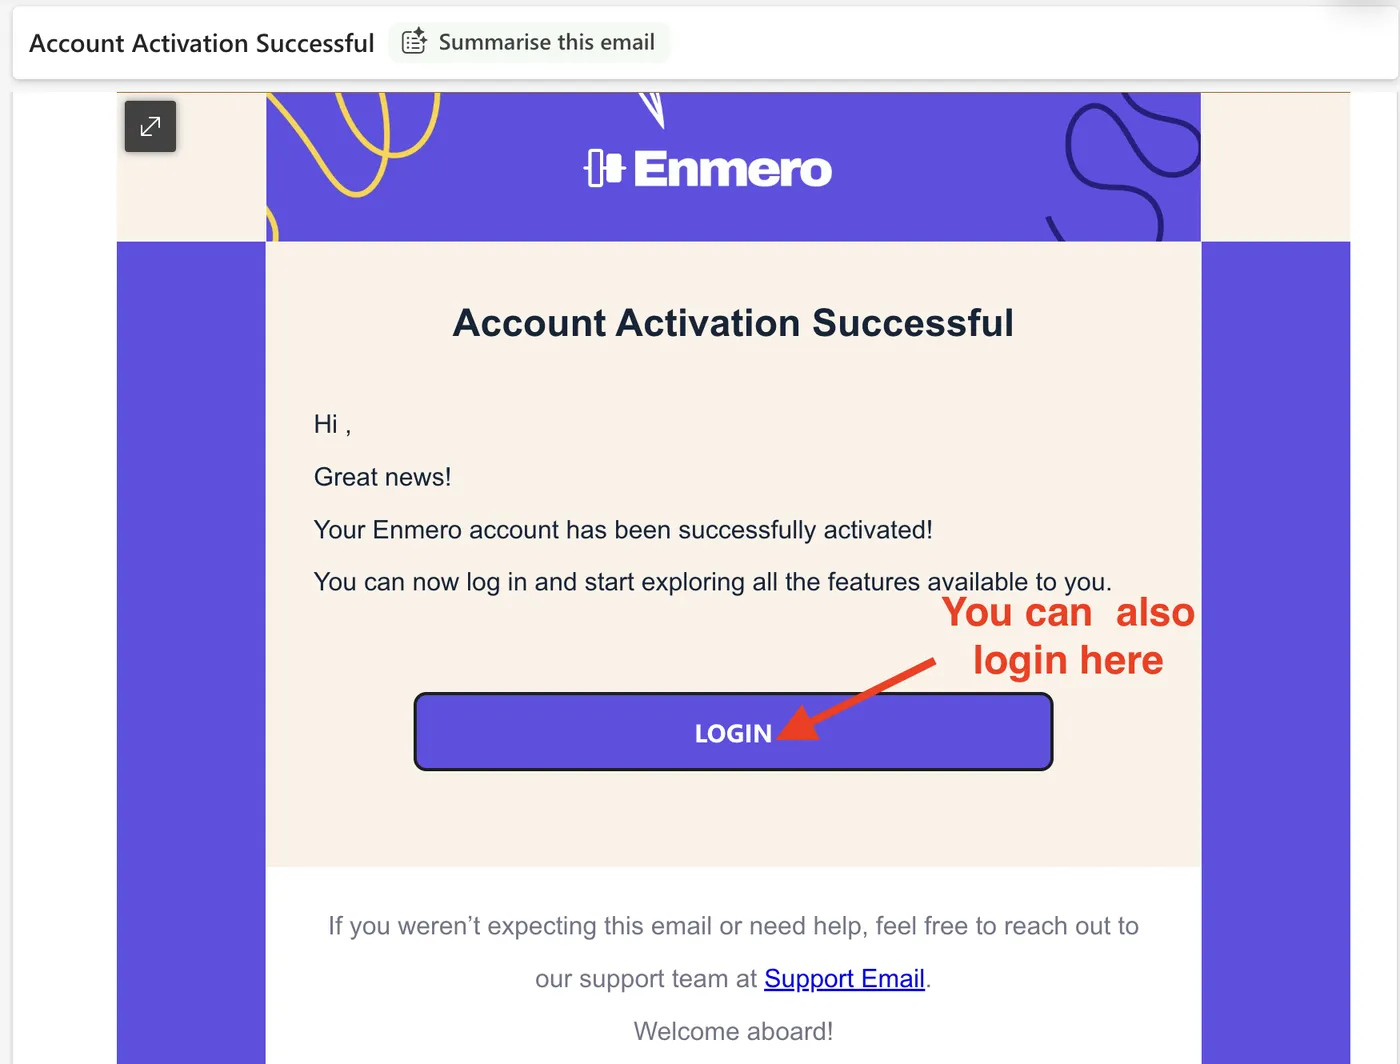
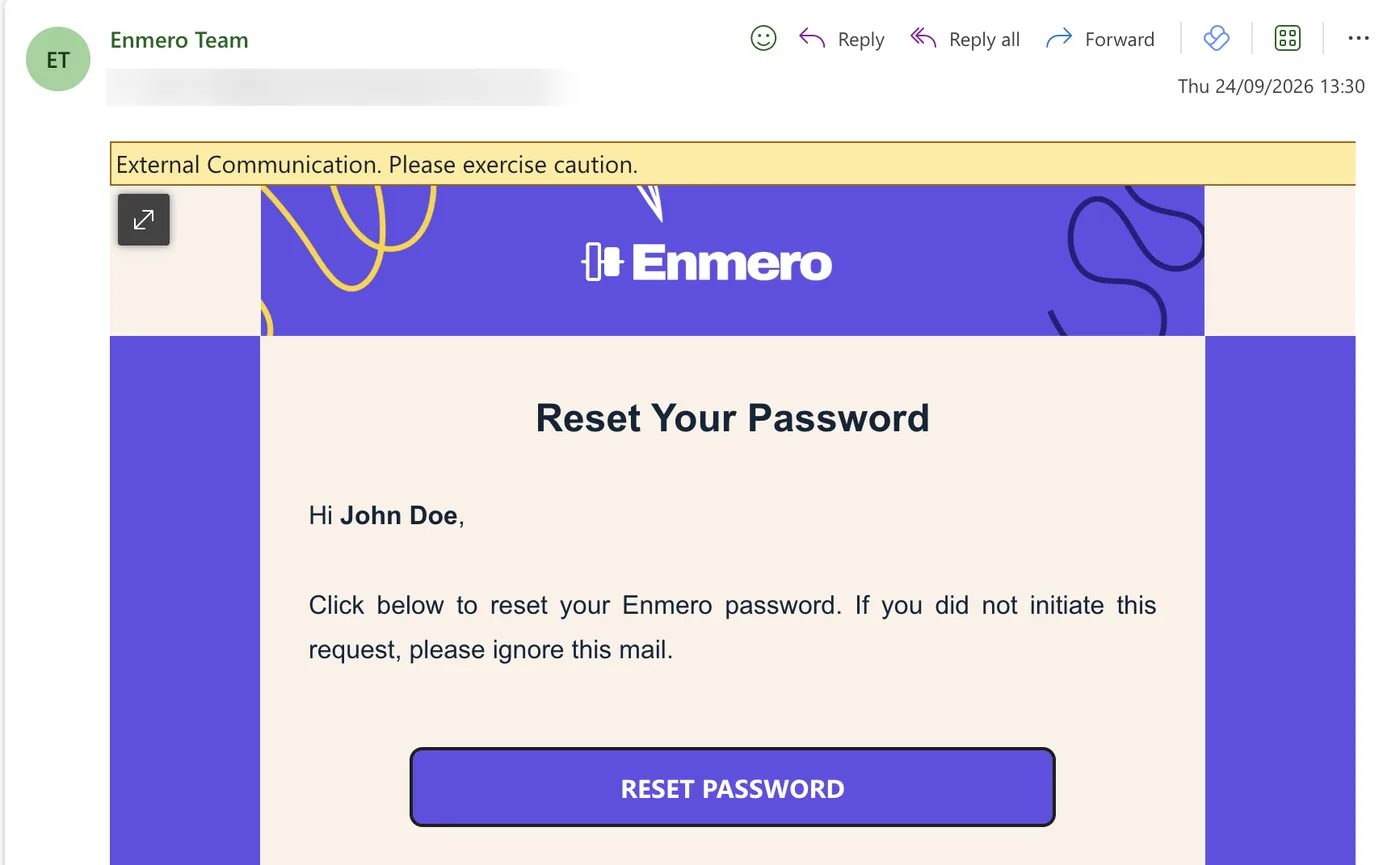
You’ll also get an email called “Account Activation Successful”. Its LOGIN button opens the same login page.
The confirmation email has a Login button too.
Troubleshooting
I can’t find my invite email
Check your junk or spam folder and search for “Enmero” or “Activate Your”. If it isn’t there, ask the person who added you to send the invite again. You can’t sign up without an invite.
The Continue button stays light purple
A required field is empty or doesn’t meet the rules. On Confirm Details, check you’ve entered a phone number. On Create Password, make sure every rule is ticked and both passwords match.
My text message code hasn’t arrived
Wait for the timer to finish, then click Resend. Check your phone has signal. If it still doesn’t come, click BACK and check your phone number.
I went back a screen by mistake
Use the BACK button at the top left of each setup screen to return to the previous step.
I didn’t expect to get an Enmero email
Don’t click anything. Contact support using the Support Email link at the bottom of the message.
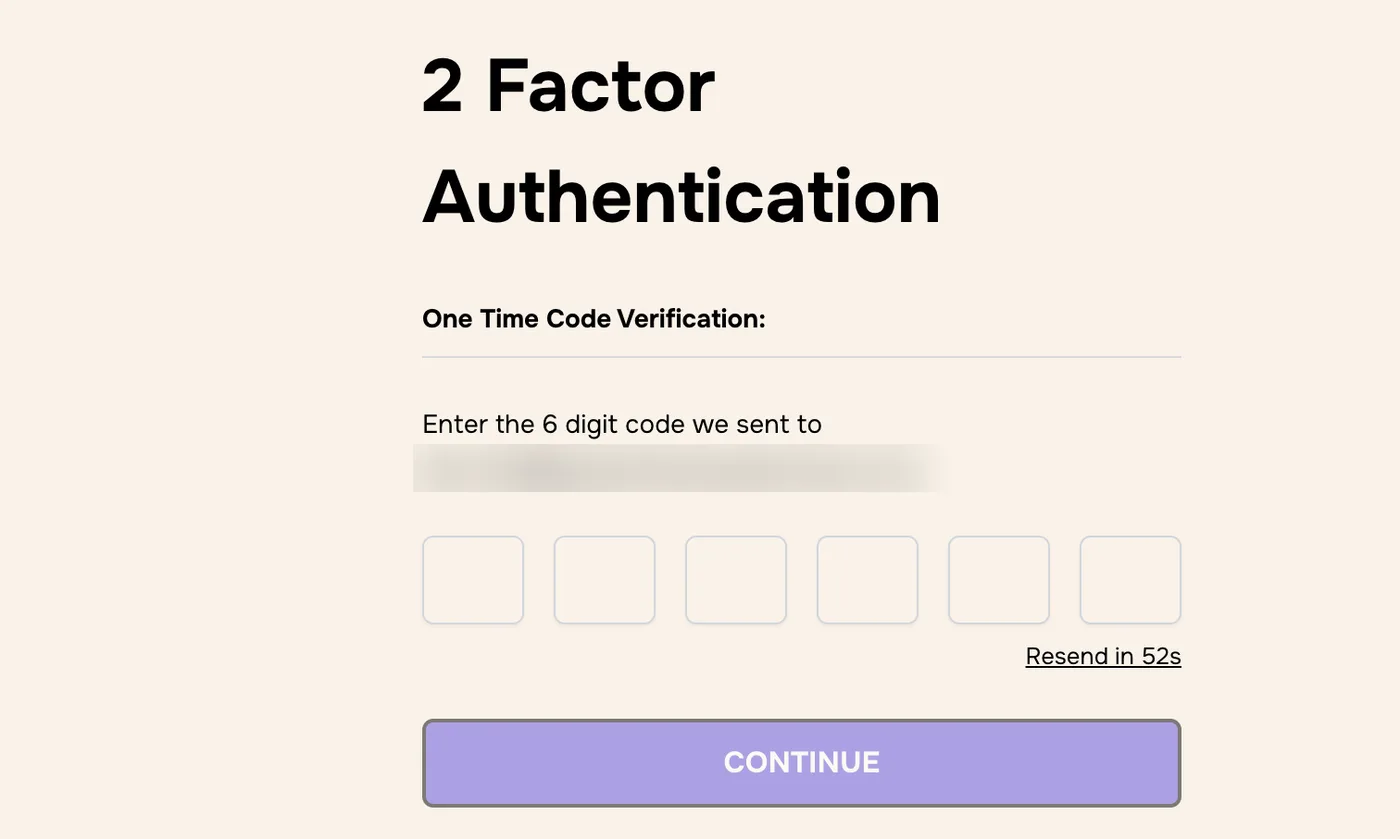
If you turned on two-factor authentication (2FA) during onboarding, Enmero asks for a one-time code after your password. Depending on your organisation’s settings, you may have to set up 2FA before you can log in.
Look for a 6-digit code in your email inbox. The screen shows which email address it went to.
Enter the code in the six boxes.
Click CONTINUE. Enmero opens, or you’re asked to choose a service portal (next step).
No code?Check your junk folder. When the timer under the boxes reaches zero, click Resend for a new code.
The 2FA screen. We’ve blurred the email address.
3
Choose your service portal
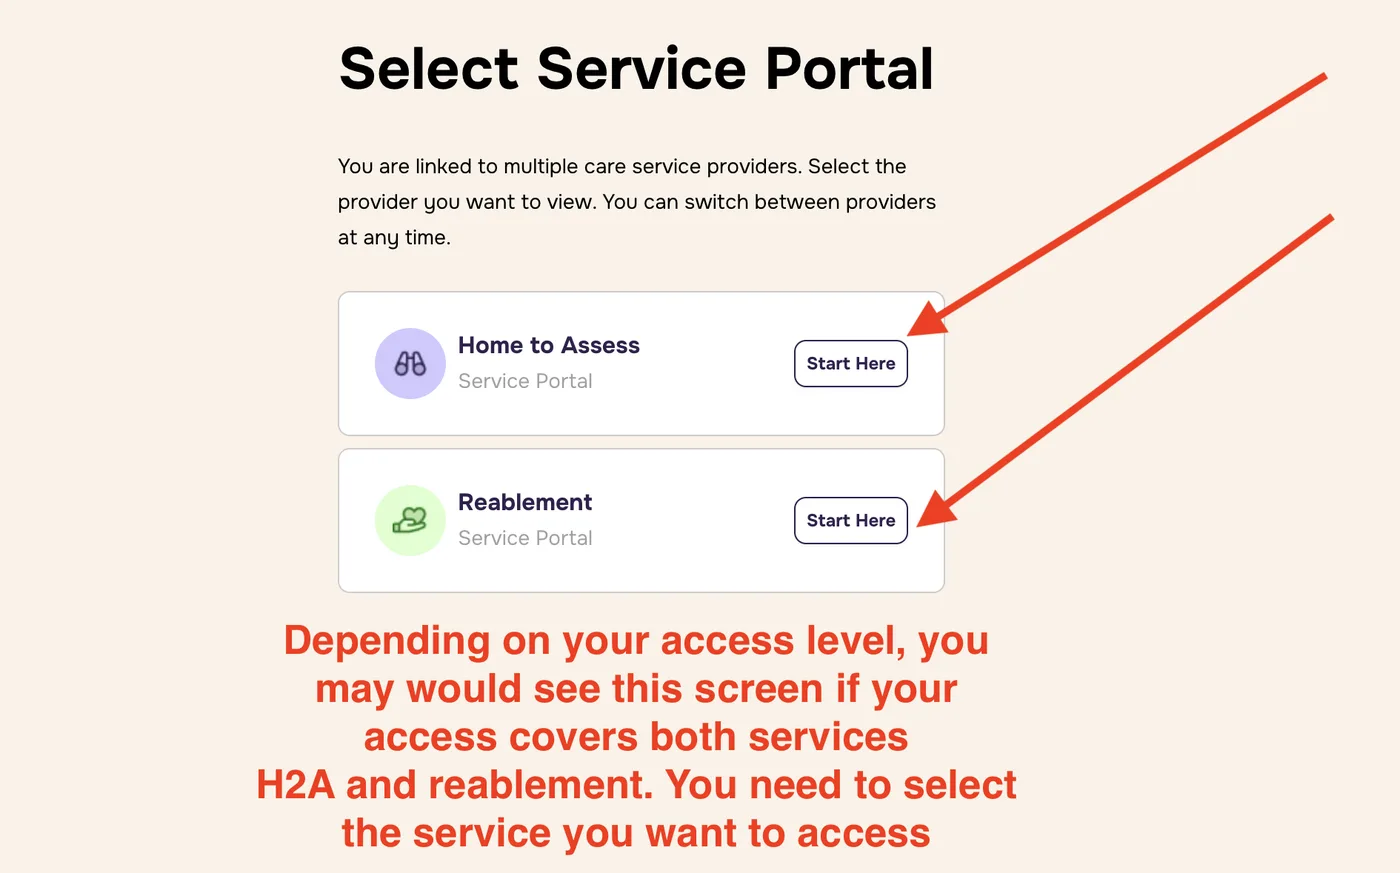
If your access covers more than one service, for example both Home to Assess (H2A) and Reablement, you’ll see Select Service Portal after your code. If you only have access to one service, you skip this screen and go straight into Enmero.
Find the service you want to work in.
Click Start Here next to it. Enmero opens in that service.
Enmero has three ways to search. Global search finds the most, so start there. The two table searches look only inside the page you’re on.
1
Which search should I use?
Search
Where
What it finds
Search by
How far back
Global searchRecommended
Magnifying glass in the top bar, on every page
Service users from every service you have access to, whichever service you’re in
Name, NHS number or Mosaic number
All records, including archived ones
Referral search
Referral Manager, “Search Referrals” box
Accepted and declined referrals and their details
Service user name only
Referrals in Referral Manager
Service user search
Service › Service Users, “Search users” box
Service users active in the recent period
Name
Usually the last 120 days
Not sure which one?Use global search. It isn’t limited to one page or one service.
2
Global search
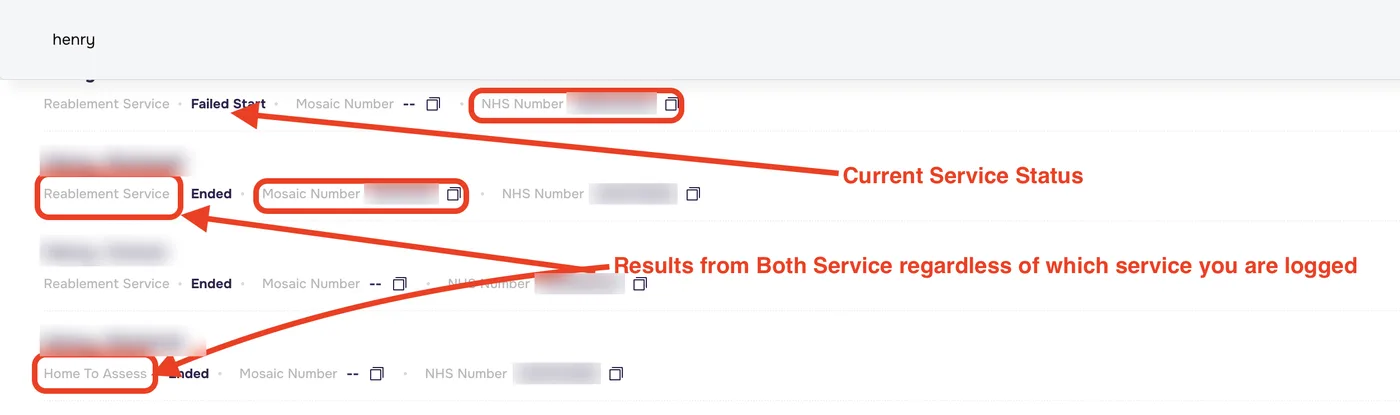
Global search looks across Reablement and Home to Assess at the same time, whichever service you’re logged in to. You only see results from the services your access covers.
Click the magnifying glass next to the service name at the top of the screen.
Type a service user’s name, NHS number or Mosaic number. Results appear as you type.
Check each result’s details to find the right person (see below), then click the result.
The global search button is in the top bar on every page.
Reading the results
Under each name you’ll see:
Service: which service the record belongs to, such as Reablement Service or Home To Assess. The same person can appear once for each service.
Status: their current service status, such as Ended or Failed Start.
Mosaic Number and NHS Number. Click the copy icon next to a number to copy it. “--” means no number is recorded.
Results for a name search, from both services. We’ve blurred names and numbers.You can also search by part of an NHS or Mosaic number.
3
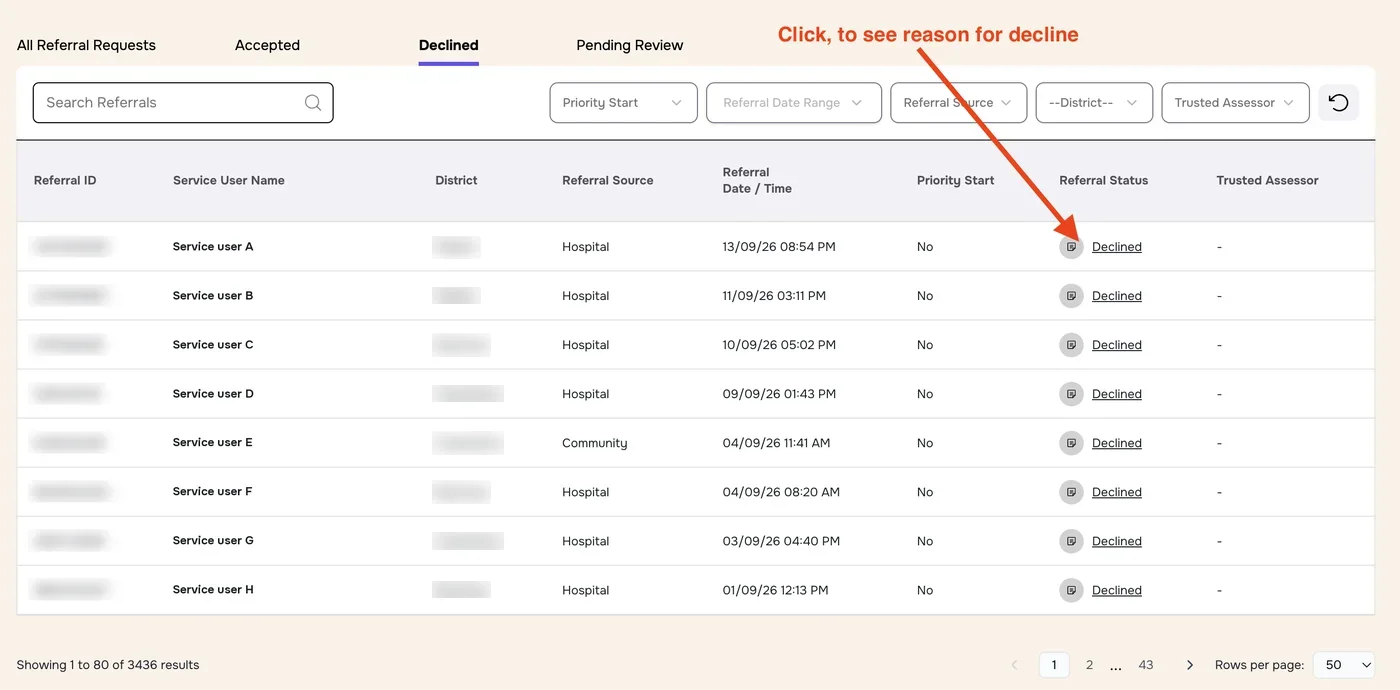
Referral search
Use this on Referral Manager to find a referral. It searches accepted and declined referrals only, and the results are referrals and their details.
Open Referral Manager from the menu.
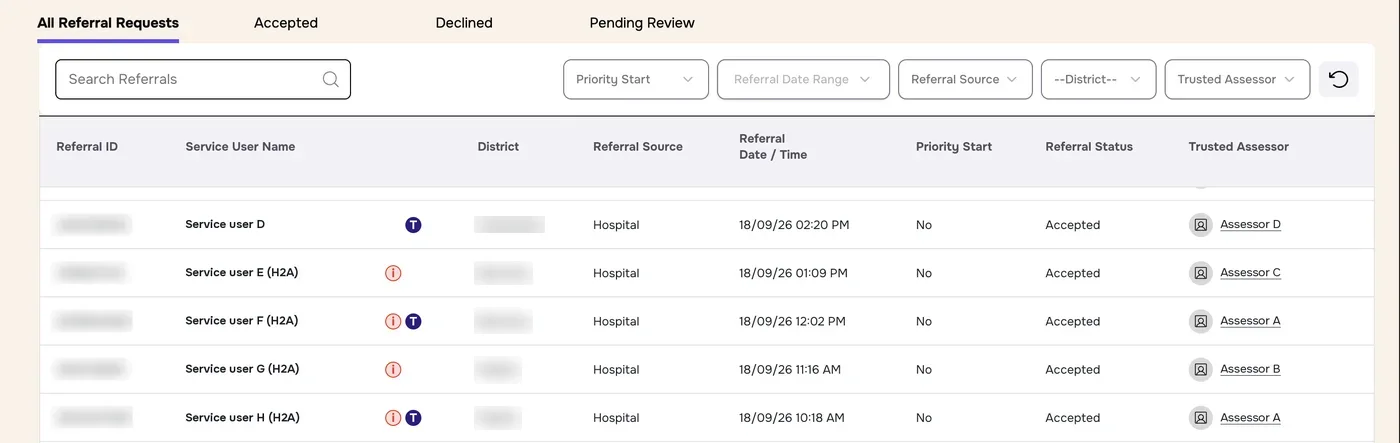
Type the service user’s name in Search Referrals. This box searches by name only. To find someone by NHS or Mosaic number, use global search.
Optional: narrow the list with the filters on the right, such as Priority Start, Referral Date Range, Referral Source, District or Trusted Assessor. Click the circular arrow button to clear them.
The Search Referrals box and filters on Referral Manager.
4
Service user search
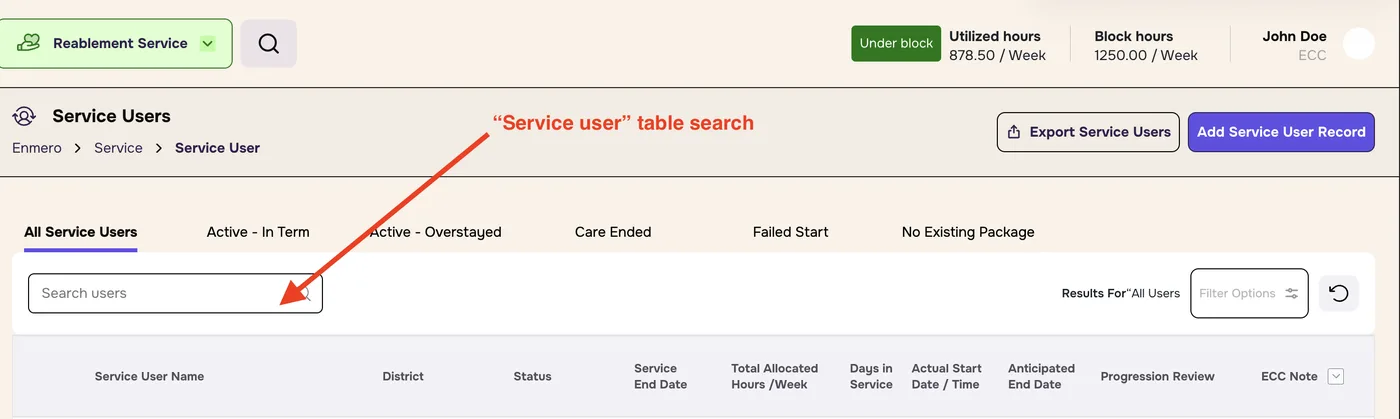
Use this on the Service Users page. It only searches service users who have been active in the recent period, usually the last 120 days. Older records are archived to keep results fast and relevant.
In the menu, open Service, then Service Users.
Type a name in Search users.
Optional: pick a tab, such as Active - In Term or Care Ended, or click Filter Options to narrow the list.
Looking for someone from more than 120 days ago?Their record is probably archived and won’t show here. Use instead.
The Search users box on the Service Users page.
Troubleshooting
I can’t find someone on the Service Users page
Their record may be archived because they haven’t been active in the last 120 days or so. Search for them with global search.
Searching an NHS number on Referral Manager finds nothing
Referral search only matches names. Use global search to search by NHS or Mosaic number.
The same person appears twice in global search
They have a record in more than one service, for example Reablement and Home To Assess. Check the service name under each result.
Global search doesn’t show a service I expected
You only see services your access covers. Ask the person who manages your organisation’s Enmero access if you need another service.
If your access covers more than one service, such as Reablement and Home to Assess (H2A), you can move between them at any time without logging out.
1
Check which service you’re in
The service you’re working in is shown in the green button at the top left of every page, next to the search button, for example Reablement Service.
Enmero has two service portals:
Reablement Service Portal
Home to Assess (H2A) Service Portal
You only see the portals your access covers. If you have access to both, Enmero asks you to pick one each time you log in (see Logging in).
2
Switch to another service
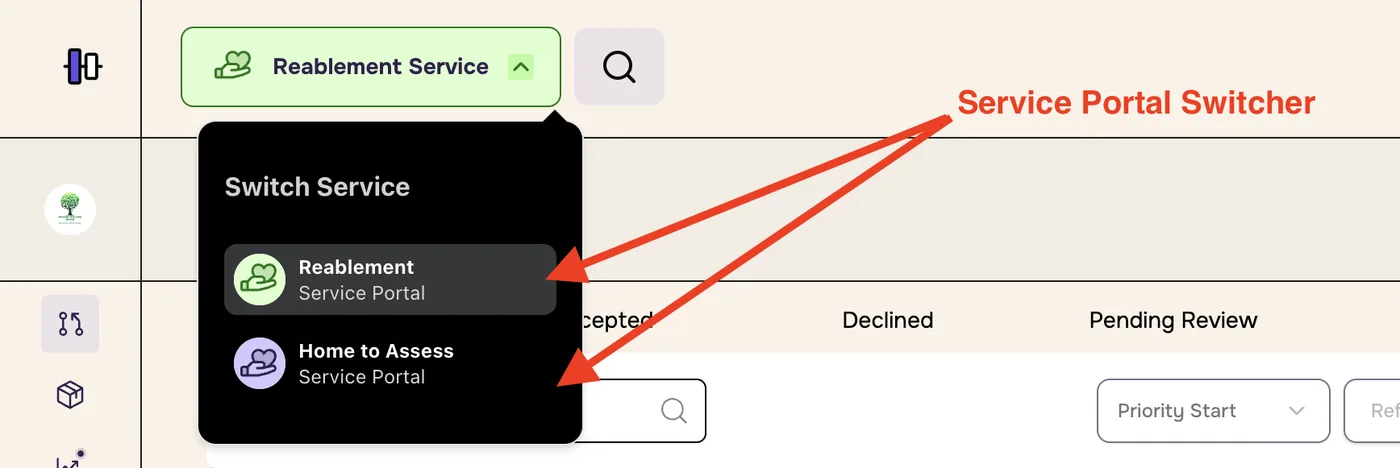
Click the service name at the top left of the screen, for example Reablement Service. The Switch Service menu opens.
Find the service you want. The one you’re in now is highlighted.
Click the other service, for example Home to Assess Service Portal. Enmero opens that service.
The Switch Service menu. Reablement is highlighted because it’s the current service.
3
After you switch
Check the name in the green button at the top left has changed to the service you picked.
Carry on working. The pages you open now show that service’s records.
Check before you add anythingBefore you add a referral or a service user record, check the service name at the top left, so it goes into the right service.
Searching?Global search always searches every service you have access to, so you don’t need to switch service just to find someone.
Troubleshooting
Nothing happens when I click the service name
Your access probably covers only one service, so there’s nothing to switch to. Ask the person who manages your organisation’s Enmero access if you need another service.
The service I need isn’t in the Switch Service menu
You only see services your access covers. Ask the person who manages your organisation’s Enmero access to add it.
I can’t find a record after switching
The record may belong to the other service. Use global search, which shows the service under each result, then switch to that service.
Get the email address and phone number of the trusted assessor assigned to a service user. You can do it from Referral Manager or from the service user’s record.
1
Choose a way
Way
Best when
Steps
Quickest
You’re already on Referral Manager, or you’re working from a referral
4
You know the service user’s name, or you’re already on their record
6
Both ways open the same Contact Card, showing the assessor’s full name, email address and phone number.
2
From Referral Manager
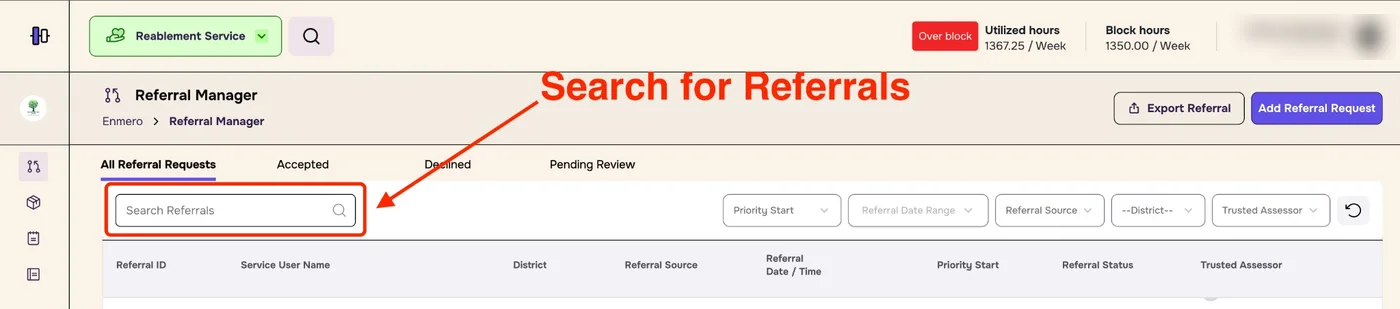
Open Referral Manager and type the service user’s name in Search Referrals.
Search for the referral.
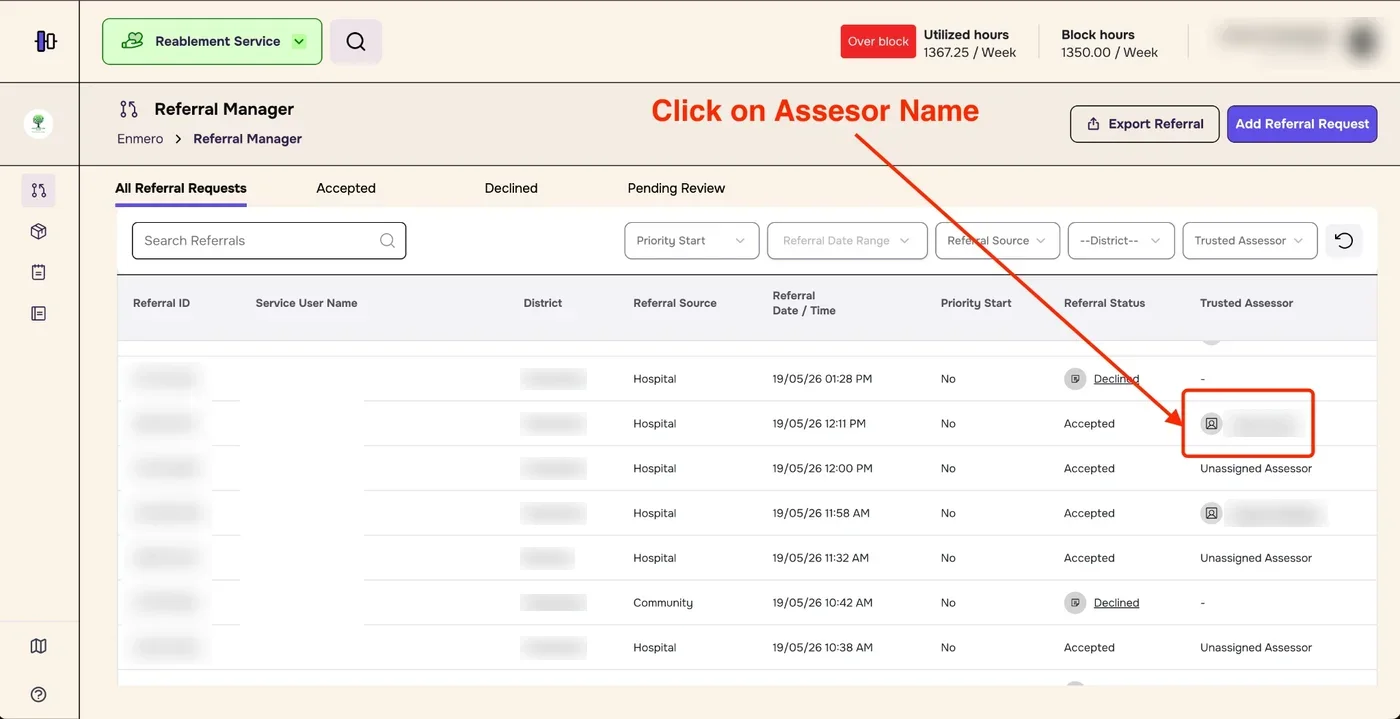
In the results, find the Trusted Assessor column and click the assessor’s name. It’s underlined, with a small profile icon beside it.
Click the assessor’s name. We’ve blurred names and referral IDs.
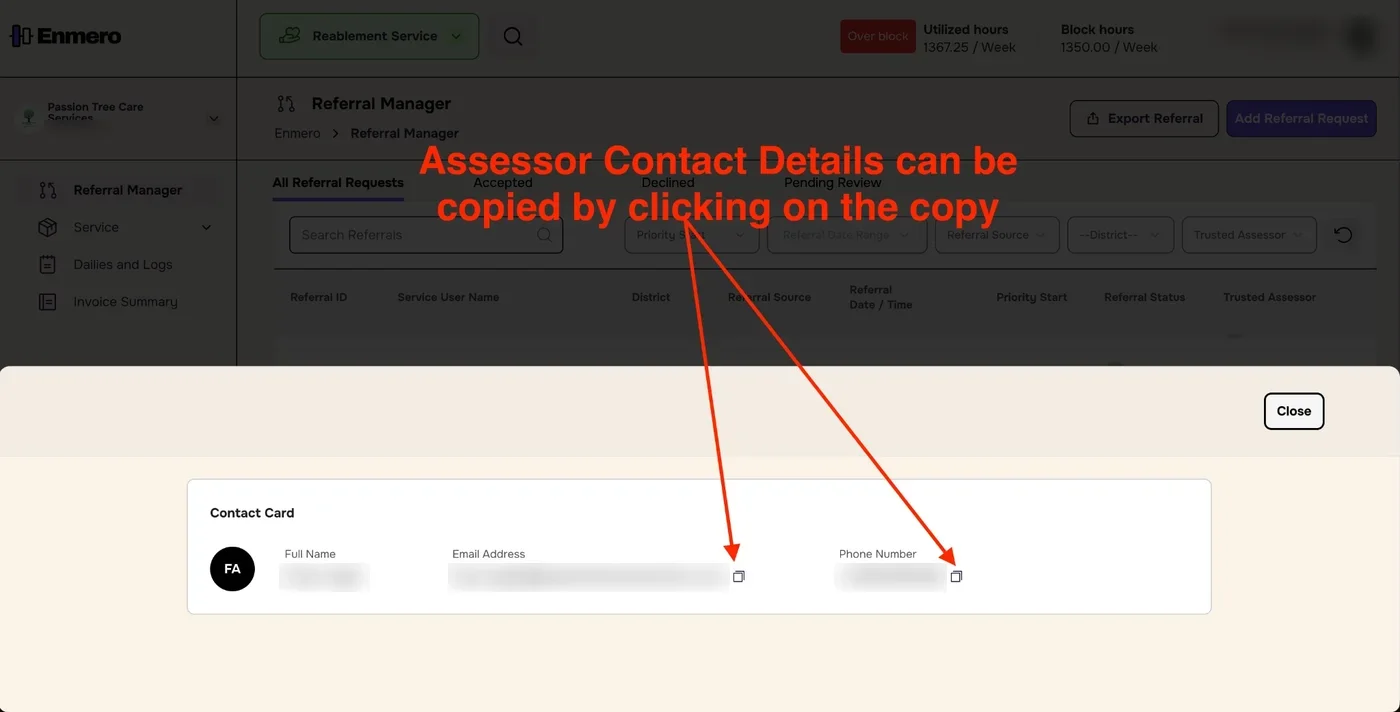
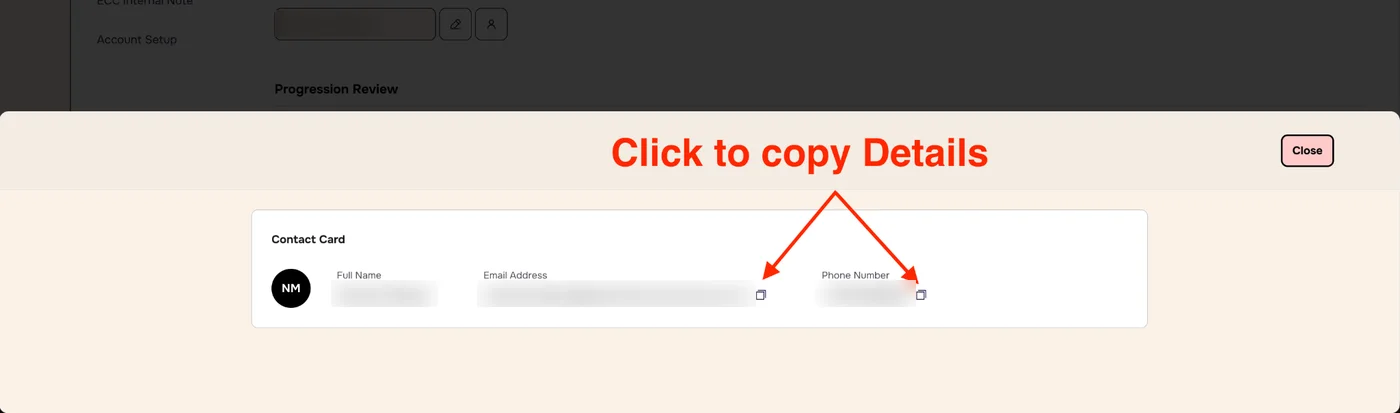
A Contact Card opens with the assessor’s full name, email address and phone number.
Click the copy icon next to the email address or phone number, then paste it where you need it. Click Close when you’ve finished.
The Contact Card. We’ve blurred the contact details.
Says “Unassigned Assessor”?No assessor has been assigned to that referral yet, so there are no contact details to show.
3
From the service user’s record
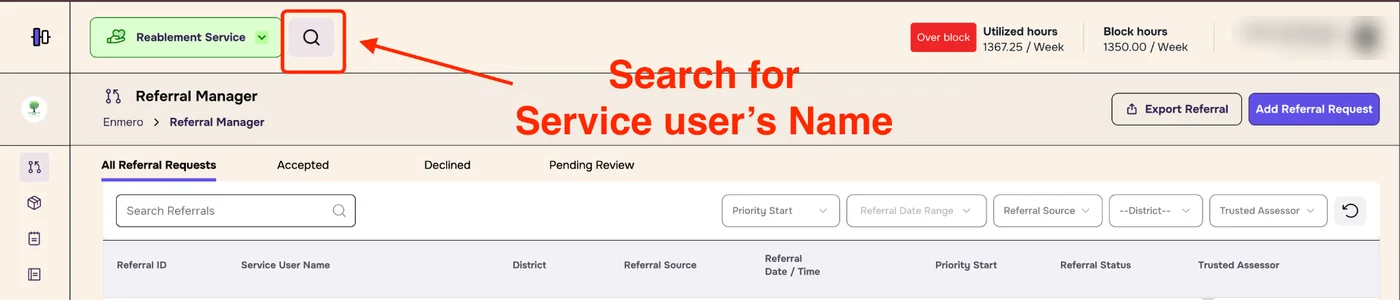
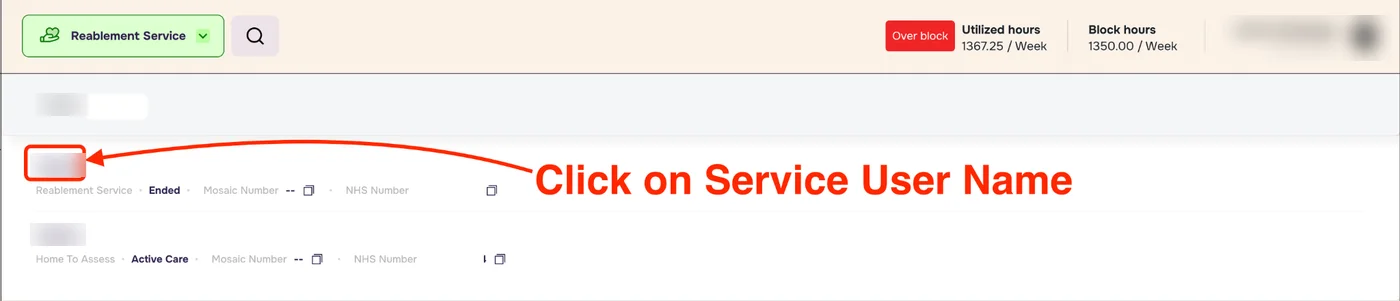
Click the magnifying glass in the top bar to open global search, and type the service user’s name.
Open global search.
Click the service user’s name in the results. Check the service and status under each name to pick the right record.
Click the right service user. We’ve blurred names.
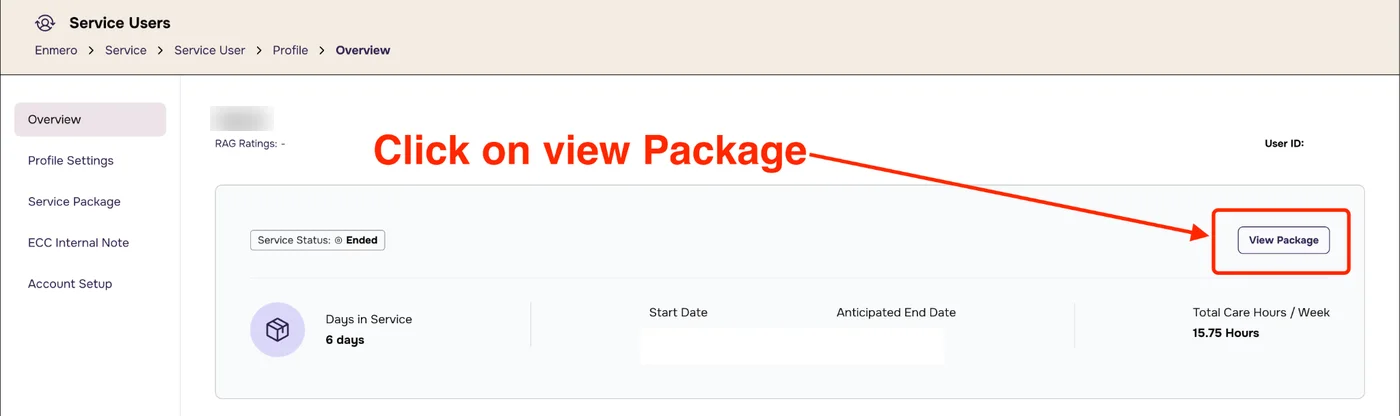
On their Overview page, click View Package.
Click View Package.
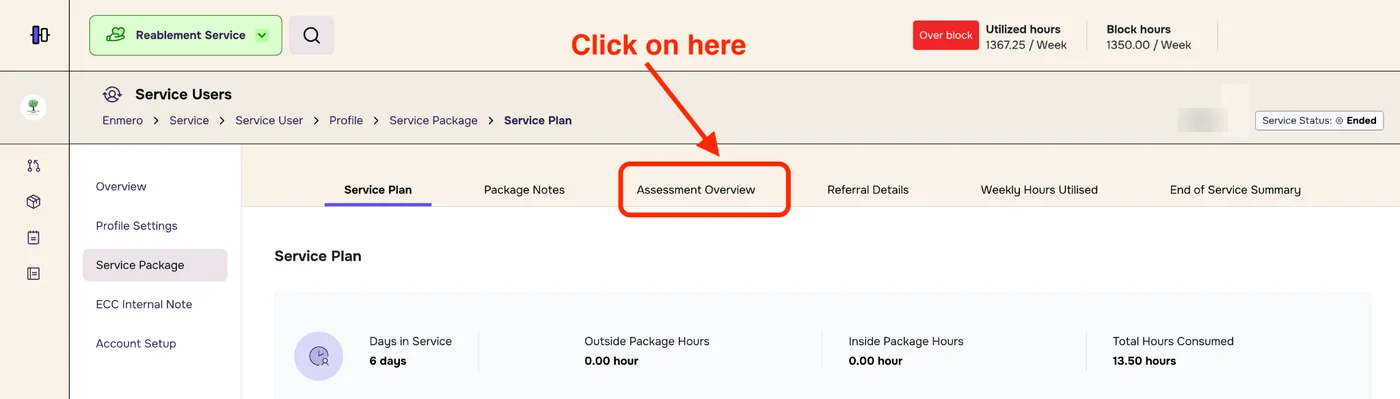
In the service package, click the Assessment Overview tab.
Open the Assessment Overview tab.
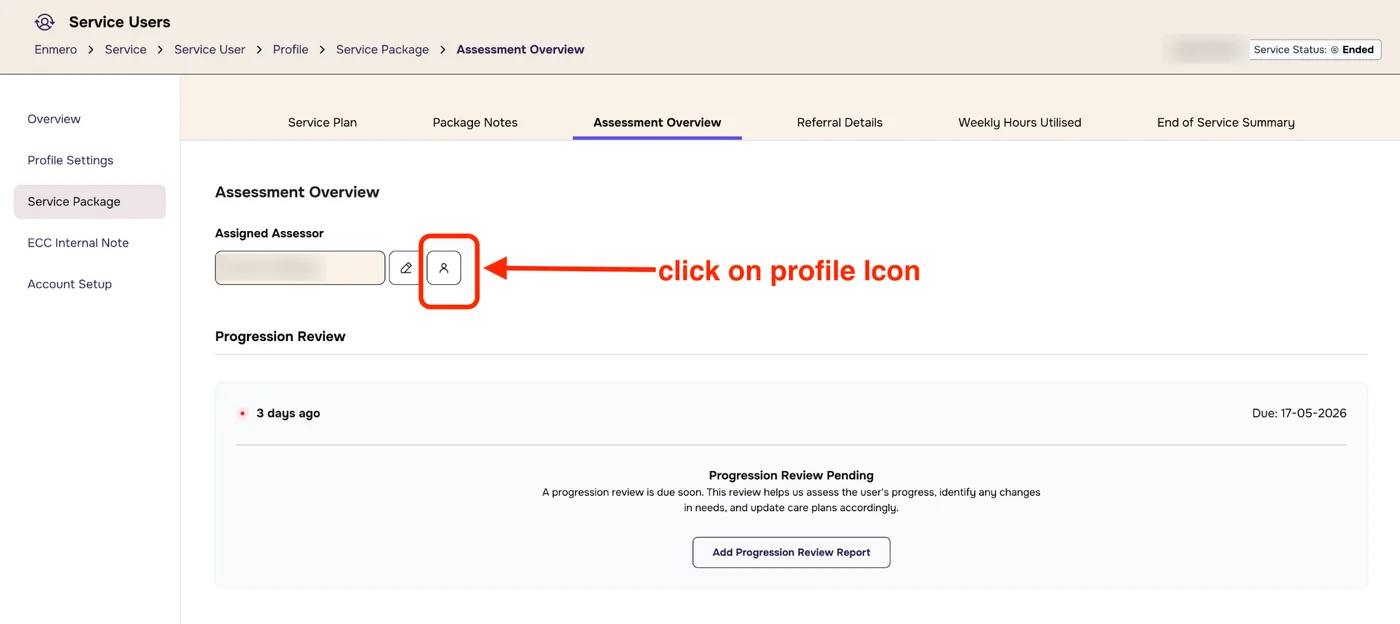
Under Assigned Assessor, click the profile icon next to the assessor’s name. The profile icon is the one on the right, after the pencil icon.
Click the profile icon.
The Contact Card opens. Click the copy icon next to the email address or phone number. Click Close when you’ve finished.
Copy the details you need. We’ve blurred the contact details.
Troubleshooting
The assessor’s name isn’t underlined
The referral has no assessor yet (it shows “Unassigned Assessor”), or it was declined. Only assigned assessors have a Contact Card.
I can’t find the referral in Search Referrals
Referral search only matches service user names, and only accepted and declined referrals. Try the second way, starting with global search.
The copy icon doesn’t seem to work
Click the icon once, then paste with Ctrl+V (Windows) or Cmd+V (Mac). If nothing pastes, select the text on the Contact Card and copy it yourself.
All four routes ask for the referral documents (PDF, up to 10 MB), an assessor, a weekly schedule, a care type and a RAG rating. The weekly hours you save apply to invoices.
“User already has an active Reablement service package”
They already have an active Reablement package. Check their package list. A new package can only be added once the current one has ended.
I’m not sure whether the referral counts as recent
If care hasn’t started yet, treat the referral as current. If care has already started, ended or failed to start, use one of the record routes. If you’re still unsure, check with your team lead.
I can’t find the service user in search
Check you’re in the right service. Then search by NHS number or Mosaic number rather than name.
Service Insight shows how your service is running: planned and delivered care hours, spare capacity, how many service users are active, and how packages are changing.
1
Open Service Insight
In the menu on the left, click Service, then Service Insight.
Check the path under the page title says Enmero › Service › Service Insight.
The page is made of four panels: Weekly Planned Hours, Daily Utilised Hours, Service Insights and Package Insights. On every panel:
Click the ^ arrow at the top right to fold the panel away. Click it again to open it.
Where a panel has Select Date, click the date to see the figures for a different day. The circular arrow button next to it resets the date.
Check your service firstThe figures are for the service you’re in, shown at the top left. How to switch service.
2
Weekly Planned Hours
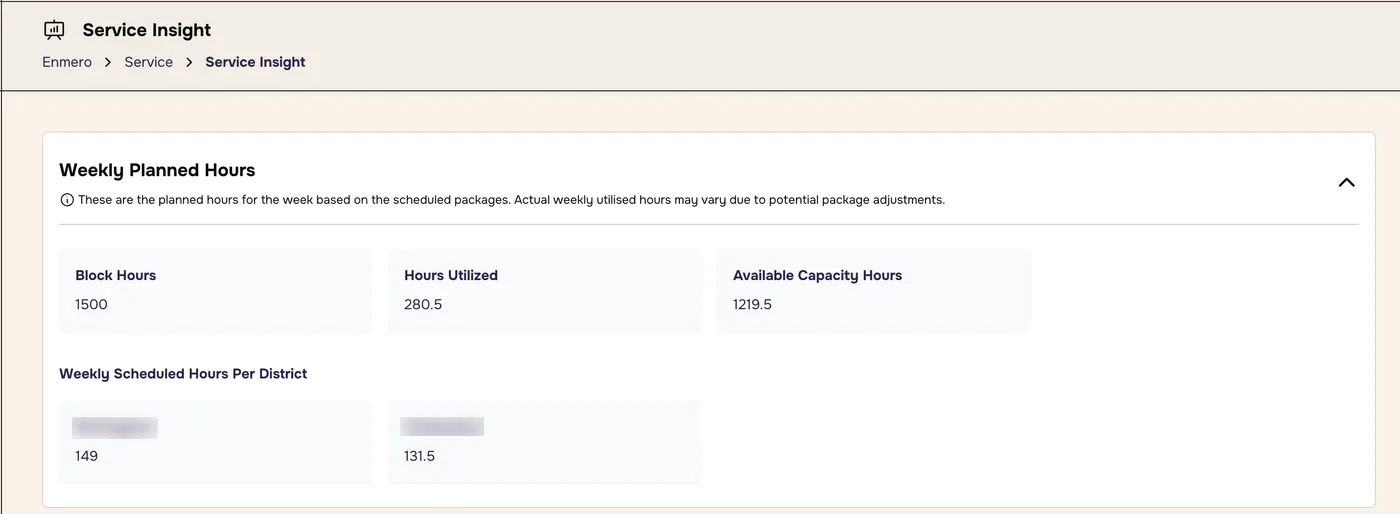
The care hours planned for this week, based on the scheduled packages. The hours actually used may be different if packages are changed during the week.
Figure
What it shows
Block Hours
The total care hours in your block for the week
Hours Utilized
The hours planned this week across all scheduled packages
Available Capacity Hours
The hours still free: Block Hours minus Hours Utilized
Weekly Scheduled Hours Per District
The planned hours split by district. The districts add up to Hours Utilized.
In the example below: 1500 block hours − 280.5 utilised = 1219.5 hours available. The two districts, 149 + 131.5, add up to 280.5.
Weekly Planned Hours.
Same figures as the top barThe Utilized hours and Block hours at the top of every Enmero page show this week’s position too. See Getting around Enmero.
3
Daily Utilised Hours
The care hours actually delivered on one day. Use Select Date to choose the day.
Today’s figures come laterToday’s daily hours are worked out at the end of the working day. Until then, pick an earlier date to see complete figures.
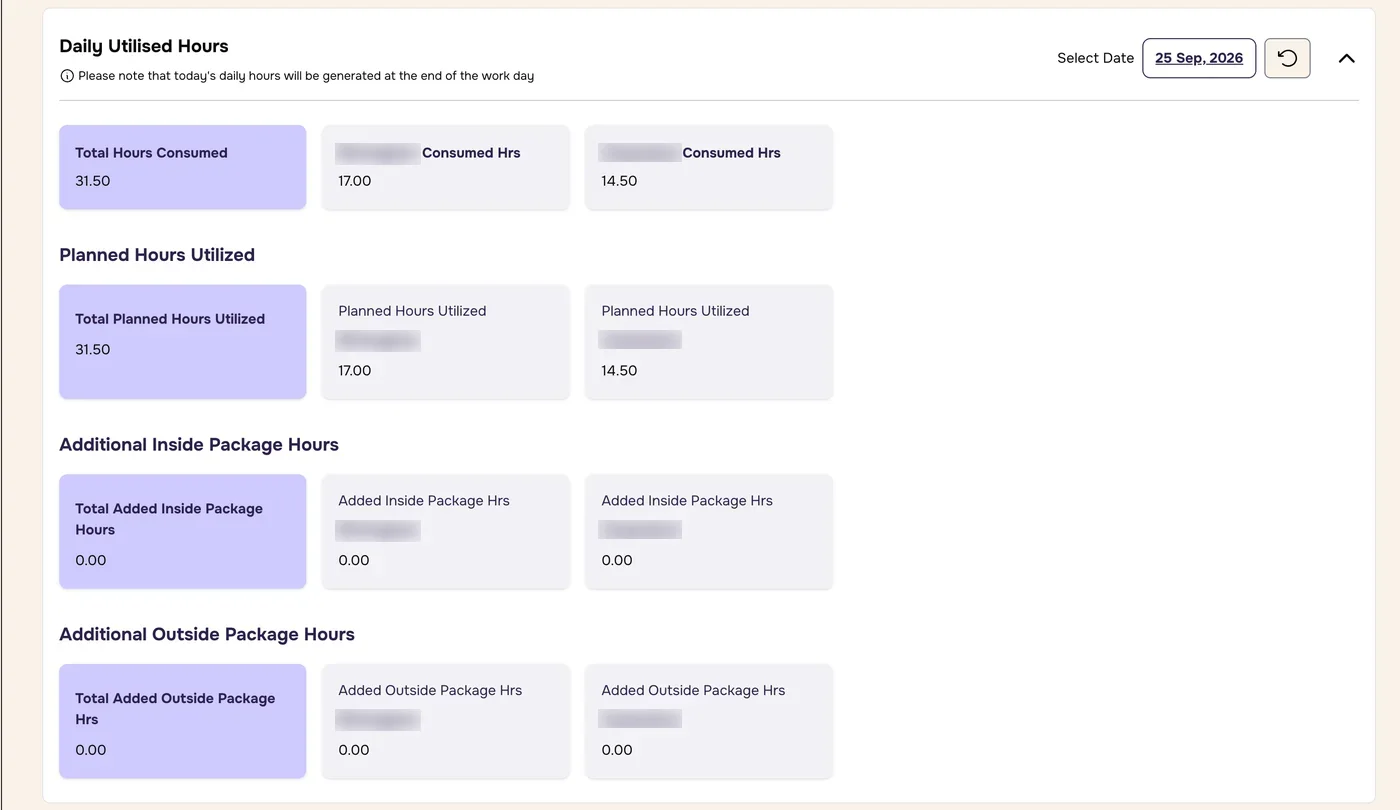
The panel has four rows. In each row, the purple tile on the left is the total, and the tiles next to it split that total by district.
Row
What it shows
Total Hours Consumed
All care hours delivered that day
Planned Hours Utilized
Hours delivered as planned in the packages’ weekly schedules
Additional Inside Package Hours
Extra hours added inside a service user’s package
Additional Outside Package Hours
Extra hours delivered outside a service user’s package
In the example below, all 31.50 hours consumed were planned hours, with no additional hours inside or outside packages.
Daily Utilised Hours for 25 September 2026.
4
Service Insights
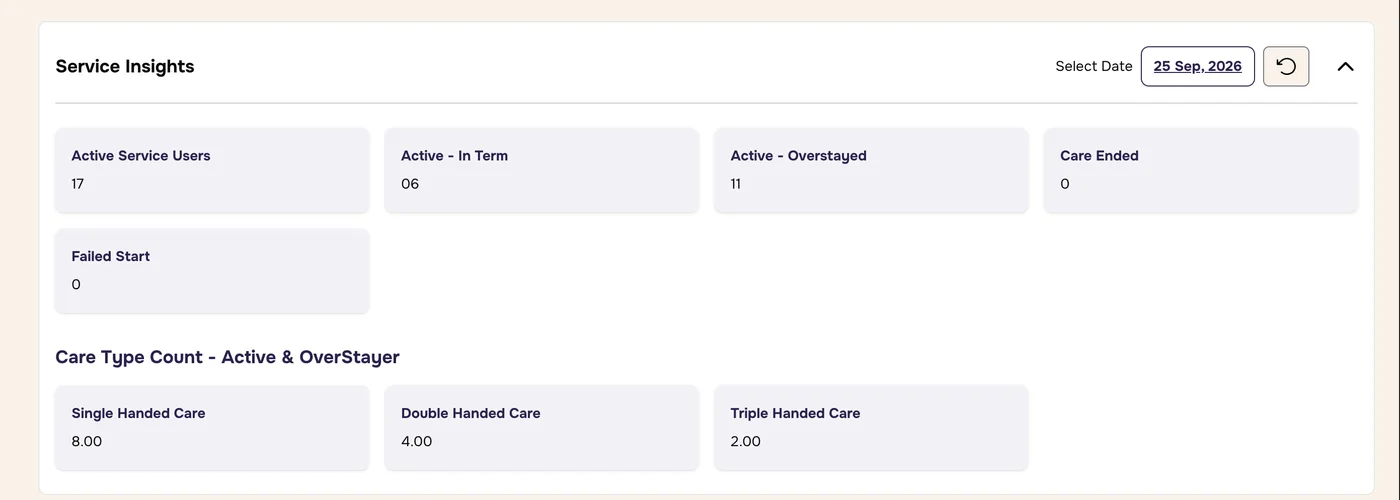
How many service users are in each stage of care on the date you choose.
Figure
What it counts
Active Service Users
Everyone currently receiving care. It’s Active - In Term plus Active - Overstayed.
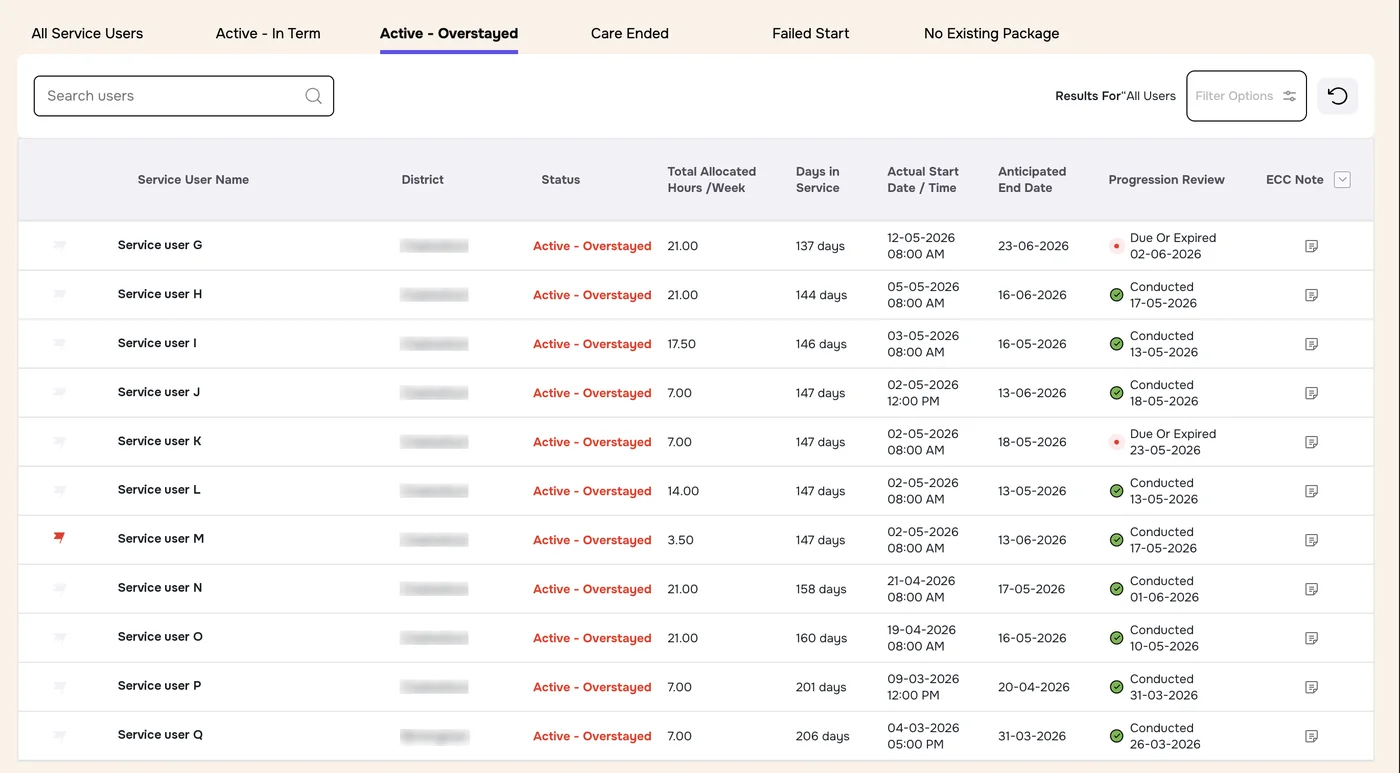
Active - In Term
Active service users still within their planned care period
Active - Overstayed
Active service users who are past their anticipated end date
Care Ended
Service users whose care has ended
Failed Start
Service users whose care didn’t start as planned
In the example: 6 in term + 11 overstayed = 17 active service users.
Care Type Count - Active & OverStayer
How active and overstaying service users are split between Single, Double and Triple Handed Care, the care types chosen when the service package was set up.
Service Insights.
5
Package Insights
How care packages changed on the date you choose.
Package Started: packages that started.
Package Ended: packages that ended.
Package Increased: packages whose care hours went up.
Package Decreased: packages whose care hours went down.
Package Insights.
Troubleshooting
Today’s Daily Utilised Hours are 0 or look too low
Today’s daily hours are generated at the end of the working day. Check again tomorrow, or choose an earlier date.
A panel has disappeared
It’s probably folded away. Click the arrow at the top right of the panel to open it again.
The planned and used hours don’t match
Weekly Planned Hours is based on the scheduled packages. The hours actually delivered can change if a package is increased, decreased or ended during the week.
The figures are for the wrong service
Service Insight shows the service you’re in. Switch service at the top left.
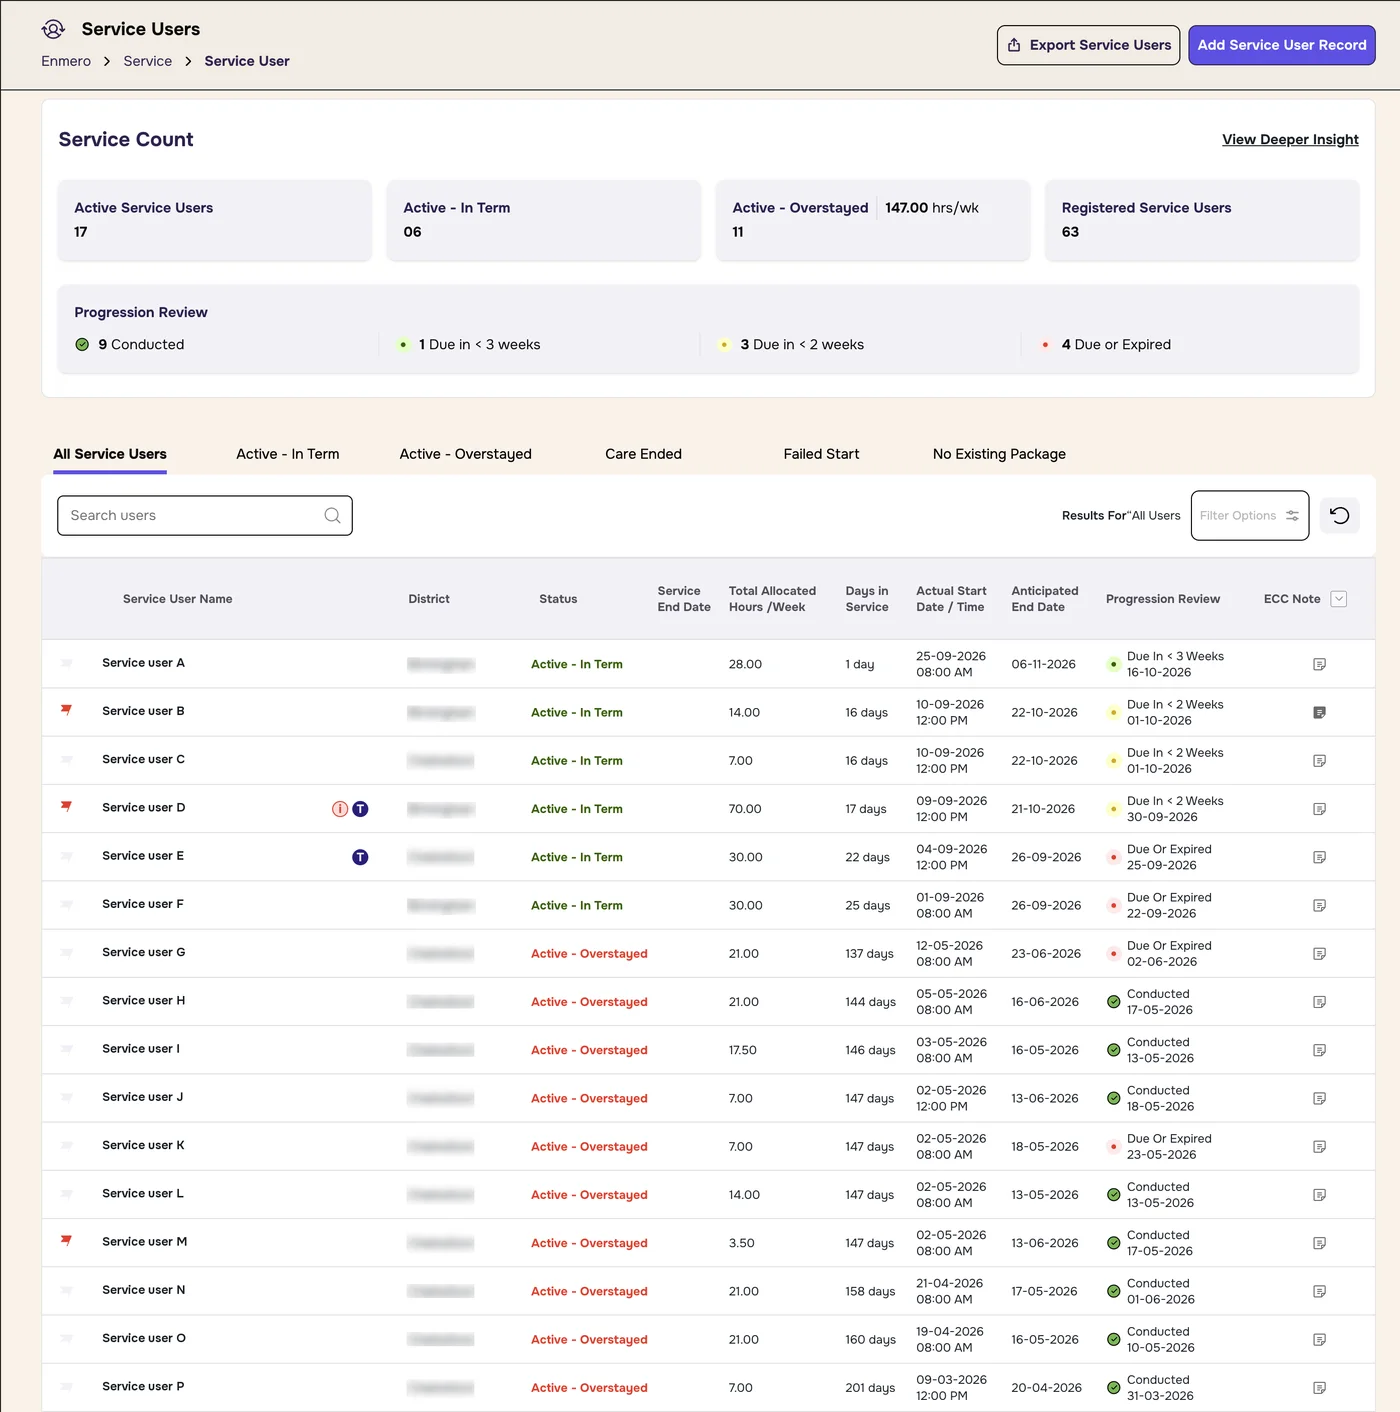
The flag at the start of each row is grey when there’s nothing to note and red when the service user is flagged. Hover over a red flag to see why and since when, for example Hospitalised - 01-09-2026.
A flag’s reason and date.
Flag reasons are: Hospitalised, Doctor’s Appointment, Away for the Day, Visiting Family, May Close as Independent, Safe Guarding Raised, and Requires Attention.
Icons next to names
iData Incomplete: the NHS or Mosaic number is missing.
TTherapy Service Users: the service user is marked as needing therapy.
6
Progression review column
Each active service user shows their review state and a date:
Conducted with a green tick, and the date it was done.
Due In < 3 Weeks (green dot) or Due In < 2 Weeks (yellow dot), and the due date.
Due Or Expired (red dot), and the date it was due.
These are the same states counted in the .
7
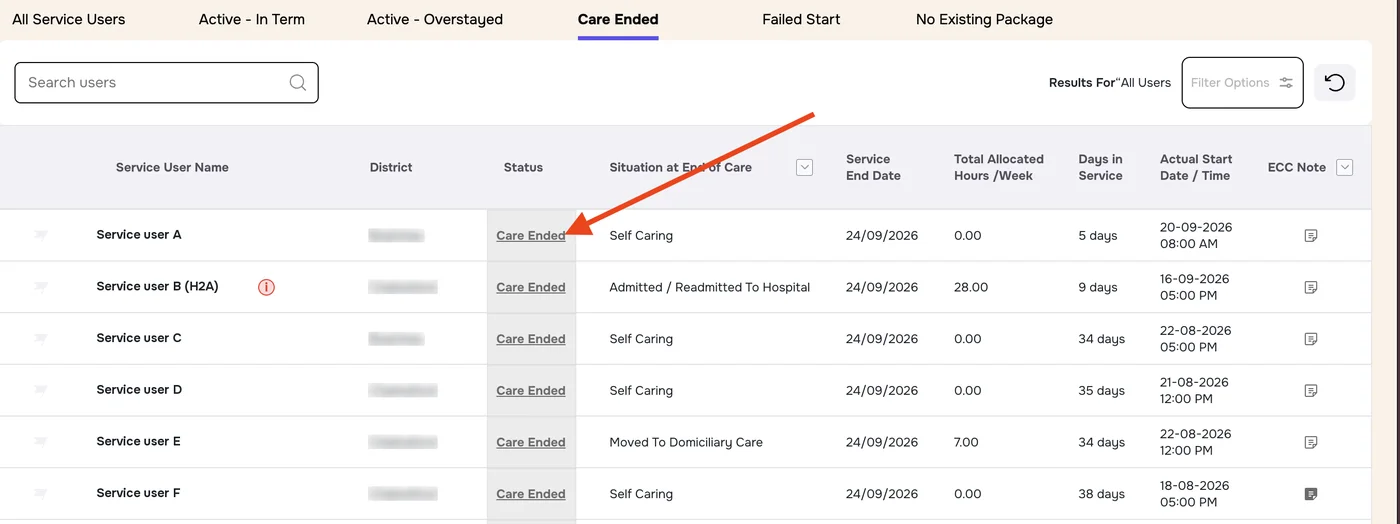
Care ended
On the Care Ended tab, the Situation at End of Care column shows where the service user went next, for example Self Caring or Admitted / Readmitted To Hospital.
See the end-of-service summary
Click Care Ended in the Status column.
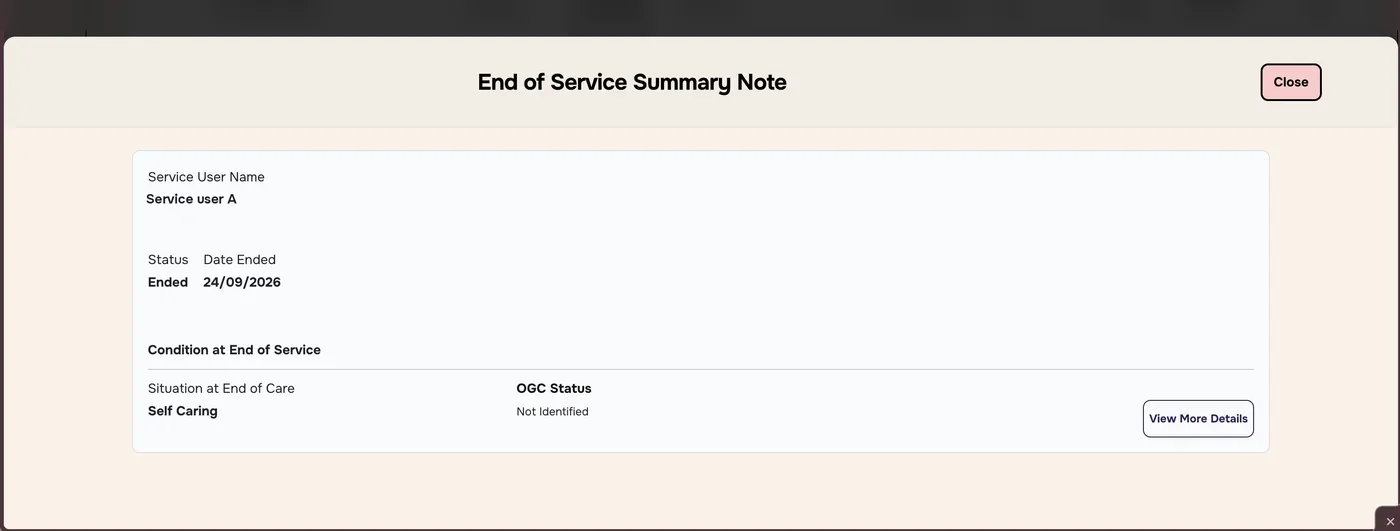
The End of Service Summary Note opens with the service user’s name, status, date ended, situation at end of care and OGC status.
Click View More Details for the full summary, or Close to go back.
Click Care Ended to open the summary.The End of Service Summary Note.
Filter by situation
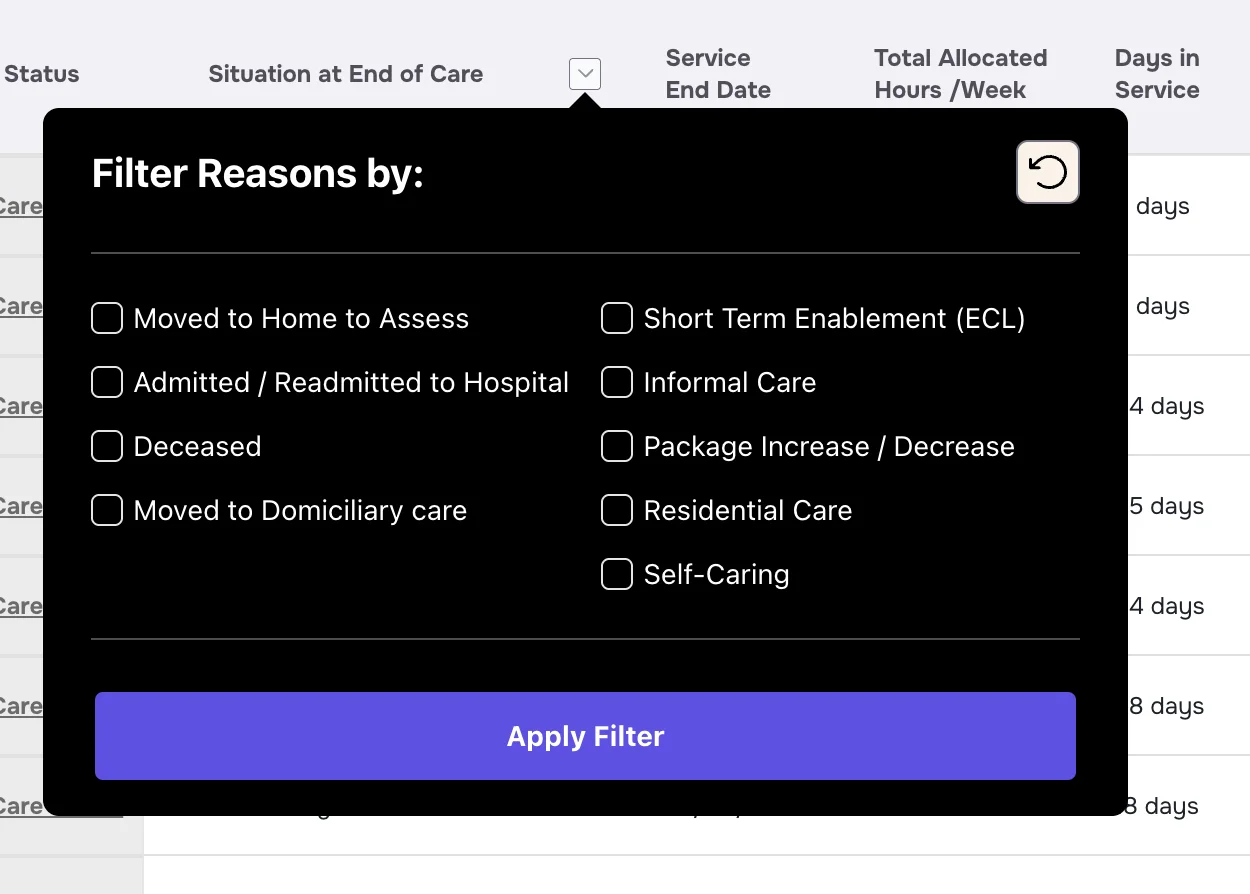
Click the arrow next to Situation at End of Care to show only certain situations. Tick one or more, then click Apply Filter. The circular arrow clears your choices.
Situations: Moved to Home to Assess, Admitted / Readmitted to Hospital, Deceased, Moved to Domiciliary care, Short Term Enablement (ECL), Informal Care, Package Increase / Decrease, Residential Care, and Self-Caring.
The Situation at End of Care filter.
8
Failed start
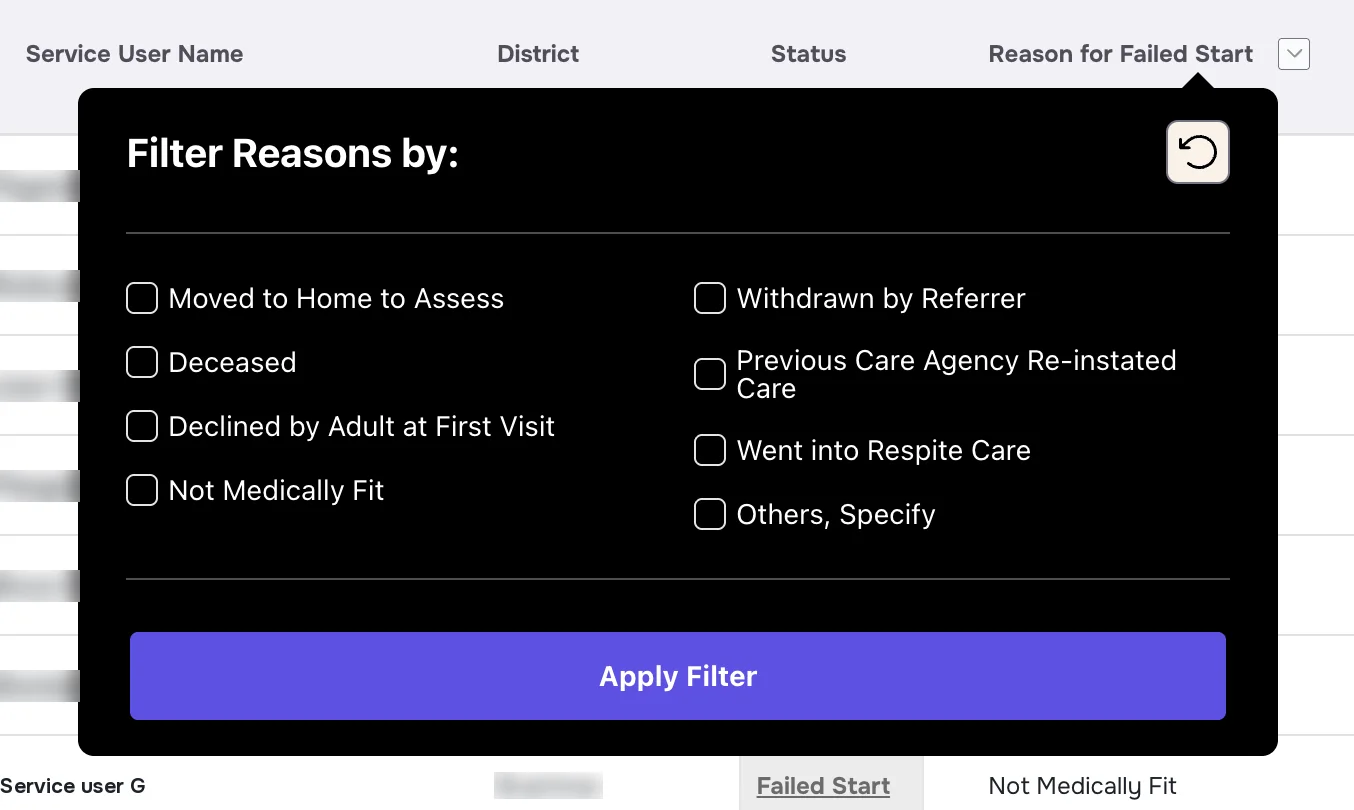
On the Failed Start tab, the Reason for Failed Start column shows why care didn’t start. Click the arrow next to the column name to filter by reason, then click Apply Filter.
Reasons: Moved to Home to Assess, Deceased, Declined by Adult at First Visit, Not Medically Fit, Withdrawn by Referrer, Previous Care Agency Re-instated Care, Went into Respite Care, and Others, Specify.
The Reason for Failed Start filter.
9
Search and filter
Search
Type a name in Search users. This searches service users active in roughly the last 120 days. For older records, use global search.
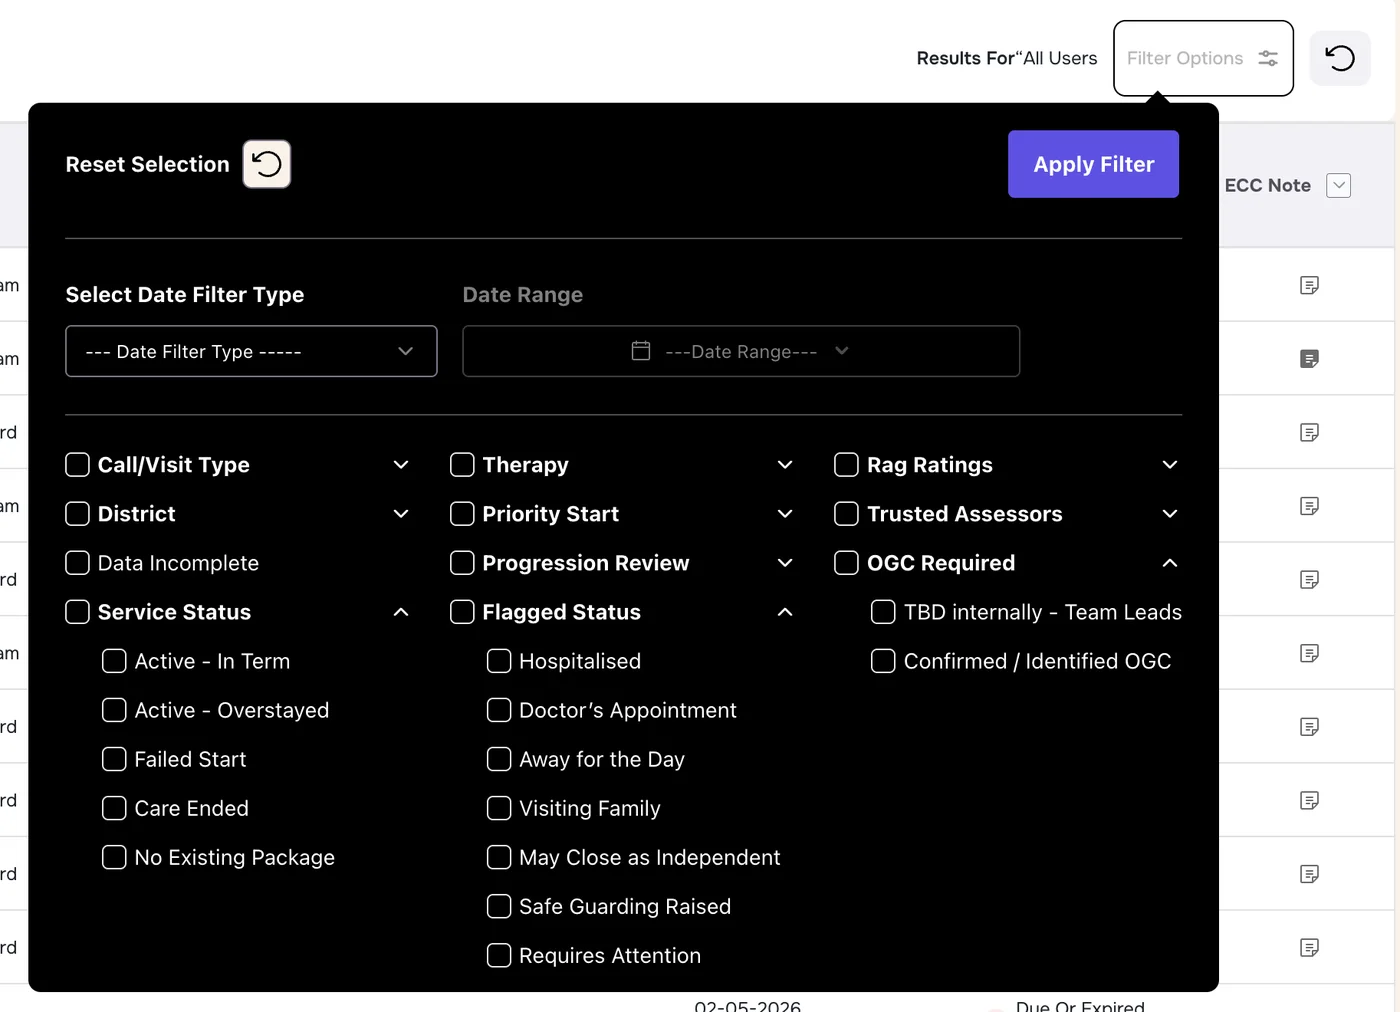
Filter Options
Click Filter Options at the top right of the table.
Optional: choose a Date Filter Type, then a Date Range.
Tick the groups and values you want. Click the arrow beside a group to see its values.
Click Apply Filter. Results For next to the button shows what you’re looking at.
To start again, click Reset Selection in the panel, or the circular arrow button next to Filter Options.
Filter
Values
Service Status
Active - In Term, Active - Overstayed, Failed Start, Care Ended, No Existing Package
Flagged Status
Hospitalised, Doctor’s Appointment, Away for the Day, Visiting Family, May Close as Independent, Safe Guarding Raised, Requires Attention
OGC Required
OGC means On Going Care. Options: TBD internally - Team Leads, Confirmed / Identified OGC
Check you’re on All Service Users and clear the filters with the circular arrow button. If they’ve been inactive for more than about 120 days, use global search.
The list looks shorter than expected
A filter may still be on. Check Results For, then click the circular arrow button to clear it.
Why is someone Overstayed?
They’re still receiving care after their anticipated end date.
What does the red flag mean?
The service user is flagged. Hover over the flag to see the reason and date.
ECC notes are written specifically for ECC teams. They’re mainly used to track updates on a service user’s service. Each note shows the team responsible and whether action is needed. Here’s how to read, add and filter them.
1
The note icon
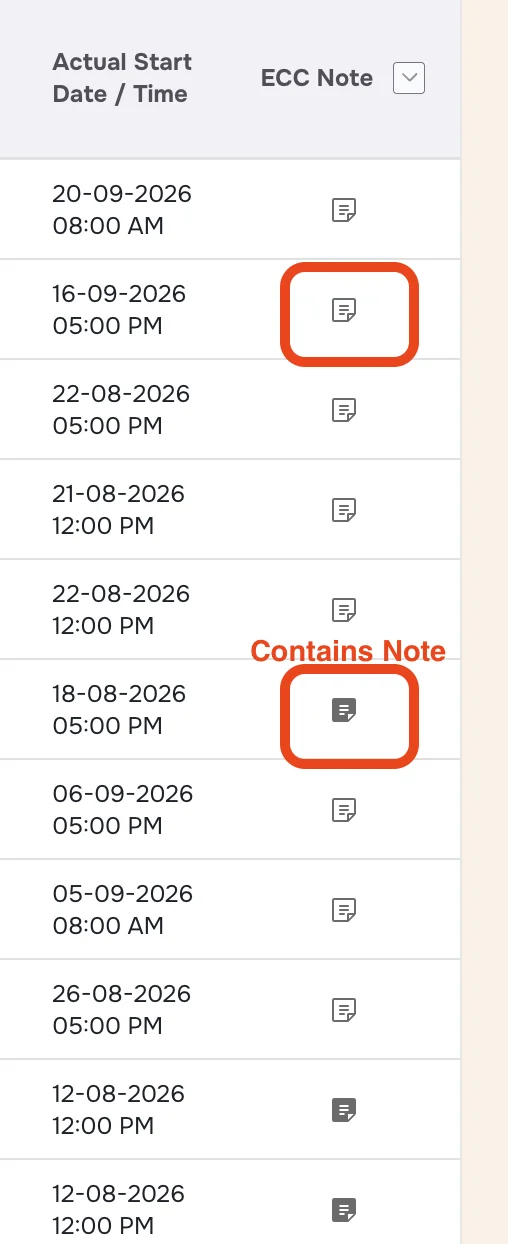
The last column of the service user table, ECC Note, has a note icon on every row:
Outline icon: no note yet.
Filled dark icon: the service user has a note.
Filled icons contain a note.
2
Read a note
Click the note icon on the service user’s row.
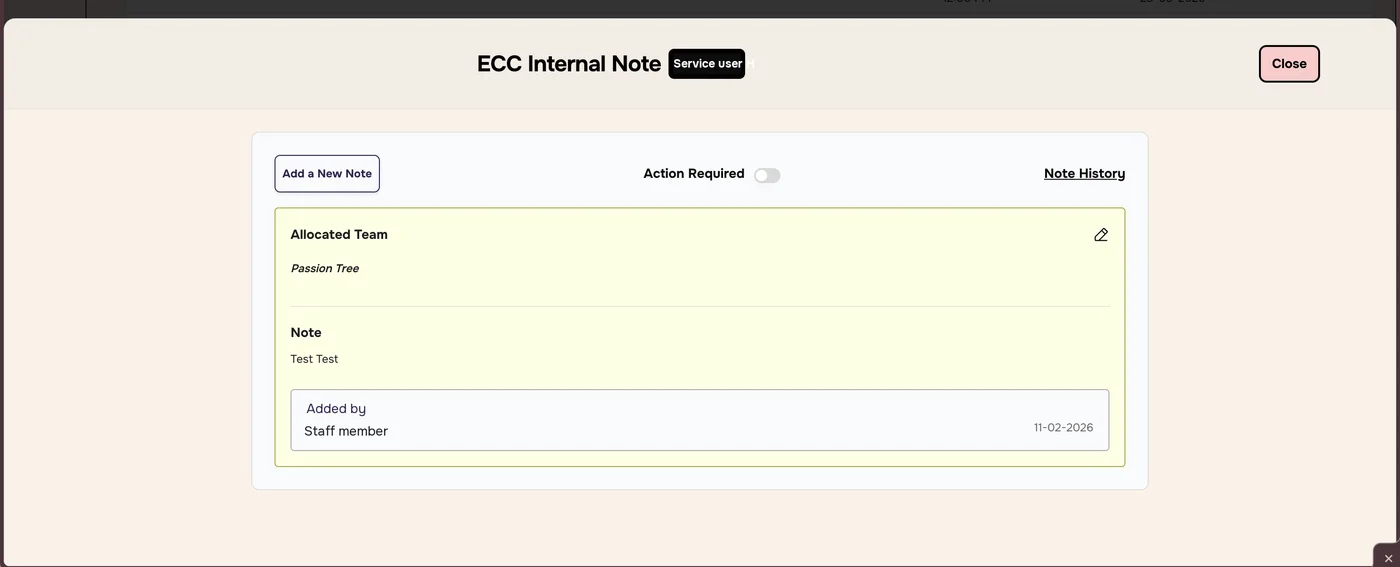
The ECC Internal Note window opens, with the service user’s name at the top. It shows:
Allocated Team: the team responsible, for example Passion Tree.
Note: what was written.
Added by: who wrote it, and the date.
Click the pencil icon to edit the note, or Note History to see earlier notes.
Use the Action Required switch to mark that something needs doing.
An ECC Internal Note. Names are replaced.
3
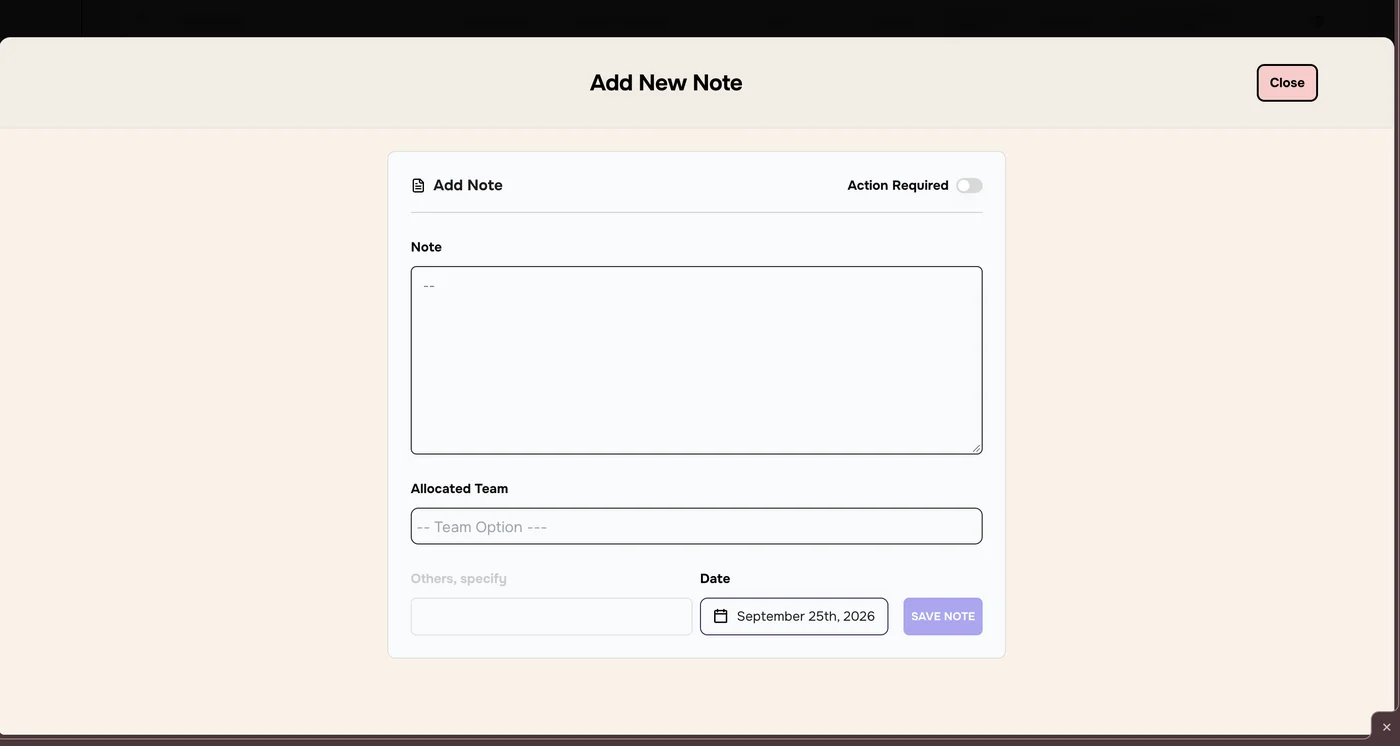
Add a note
Open the ECC Internal Note window and click Add a New Note.
Switch Action Required on if someone needs to act on the note.
Type the note in Note.
Choose the Allocated Team. If the team isn’t listed, choose Others and type it in Others, specify.
Check the Date. It’s set to today.
Click SAVE NOTE. It stays greyed out until the note and team are filled in.
The Add New Note form.
4
Filter by notes
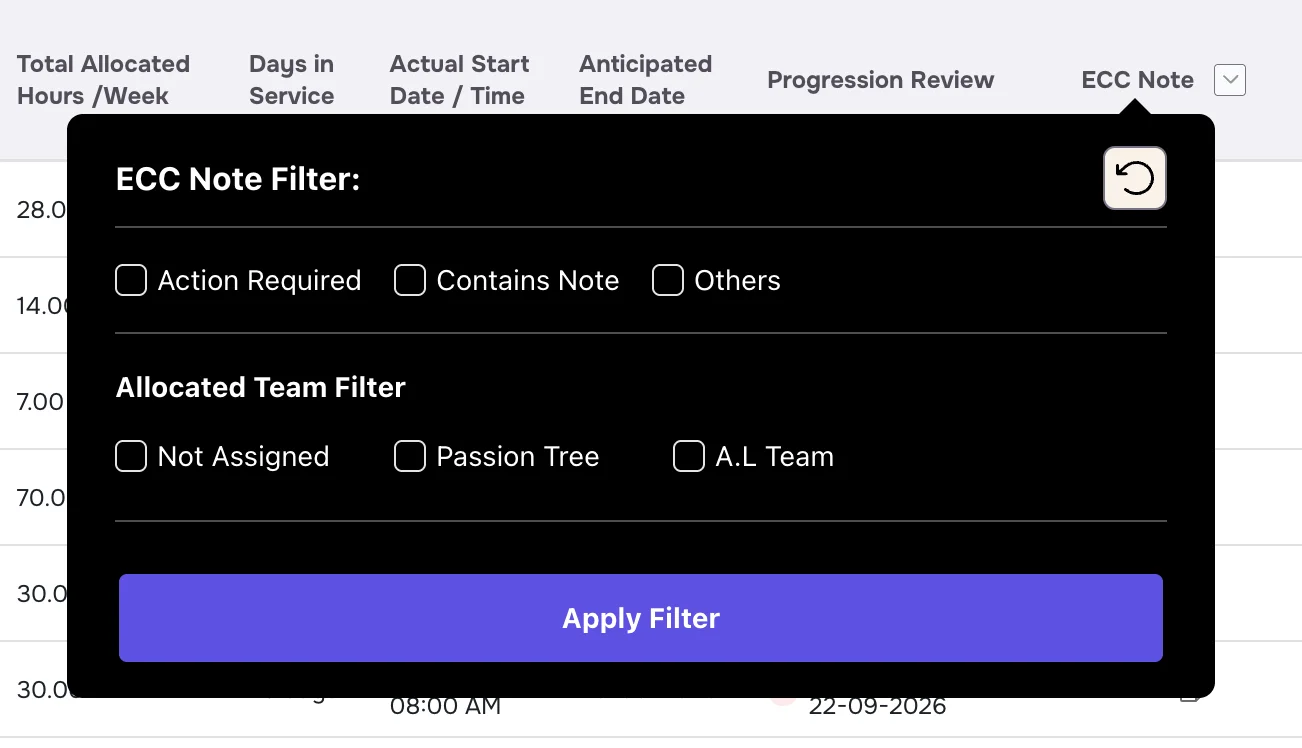
Click the arrow next to ECC Note in the table header.
Under ECC Note Filter, tick Action Required, Contains Note or Others.
Under Allocated Team Filter, tick Not Assigned, Passion Tree or A.L Team.
Click Apply Filter. The circular arrow in the panel clears your choices.
TipTick Action Required to see every service user who needs something done.
The ECC Note filter.
Troubleshooting
SAVE NOTE is greyed out
Type a note and choose an Allocated Team. If you chose Others, fill in Others, specify.
I can’t find an older note
Open the ECC Internal Note window and click Note History.
The icon is still an outline after I added a note
Close the window and check the note saved. The icon fills in once the service user has a note.
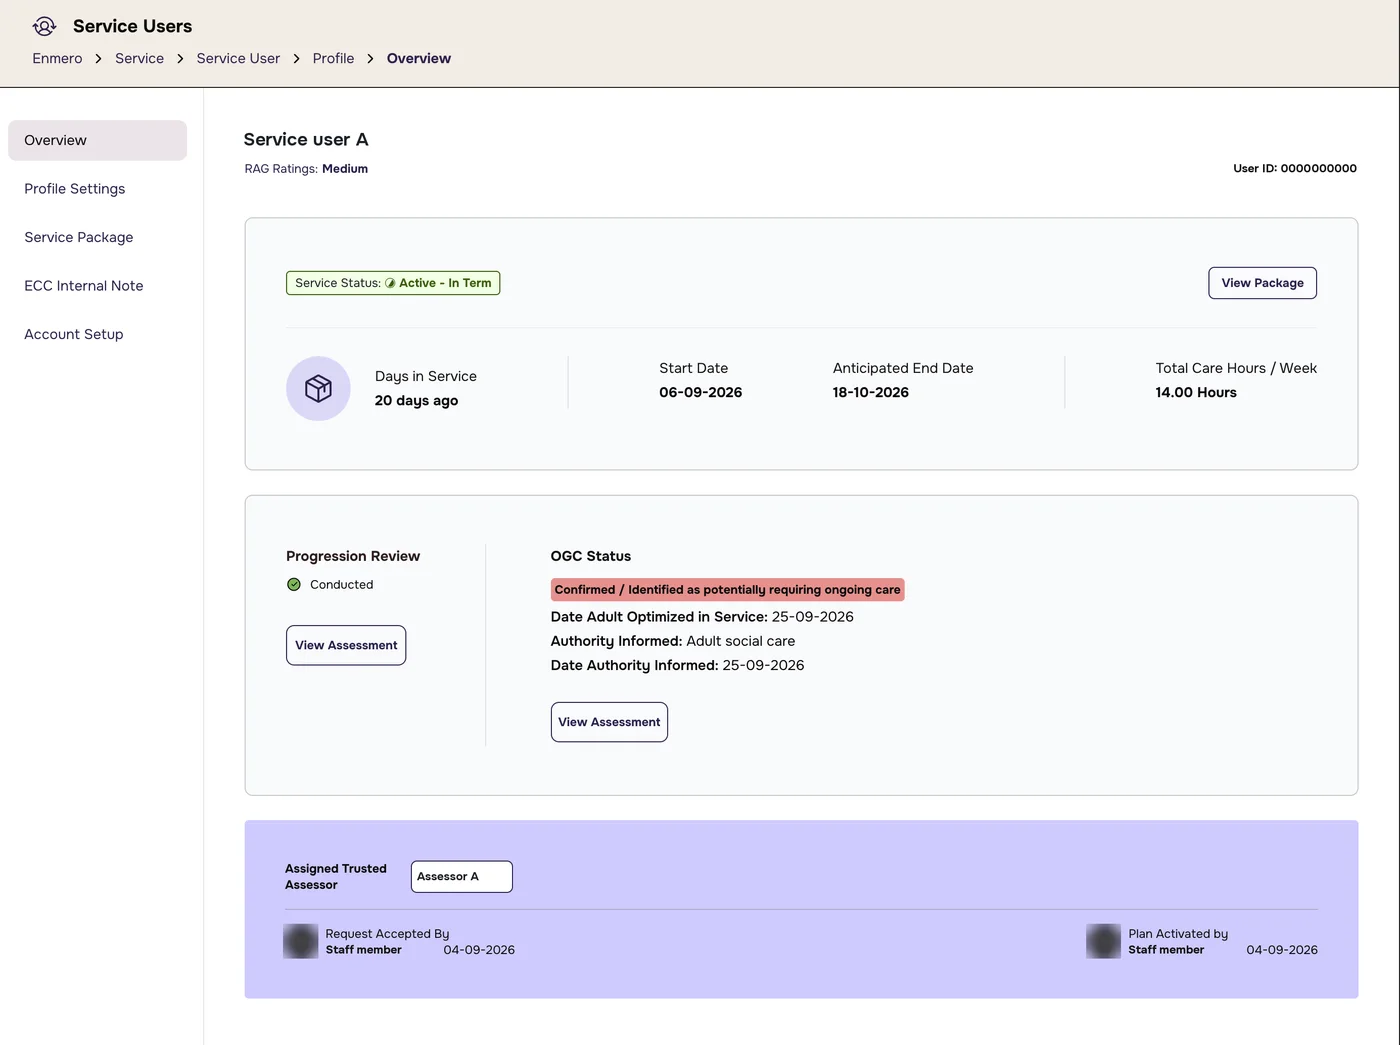
The first page of a service user’s profile: a summary of their current care.
1
Name, RAG rating and User ID
The top of the page shows the service user’s name, their RAG Ratings (for example Medium) and their User ID on the right. Quote the User ID when you ask about a service user.
Service Status: where the service user is in their care. It’s one of:
Active - In Term: receiving care, before their anticipated end date.
Active - Overstayed: still receiving care after their anticipated end date.
Care Ended: care has finished.
Failed Start: care didn’t start as planned.
No Existing Package: no care package has been set up.
Days in Service: how long ago care started.
Start Date and Anticipated End Date.
Total Care Hours / Week.
Click View Package to open the current care package.
3
Progression review and OGC status
Progression Review
Shows the review state, for example Conducted with a green tick. Click View Assessment to read it.
OGC Status
Shows whether the service user may need On Going Care (OGC) after reablement, for example Confirmed / Identified as potentially requiring ongoing care in red. When confirmed, it also shows:
Date Adult Optimized in Service: when they reached their best level of independence.
Authority Informed: who was told, for example Adult social care.
Date Authority Informed.
Click View Assessment under OGC Status for the full assessment.
4
Who is responsible
The purple panel at the bottom shows:
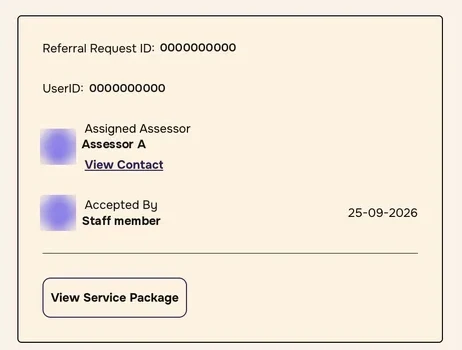
Assigned Trusted Assessor: the assessor for this service user.
Request Accepted By: who accepted the referral, and the date.
Plan Activated by: who activated the care plan, and the date.
Troubleshooting
What does OGC mean?
OGC means On Going Care: whether the service user is likely to need care after reablement ends.
The dates look wrong
Start and end dates come from the service package. Check the package from View Package or the Service Package page.
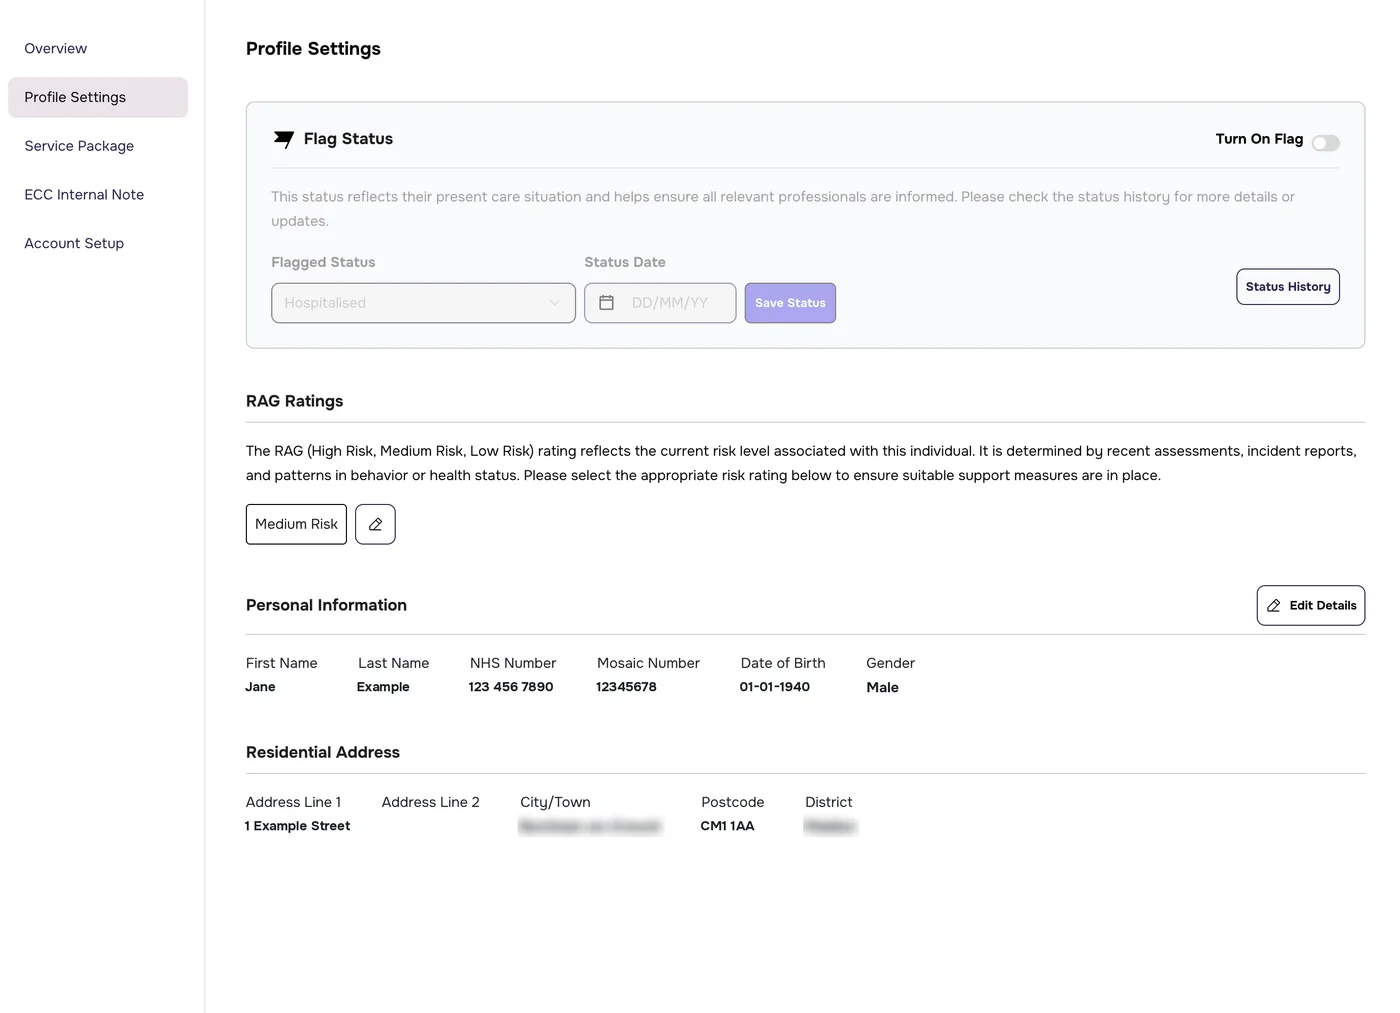
Flag a service user, set their risk rating, and check or edit their personal details and address.
1
Flag a service user
A flag tells everyone about the service user’s current situation, for example that they’re in hospital. Flagged service users show a red flag in the service user table.
Switch on Turn On Flag at the top right of the Flag Status box.
Choose the Flagged Status: Hospitalised, Doctor’s Appointment, Away for the Day, Visiting Family, May Close as Independent, Safe Guarding Raised or Requires Attention.
Choose the Status Date.
Click Save Status.
Click Status History to see earlier flags. To remove a flag, switch Turn On Flag off.
Profile Settings. Personal details are examples and the town is blurred.
2
Set the RAG rating
The RAG rating shows how much risk is currently associated with the service user: High Risk, Medium Risk or Low Risk. Base it on recent assessments, incident reports, and patterns in behaviour or health.
Click the pencil icon next to the current rating.
Choose the new rating and save.
The rating shows at the top of the profile Overview.
3
Check and edit personal details
The page shows the service user’s Personal Information (name, NHS number, Mosaic number, date of birth, gender) and Residential Address (address lines, city or town, postcode, district).
Click Edit Details.
Correct the details and save.
Missing NHS or Mosaic number?Add it here. Without it the service user shows the red i Data Incomplete icon.
Troubleshooting
Save Status is greyed out
Switch on Turn On Flag, then choose a Flagged Status and a Status Date.
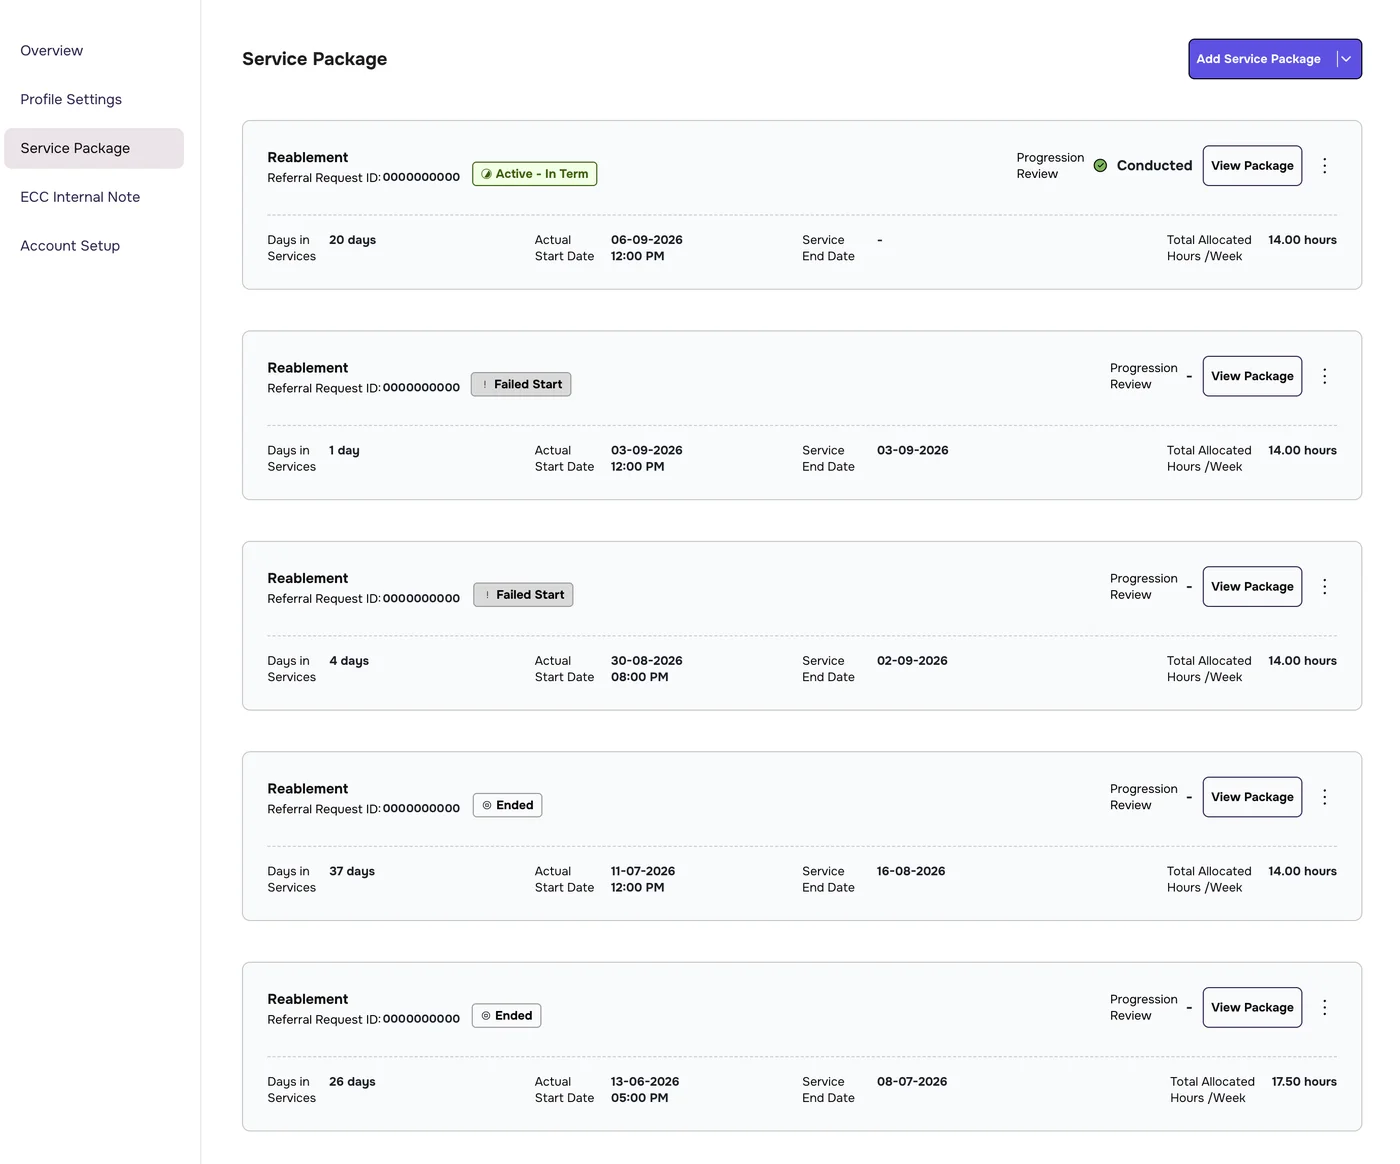
Already in Enmero: add the package from their profile, using this guide.
Why a returning service user can’t be added as a referralEnmero checks each new referral’s NHS number and Mosaic number against existing profiles. If one matches, it stops the referral and tells you a matching profile already exists. Open that profile and add the package there instead.
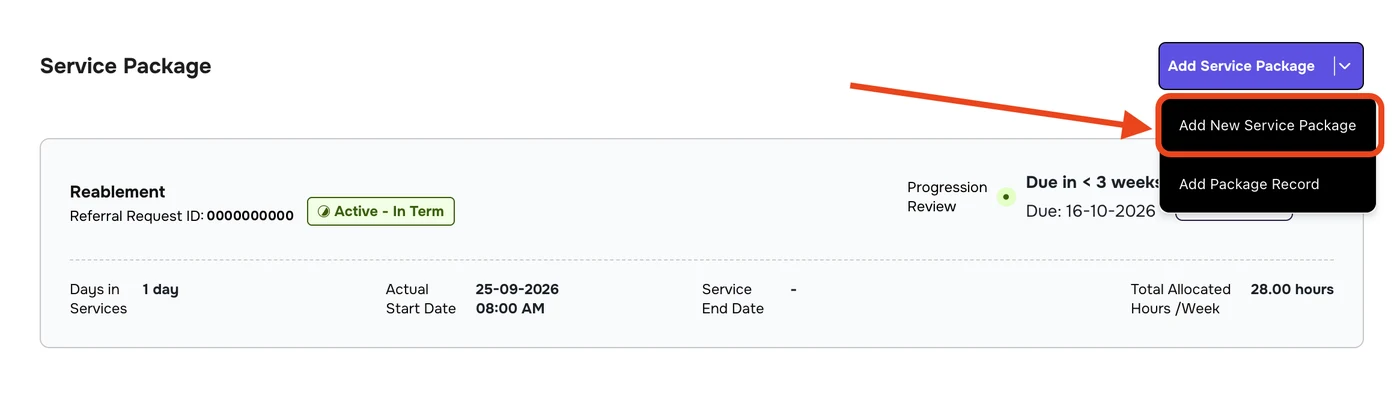
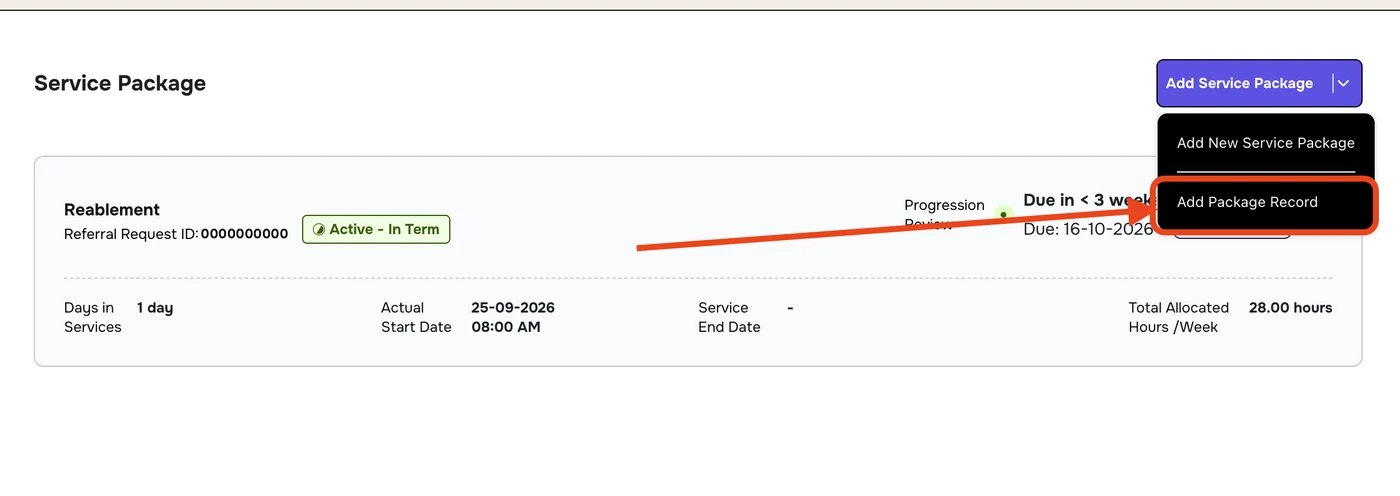
On the profile, Add Service Package ▾ has two options:
Add New Service Package: a new referral or an upcoming package for this service user. This guide covers it.
Add Package Record: an older package entered as a record. Use it for one that has already ended, was a failed start, or has already started and needs onboarding. See Add package record.
At the top right, click the arrow on Add Service Package ▾.
Choose Add New Service Package.
Choose Add New Service Package. The Referral Request ID is replaced.
A five-stage form opens. On every stage, Close at the top right leaves the form. From stage 2 onwards, the ← button at the top left goes back a stage.
3
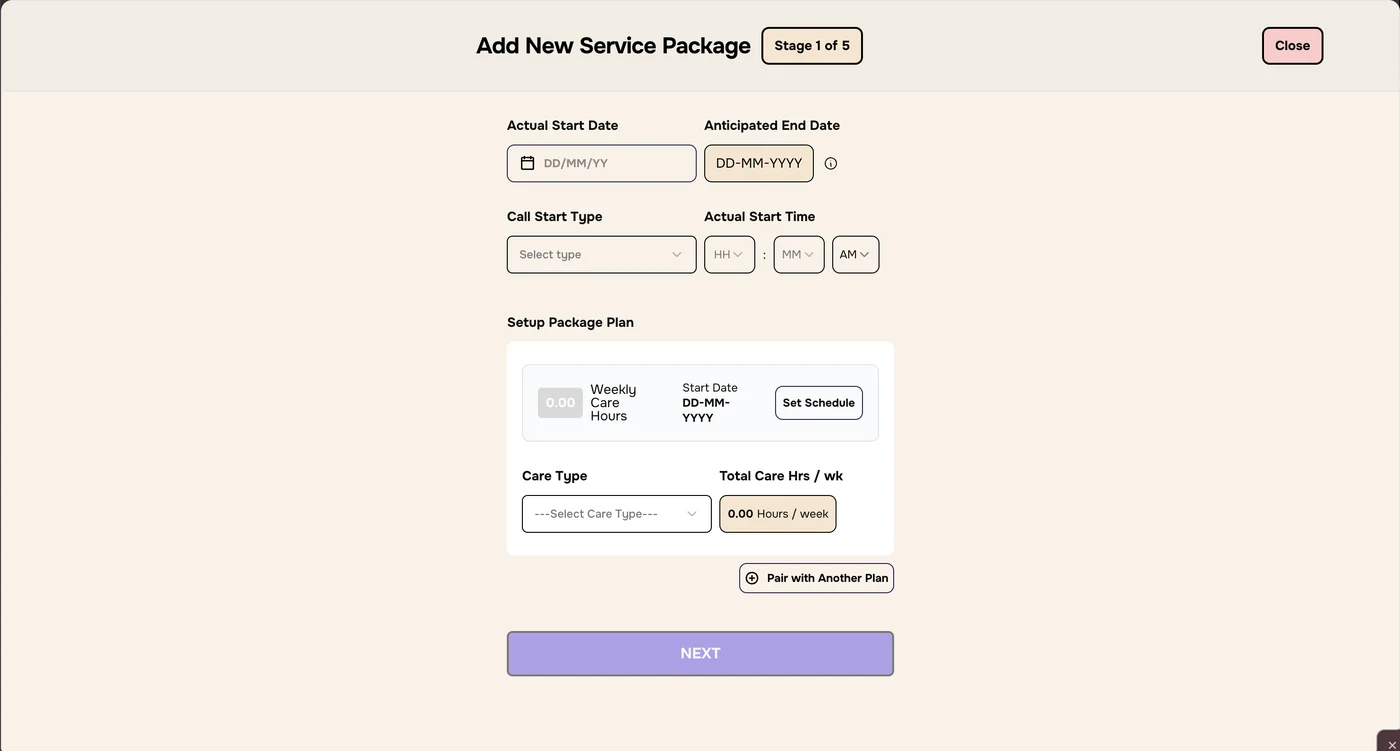
Stage 1: dates and start time
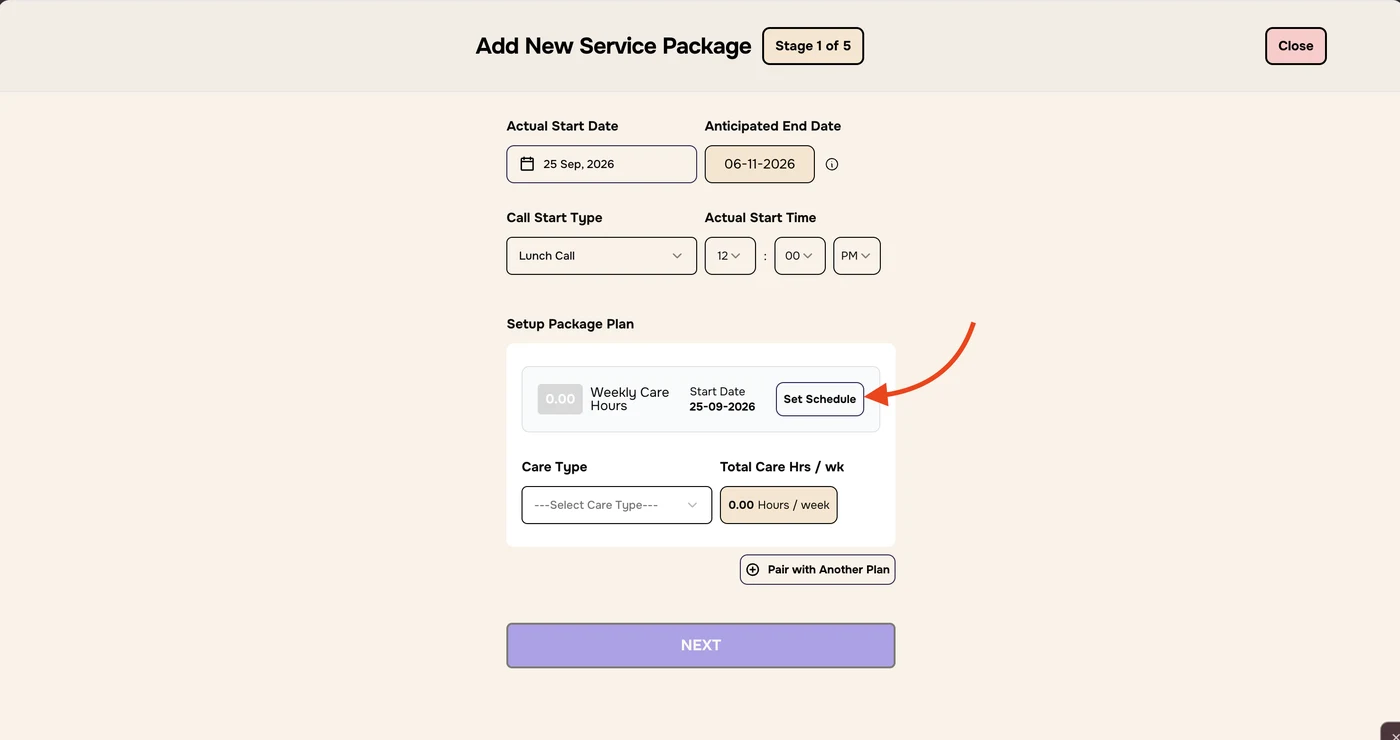
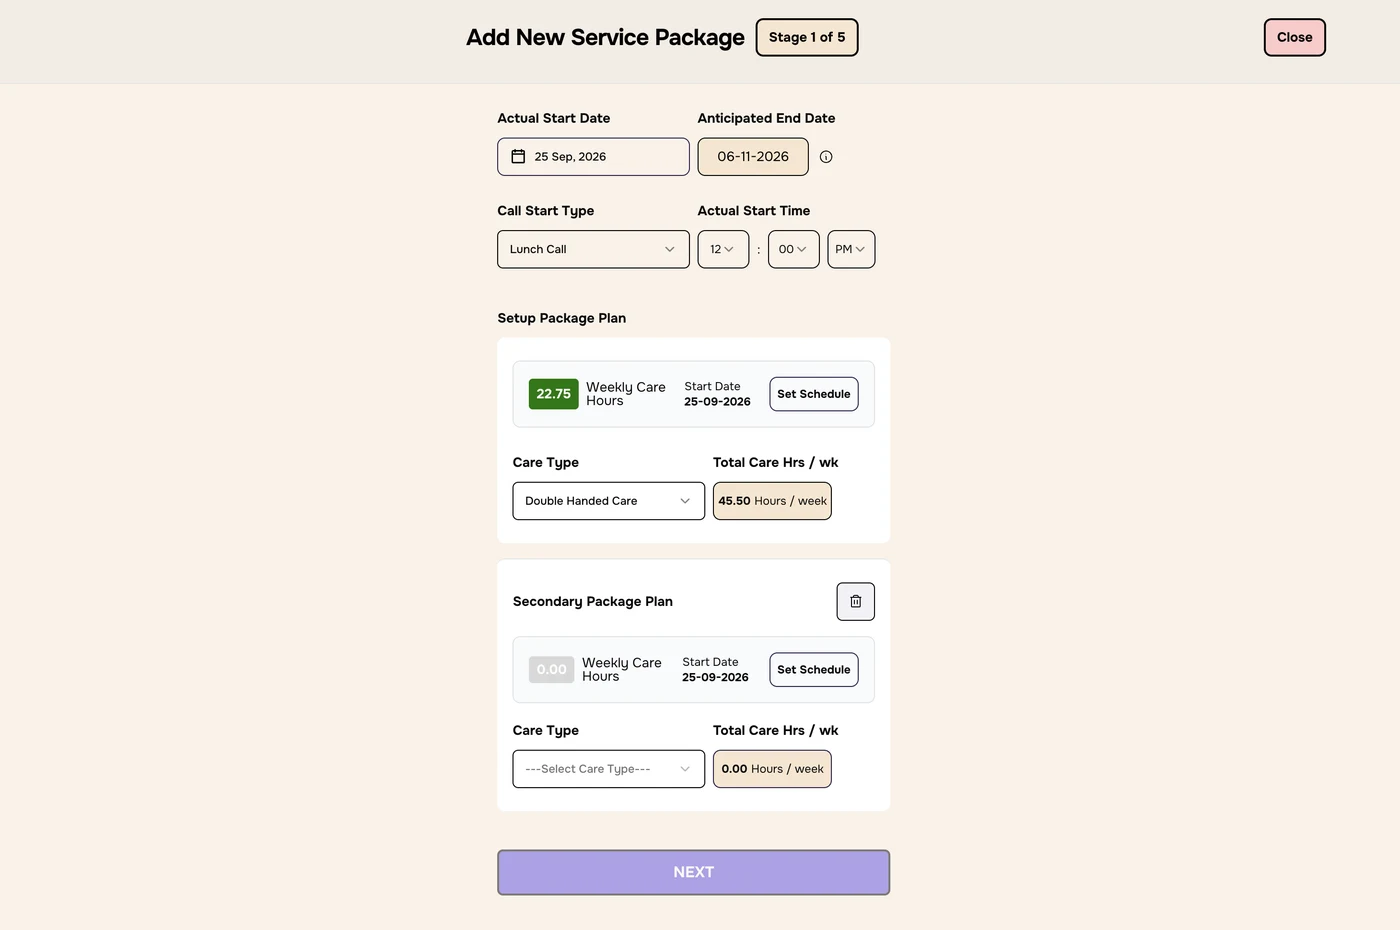
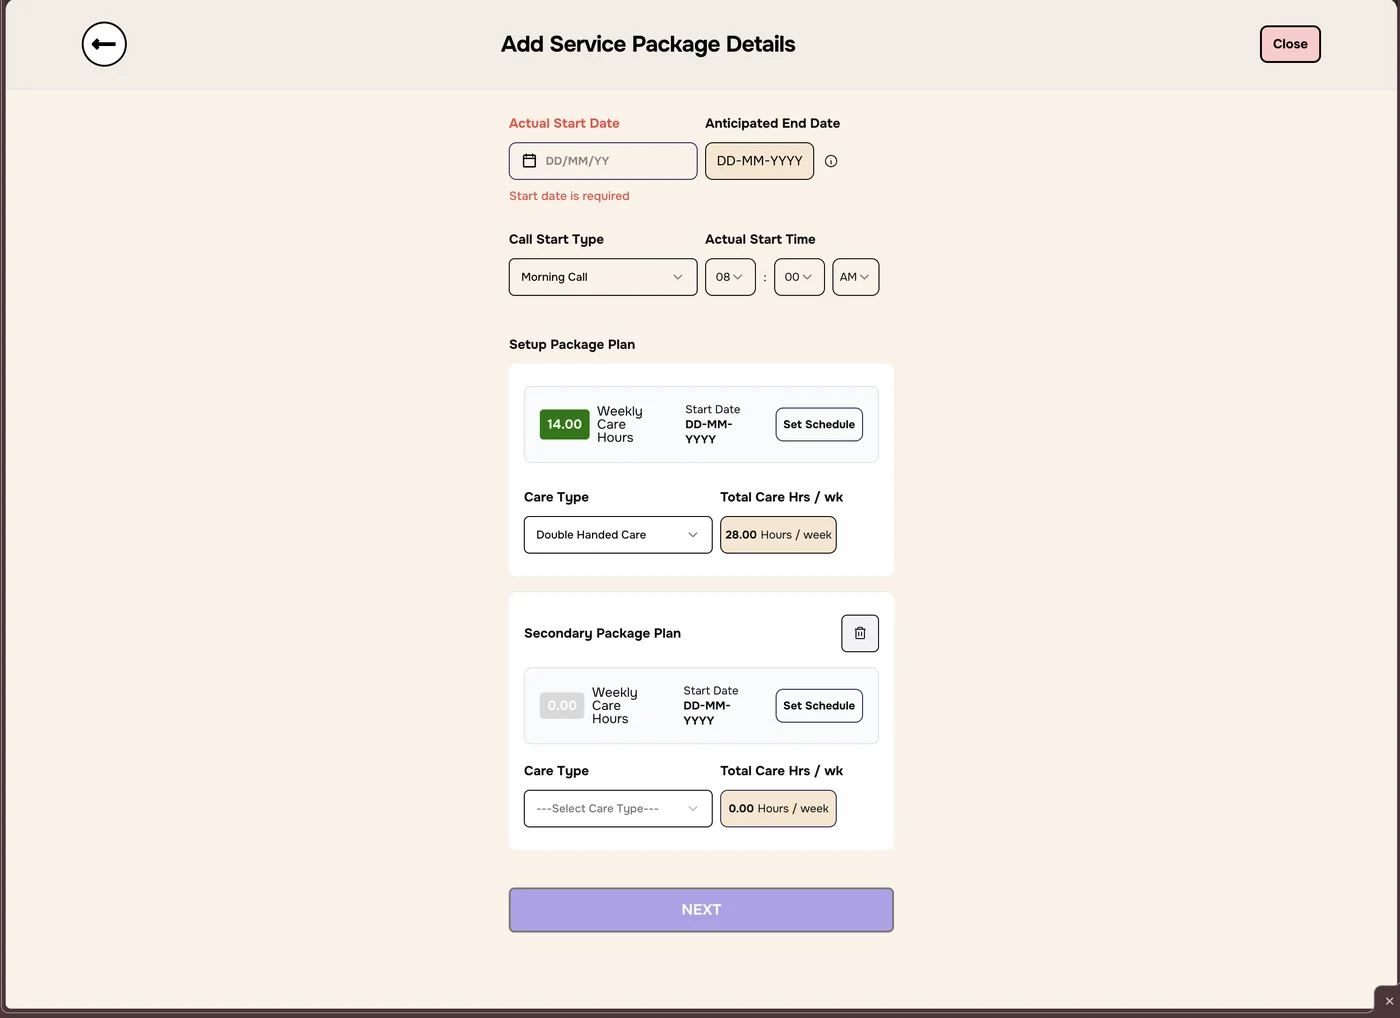
Stage 1 of 5 is called Add New Service Package.
Actual Start Date: choose the date care starts.
Anticipated End Date: Enmero fills this in from the start date, 6 weeks later. For example, a start date of 25 Sep 2026 gives an end date of 06-11-2026. You can’t edit it. Hover over the ⓘ icon for more detail.
Call Start Type: choose the first call, for example Lunch Call.
Actual Start Time: choose the hour, minutes and AM or PM.
Stage 1 before anything is filled in. NEXT stays light purple until the stage is complete.
4
Stage 1: weekly schedule
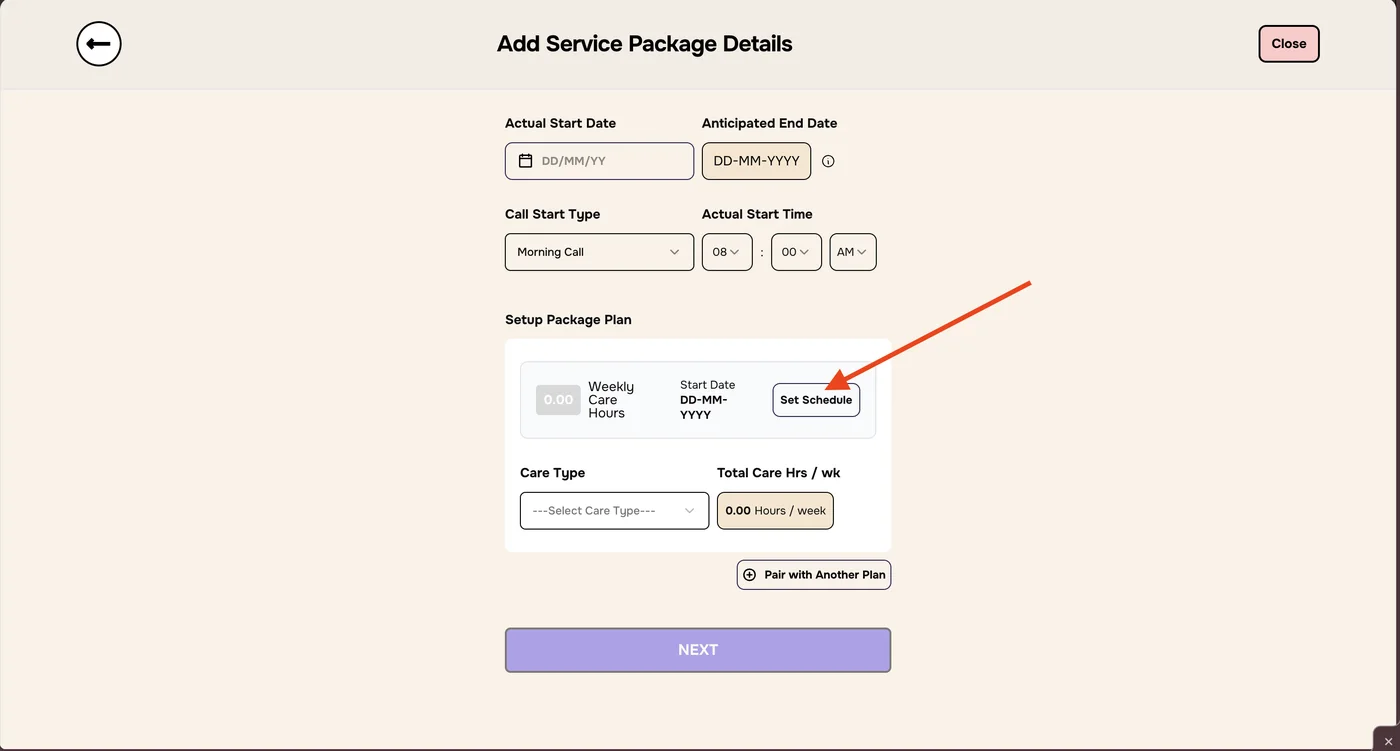
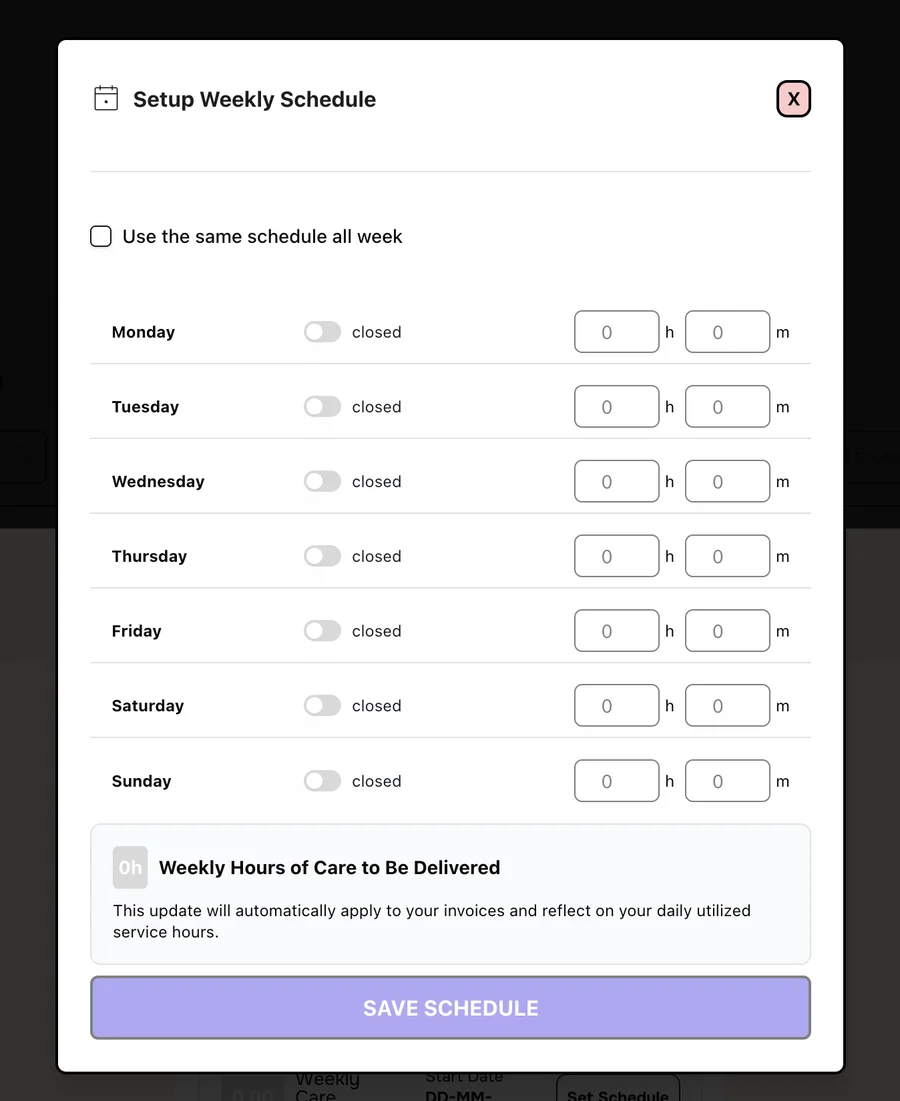
Under Setup Package Plan, click Set Schedule. The plan’s Start Date matches the Actual Start Date.
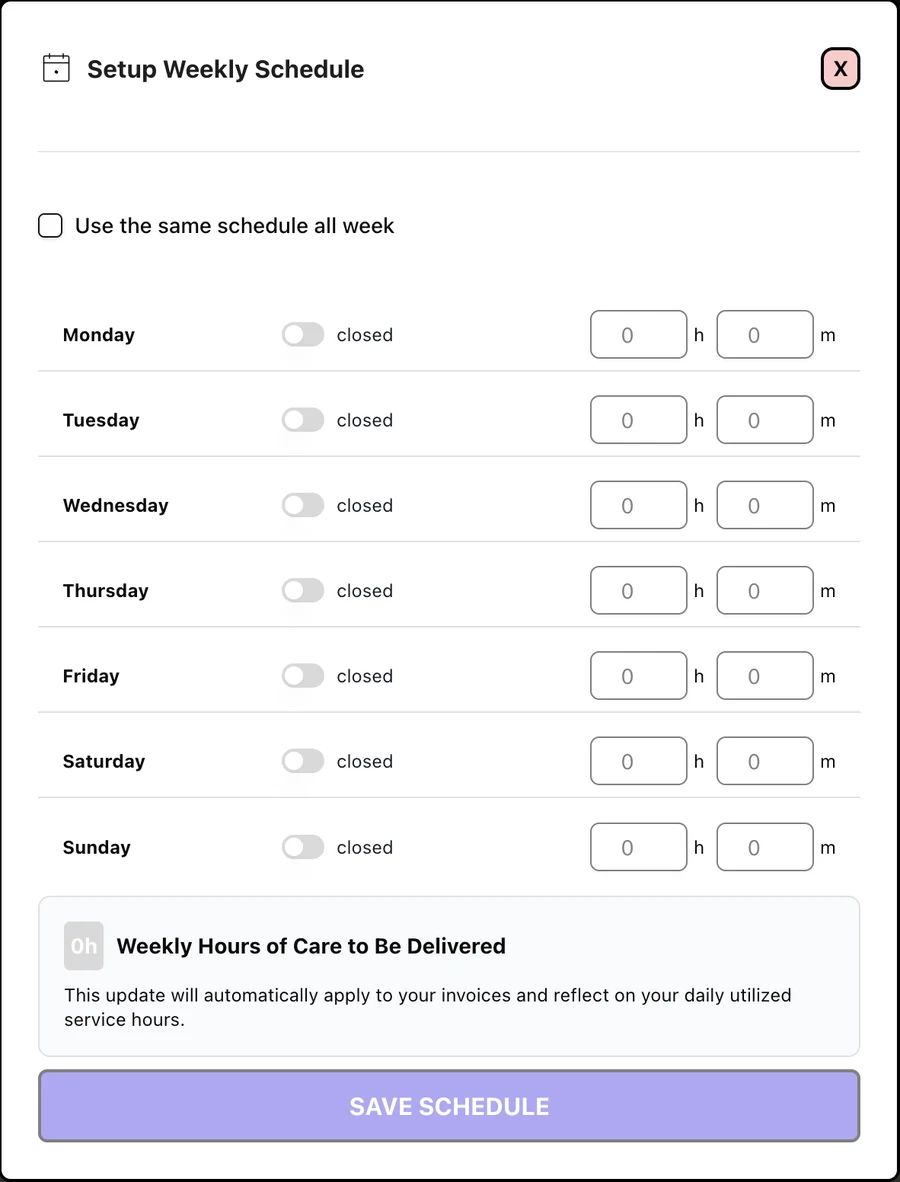
In Setup Weekly Schedule, switch on each day that care is delivered. The day’s label changes from closed to Open.
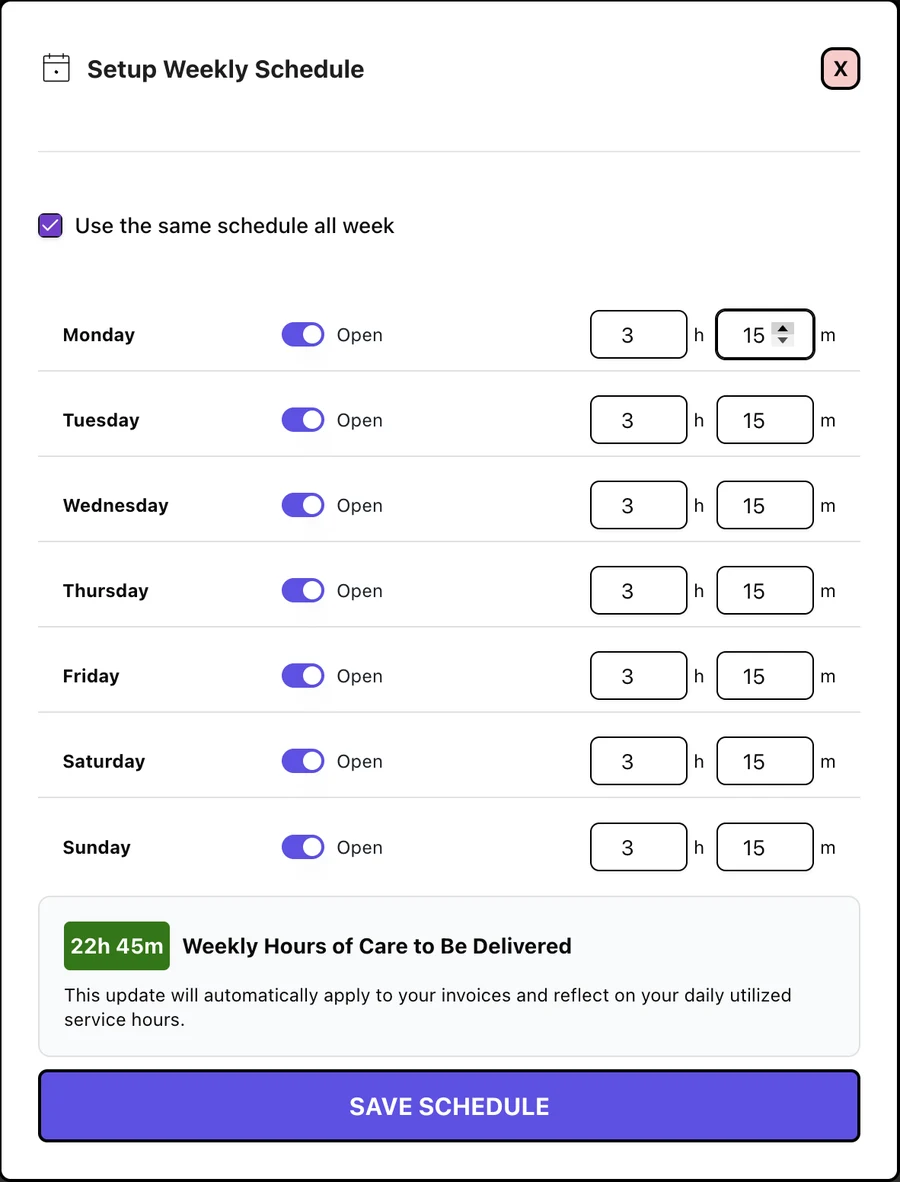
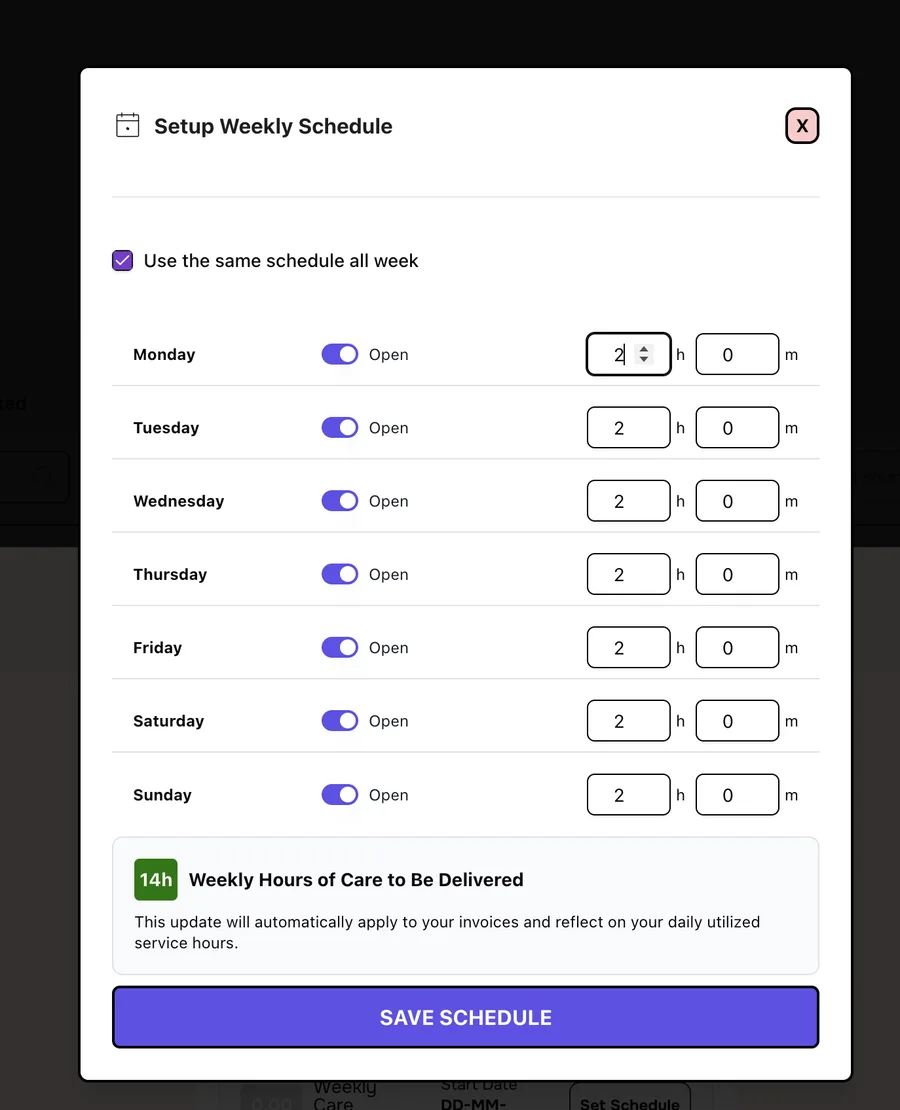
Enter the care time for each day in hours (h) and minutes (m). If every day is the same, tick Use the same schedule all week.
Check Weekly Hours of Care to Be Delivered. For example, 3h 15m every day adds up to 22h 45m.
Click SAVE SCHEDULE. To leave without saving, click X.
Click Set Schedule.
This affects invoicesThe weekly hours you save apply automatically to invoices and to the daily utilised service hours.
Before: every day closed, 0h.After: 3h 15m every day, 22h 45m a week.
5
Stage 1: care type and paired plan
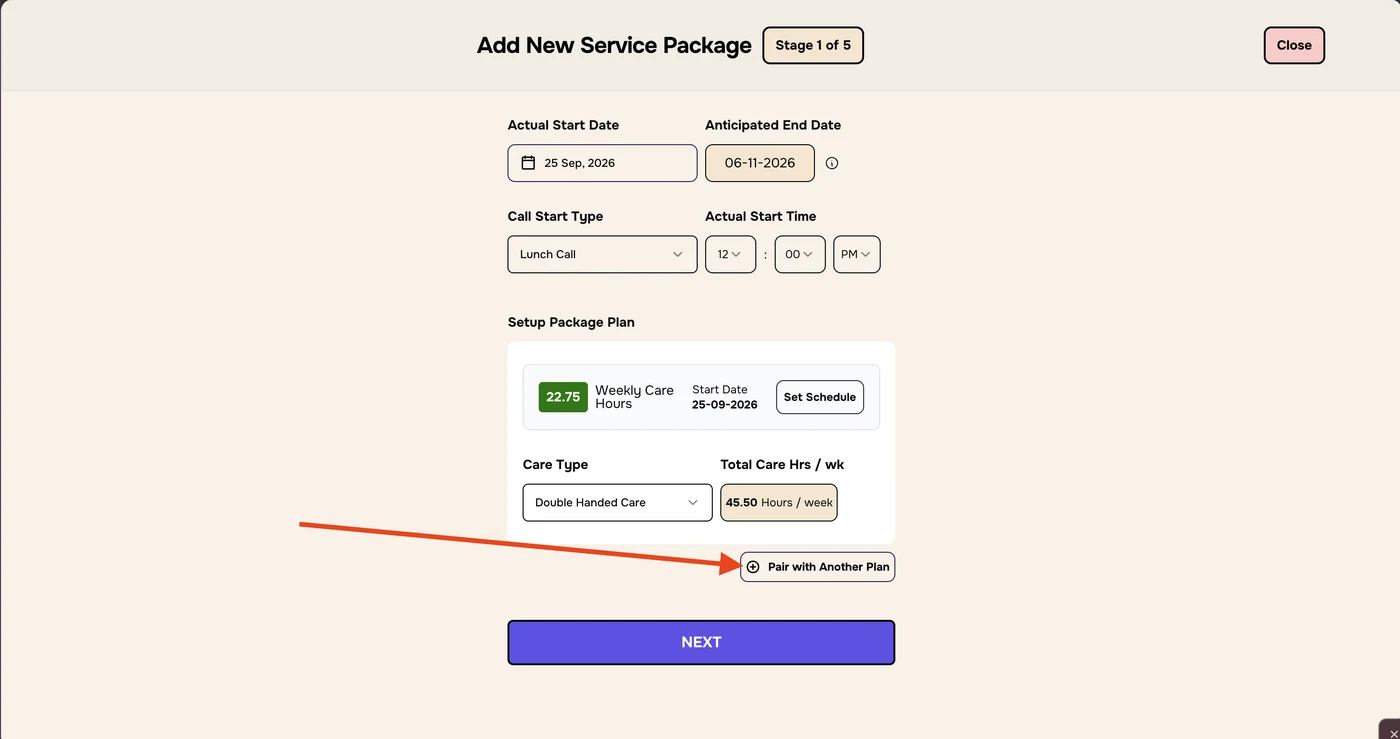
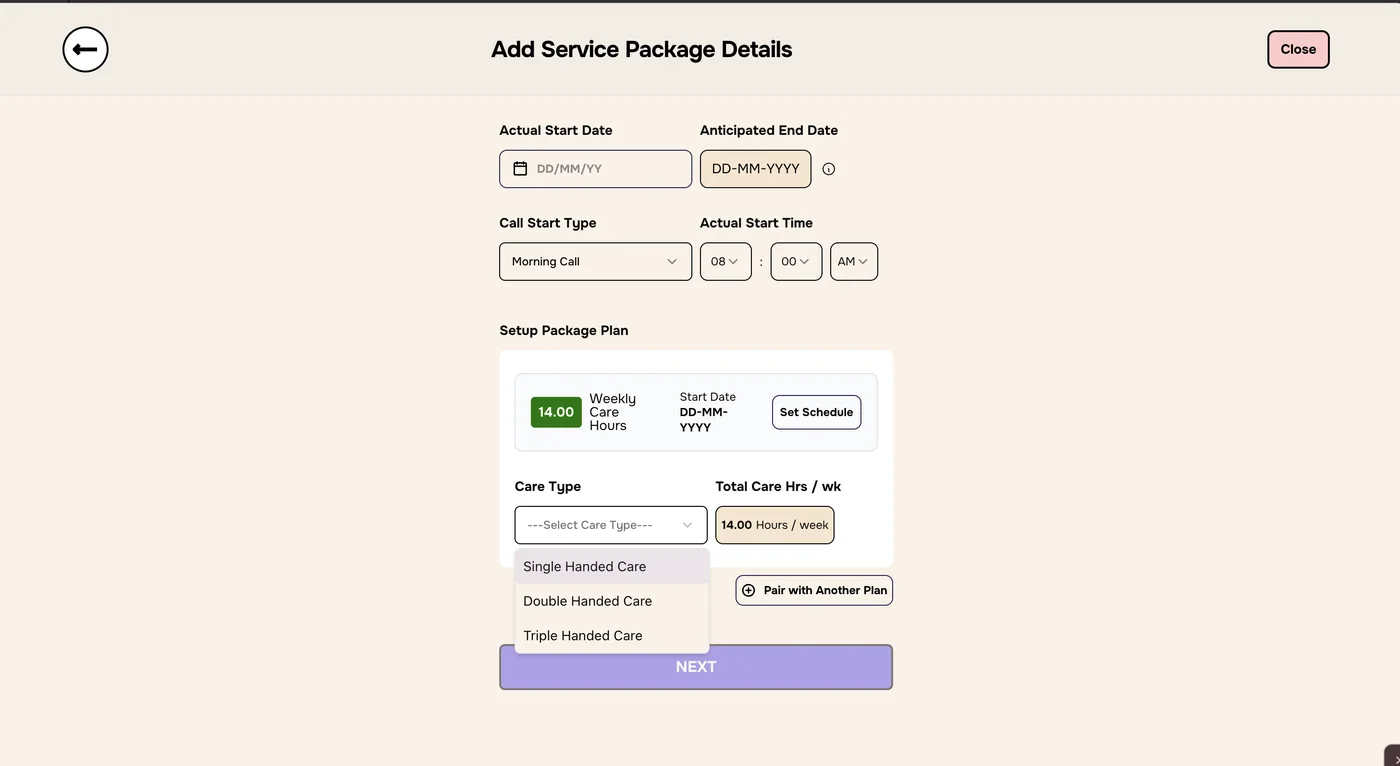
Back on stage 1, the green box shows the Weekly Care Hours, for example 22.75.
Open Care Type and choose Single, Double or Triple Handed Care.
Check Total Care Hrs / wk. It multiplies the weekly hours by the number of carers. For example, 22.75 with Double Handed Care is 45.50 hours a week.
Stage 1 complete. NEXT is now dark purple.
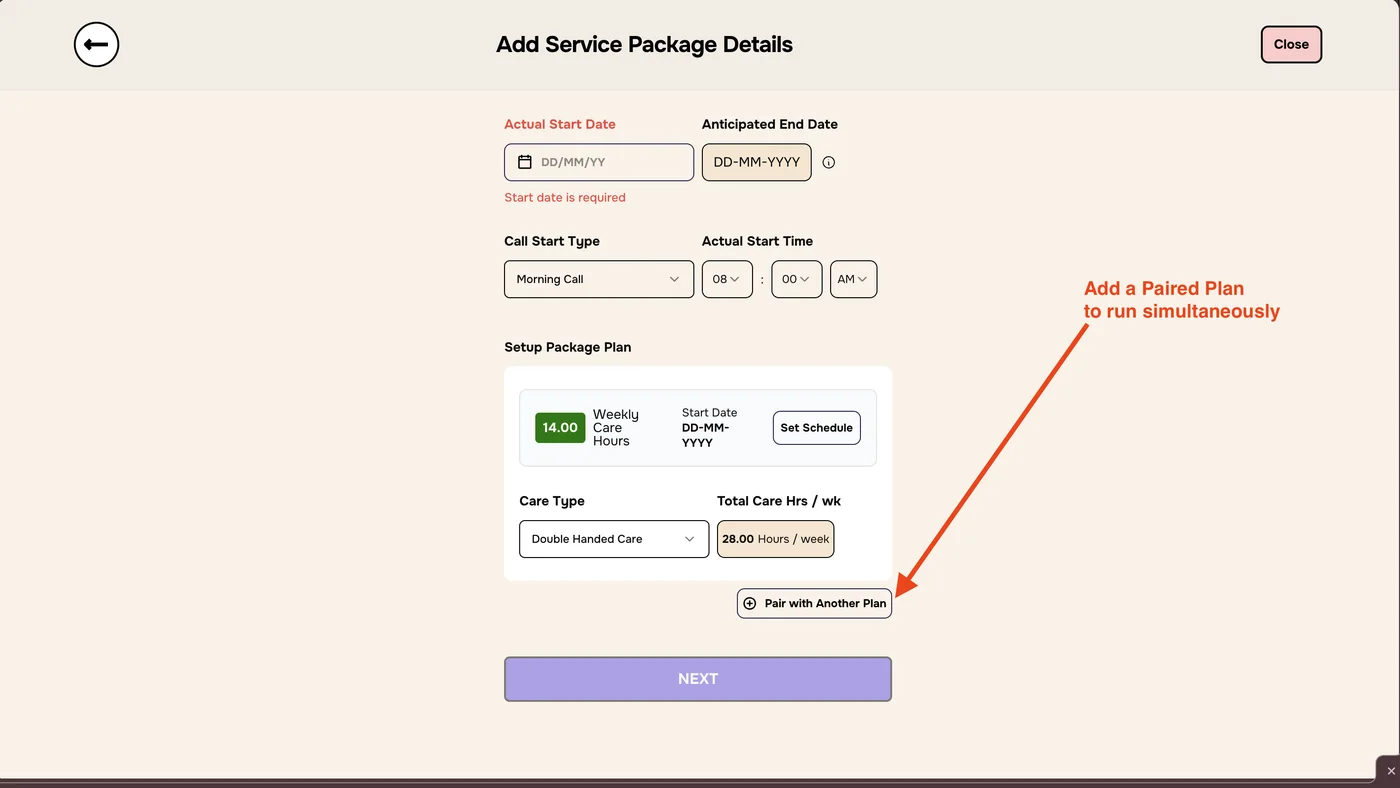
Add a paired plan (optional)
If a second plan needs to run at the same time, for example with a different care type:
Click Pair with Another Plan.
A Secondary Package Plan appears. Set its schedule and care type in the same way.
To remove it, click the bin icon at its top right.
NEXT is greyed out until the secondary plan is complete, or removed.
Click NEXT.
6
Stage 2: referral type and timing
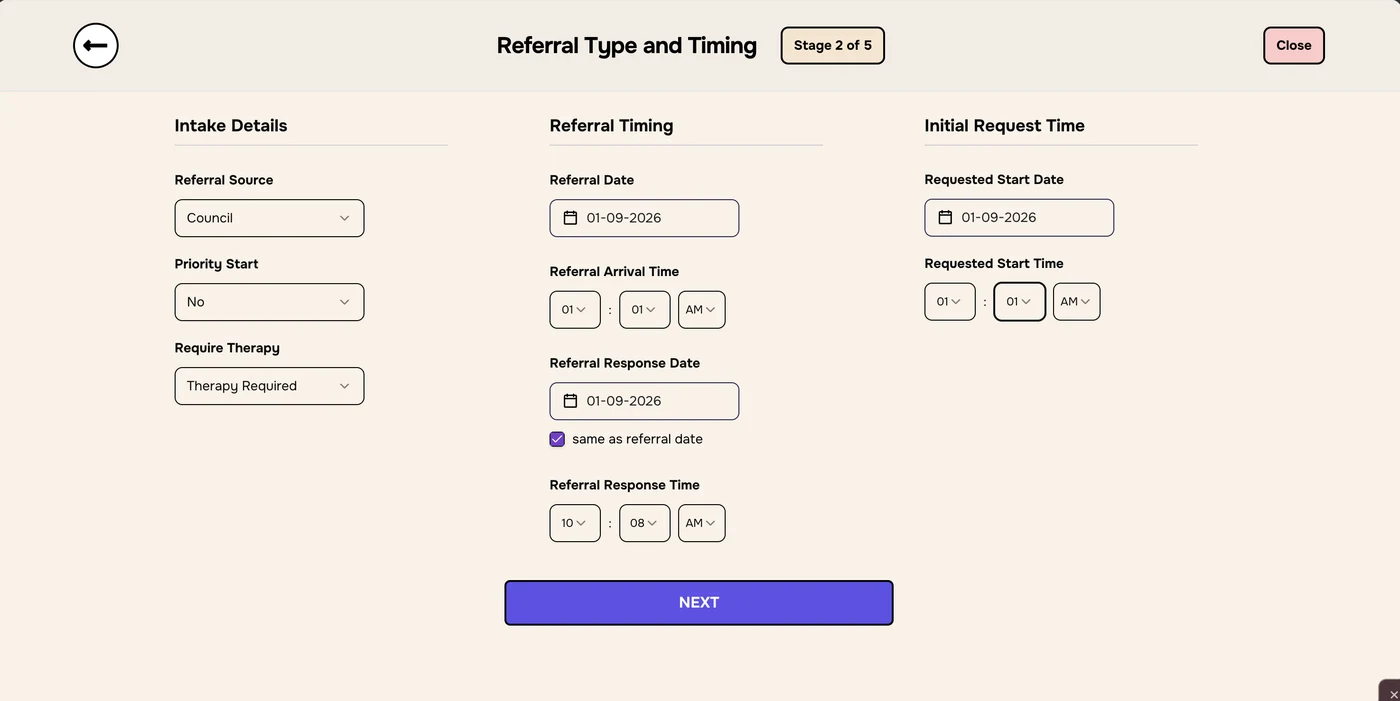
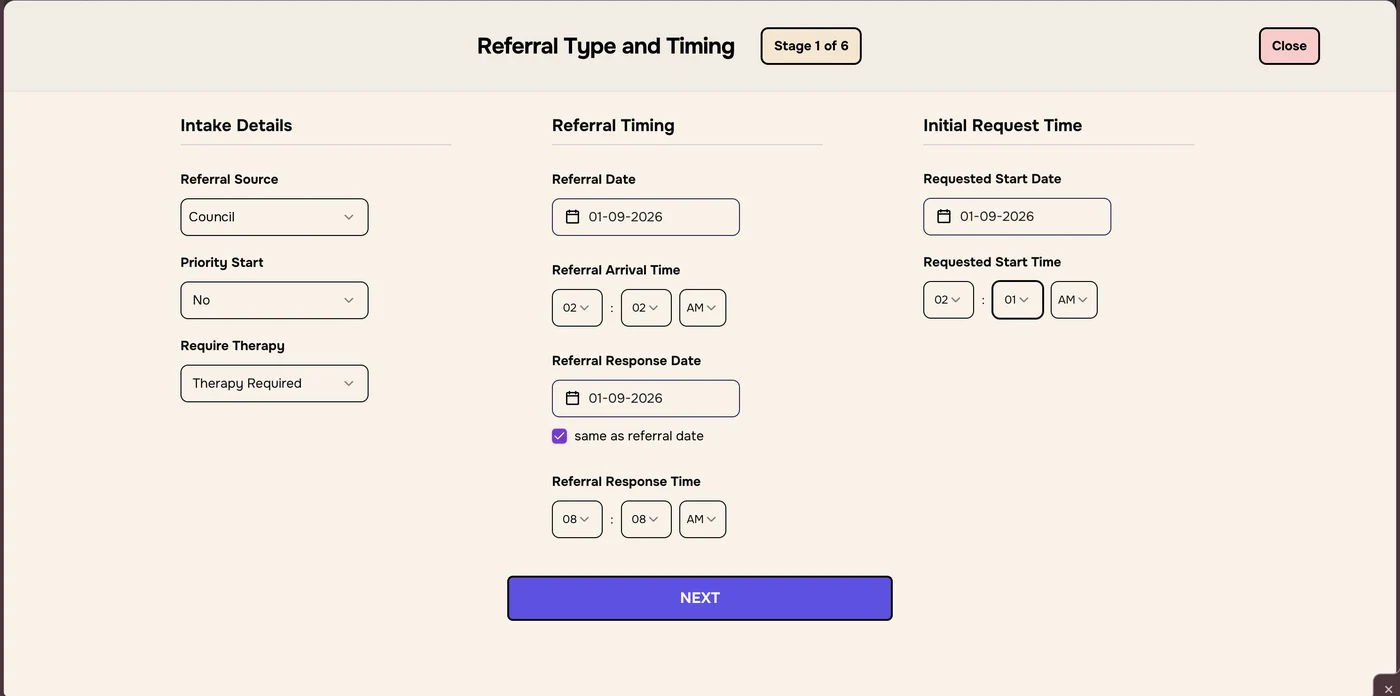
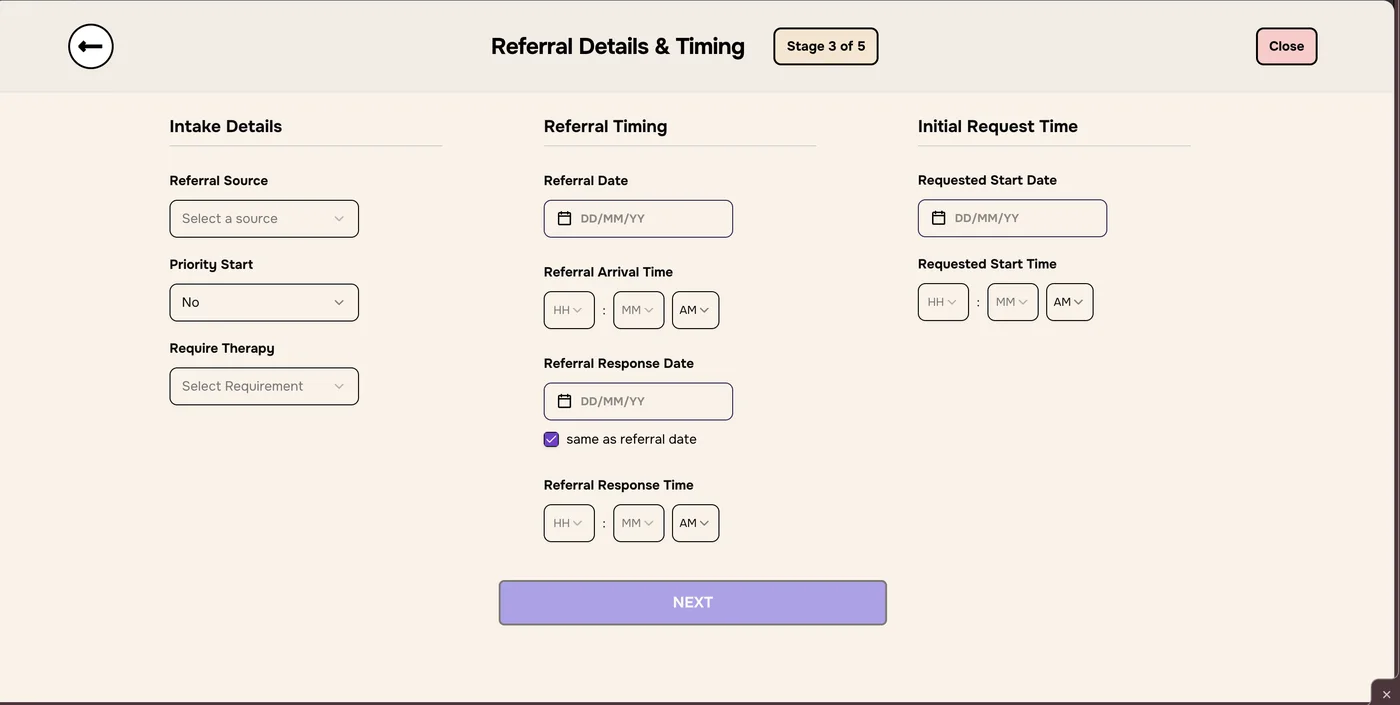
Stage 2 of 5 is called Referral Type and Timing. It has three columns.
Intake Details: Referral Source (for example Council), Priority Start (Yes or No) and Require Therapy (for example Therapy Required).
Referral Timing: Referral Date, Referral Arrival Time, Referral Response Date and Referral Response Time. Tick same as referral date if you responded on the day the referral came in.
Initial Request Time: the Requested Start Date and Requested Start Time the referrer asked for.
Stage 2 filled in.
Click NEXT.
7
Stage 3: documents and assessor
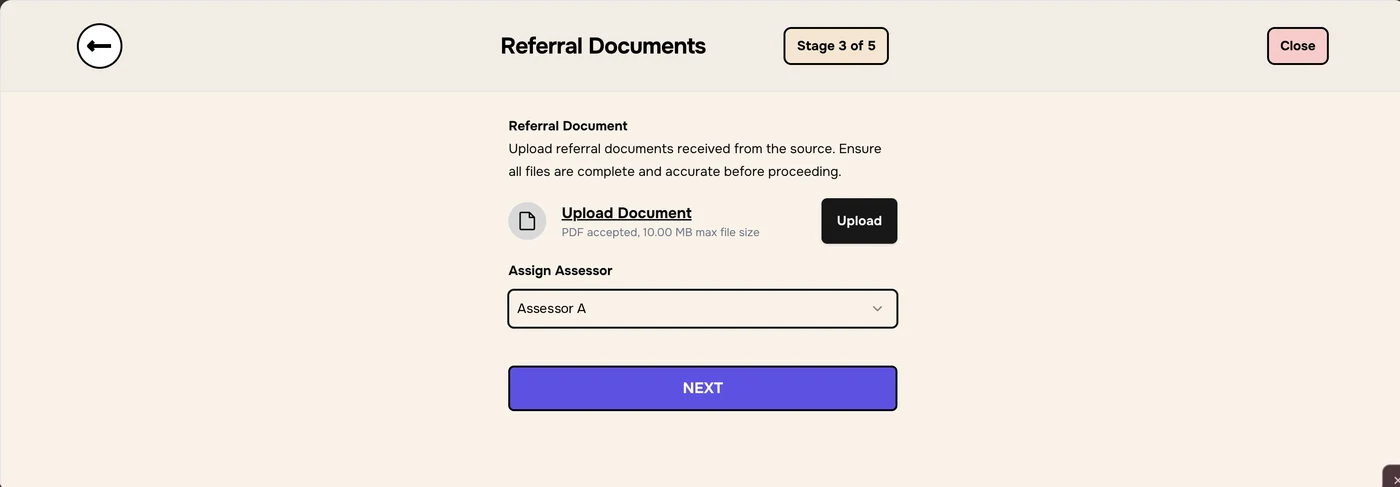
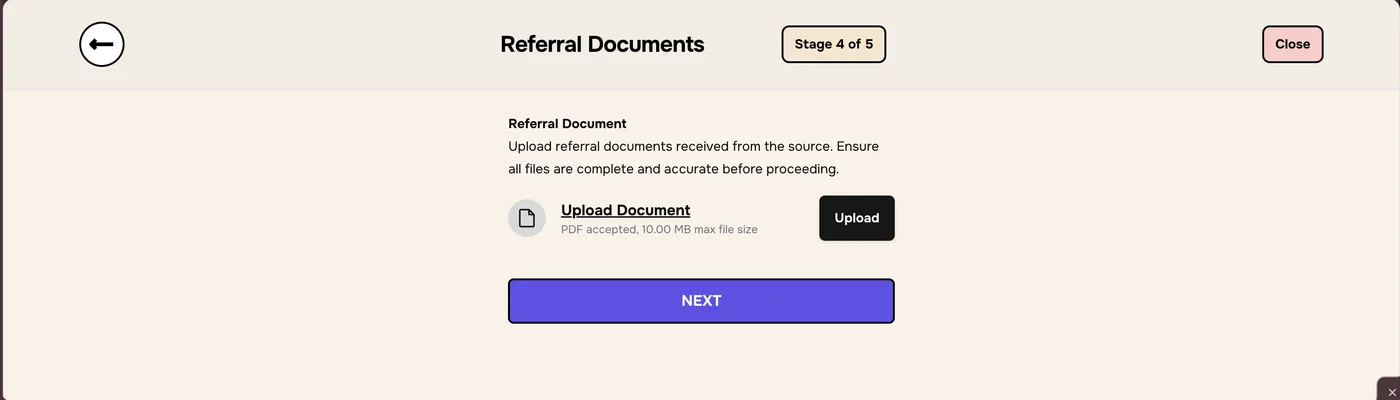
Stage 3 of 5 is called Referral Documents.
Upload the referral documents from the source. Click Upload Document to choose a file, then click Upload. Only PDFs of up to 10 MB are accepted.
Under Assign Assessor, choose who will assess the service user.
Click NEXT.
Upload the referral and assign an assessor. The assessor’s name is replaced.
8
Stage 4: VOO and RAG rating
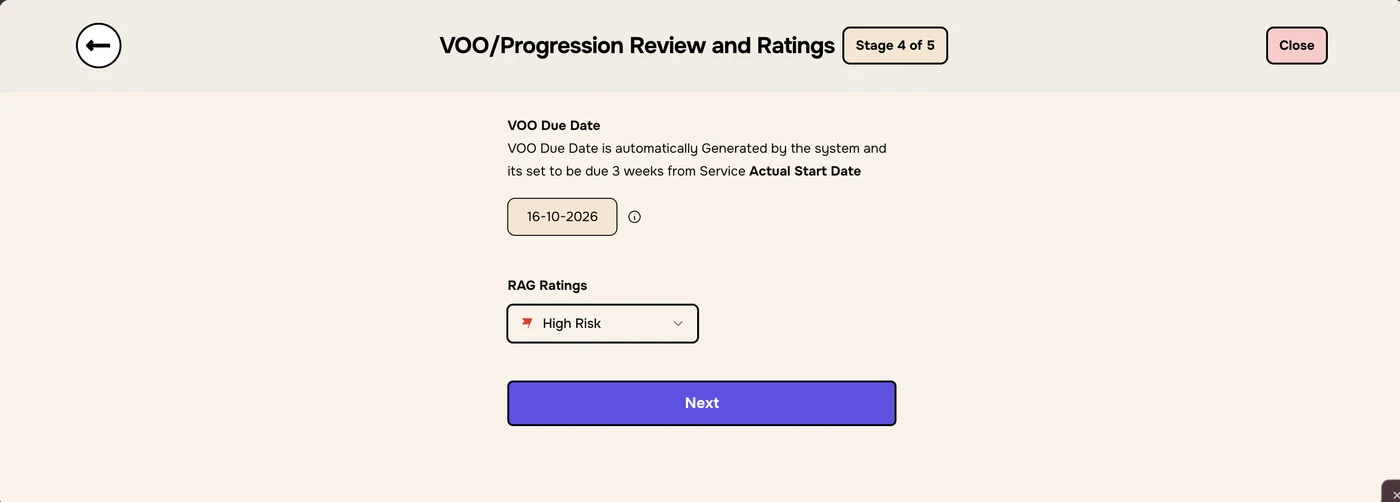
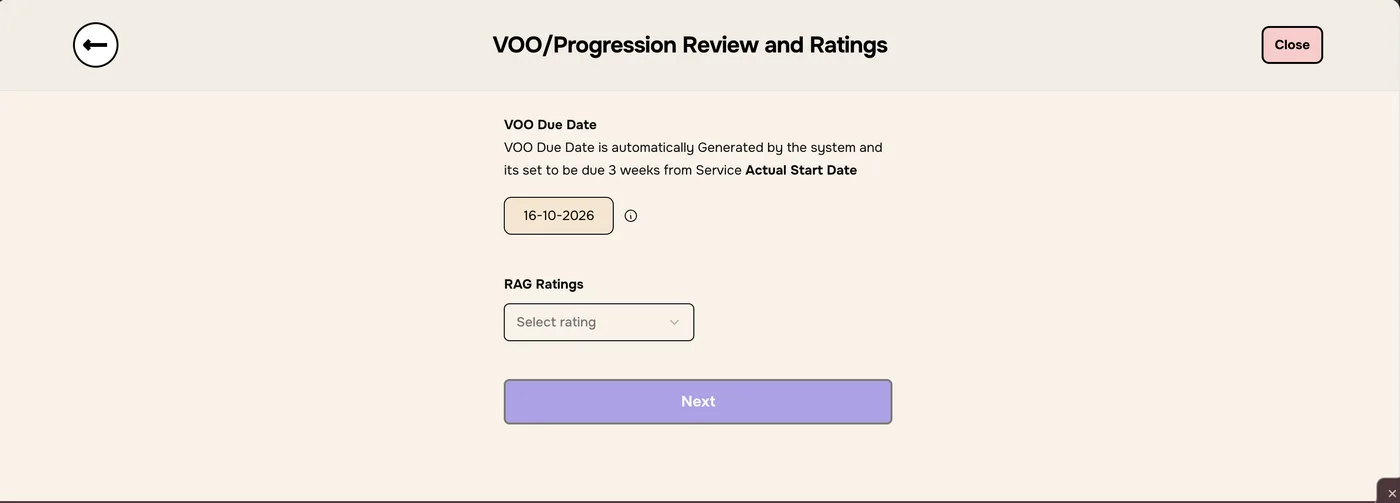
Stage 4 of 5 is called VOO/Progression Review and Ratings.
Check the VOO Due Date. Enmero sets it to 3 weeks after the Actual Start Date, and you can’t edit it.
Under RAG Ratings, choose the service user’s rating, for example High Risk.
Click Next.
The VOO due date is set for you.
9
Stage 5: assessment overview
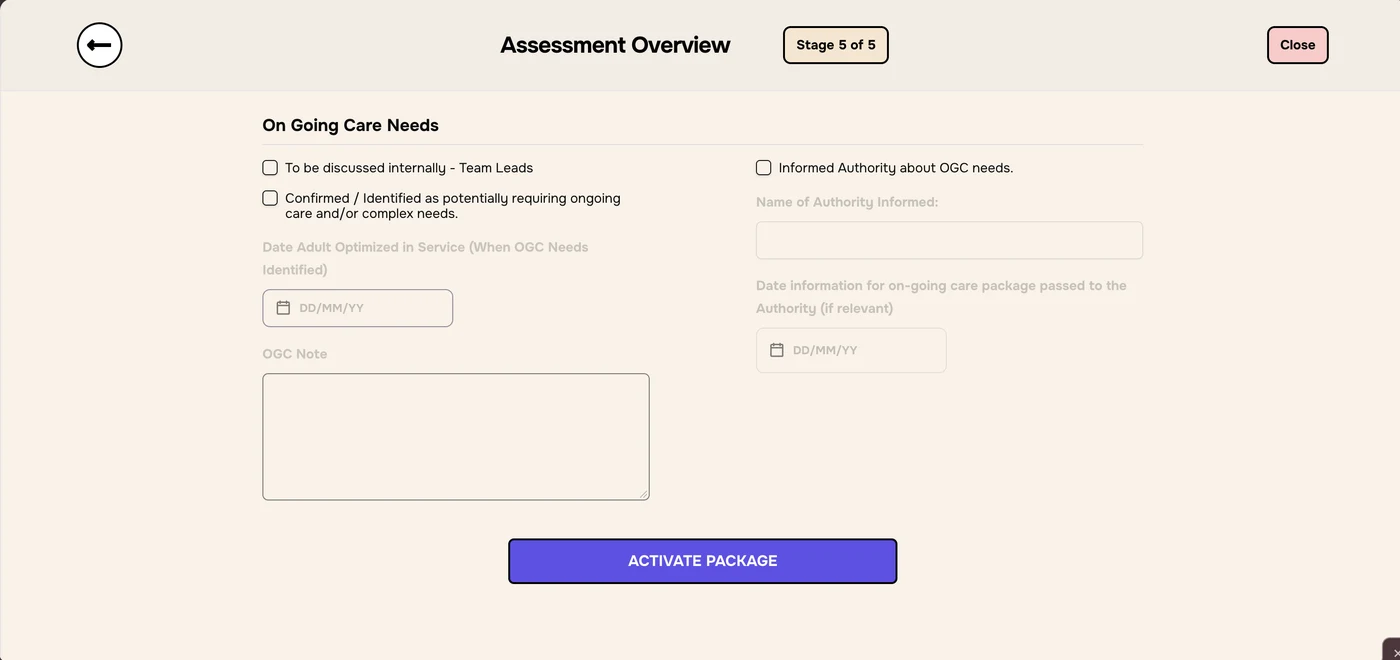
Stage 5 of 5 is called Assessment Overview. Use its On Going Care Needs (OGC) section if the service user may need care after reablement. Fill in only what applies:
To be discussed internally - Team Leads: tick if team leads need to discuss it.
Confirmed / Identified as potentially requiring ongoing care and/or complex needs: tick if needs have been identified. This turns on Date Adult Optimized in Service and the OGC Note.
Informed Authority about OGC needs: tick once the authority has been told. This turns on Name of Authority Informed and the Date information for on-going care package passed to the Authority.
The greyed-out fields turn on when you tick the box above them.
Click ACTIVATE PACKAGE. The new package then appears in the package list.
Troubleshooting
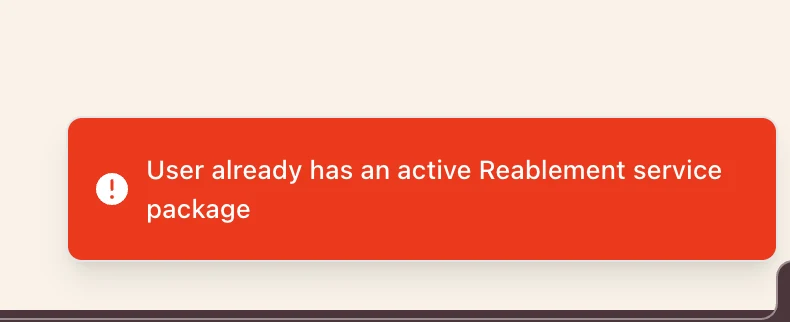
“User already has an active Reablement service package”
A service user can only have one active Reablement package at a time. You’ll need to end the current package first. Check the package list for a package marked Active - In Term.
The referral was stopped because a matching profile exists
The service user is already in Enmero, matched by NHS or Mosaic number. Open their profile and add the package there, as shown in this guide.
The package has already ended, failed to start or started earlier
Use Add Package Record from the same menu instead. See Add package record.
The NEXT button stays light purple
A required field on that stage is empty. If you added a Secondary Package Plan, set its schedule and care type, or delete it.
Total Care Hrs / wk is higher than the weekly hours
That’s expected for Double or Triple Handed Care, because the total counts every carer’s hours.
I can’t change the end date or VOO due date
Enmero works both out from the Actual Start Date. Change the start date and both dates update.
The record form has six stages. Unlike Add New Service Package, it starts with the referral details, and it ends with a Service Summary that sets the package’s status.
2
Open Add Package Record
Open the service user’s profile and click Service Package in the left menu.
Click the arrow on Add Service Package ▾.
Choose Add Package Record.
Choose Add Package Record. The Referral Request ID is replaced.
On every stage, Close at the top right leaves the form. From stage 2 onwards, the ← button goes back a stage.
3
Stage 1: referral type and timing
Enter the details of the original referral:
Intake Details: Referral Source, Priority Start and Require Therapy.
Referral Timing: Referral Date, Referral Arrival Time, Referral Response Date and Referral Response Time. Tick same as referral date if you responded on the same day.
Initial Request Time: the Requested Start Date and Requested Start Time.
Stage 1 of 6.
Click NEXT.
4
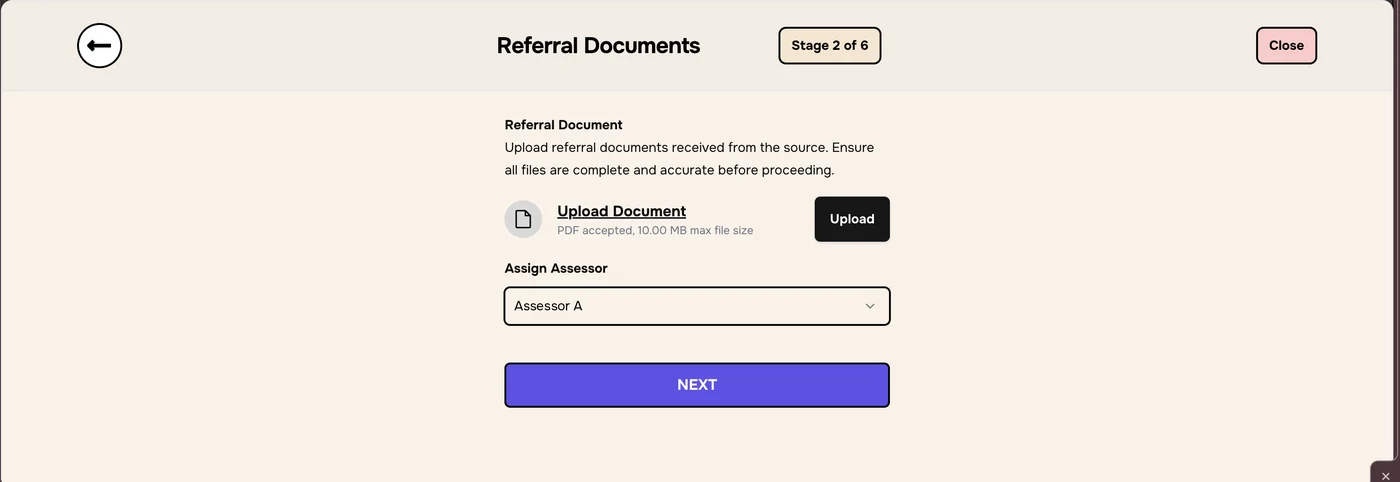
Stage 2: documents and assessor
Upload the referral documents. Click Upload Document, choose the file, then click Upload. Only PDFs of up to 10 MB are accepted.
Under Assign Assessor, choose the assessor.
Click NEXT.
Stage 2 of 6. The assessor’s name is replaced.
5
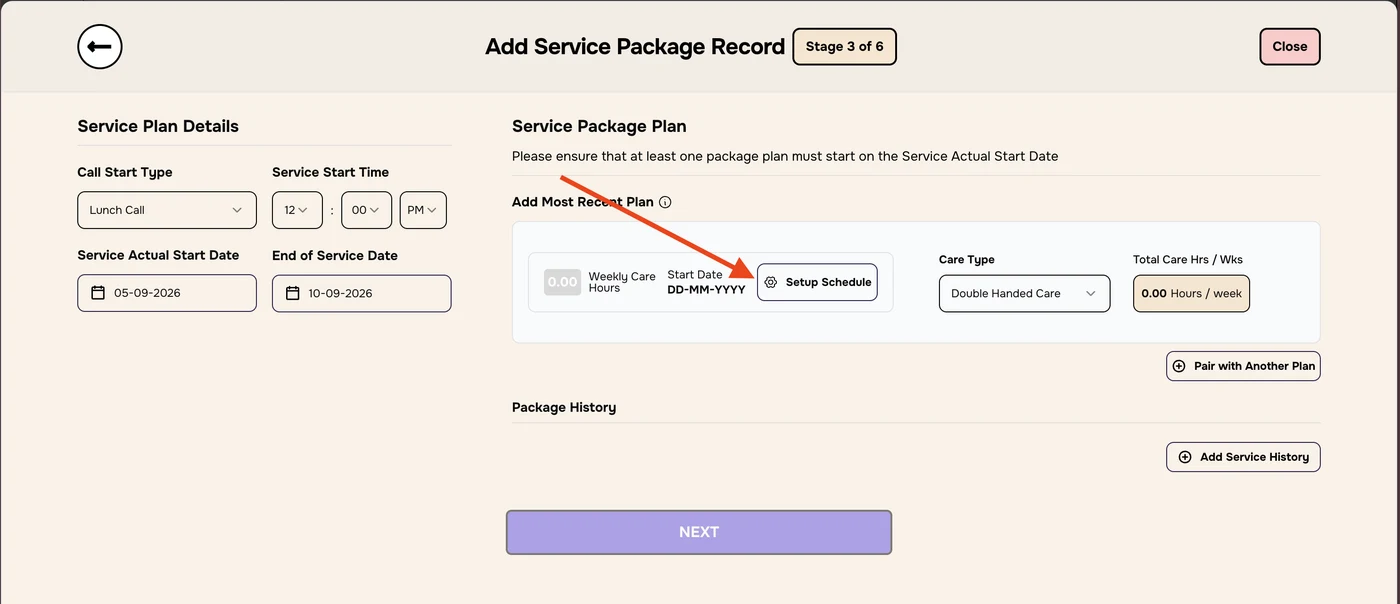
Stage 3: service dates and most recent plan
Stage 3 of 6 is called Add Service Package Record.
Service Plan Details
Choose the Call Start Type and Service Start Time.
Enter the Service Actual Start Date.
Enter the End of Service Date, if the package has ended. Unlike a new package, you enter this date yourself.
Add Most Recent Plan
Enter the plan the package was on most recently. At least one package plan must start on the Service Actual Start Date.
Click Setup Schedule.
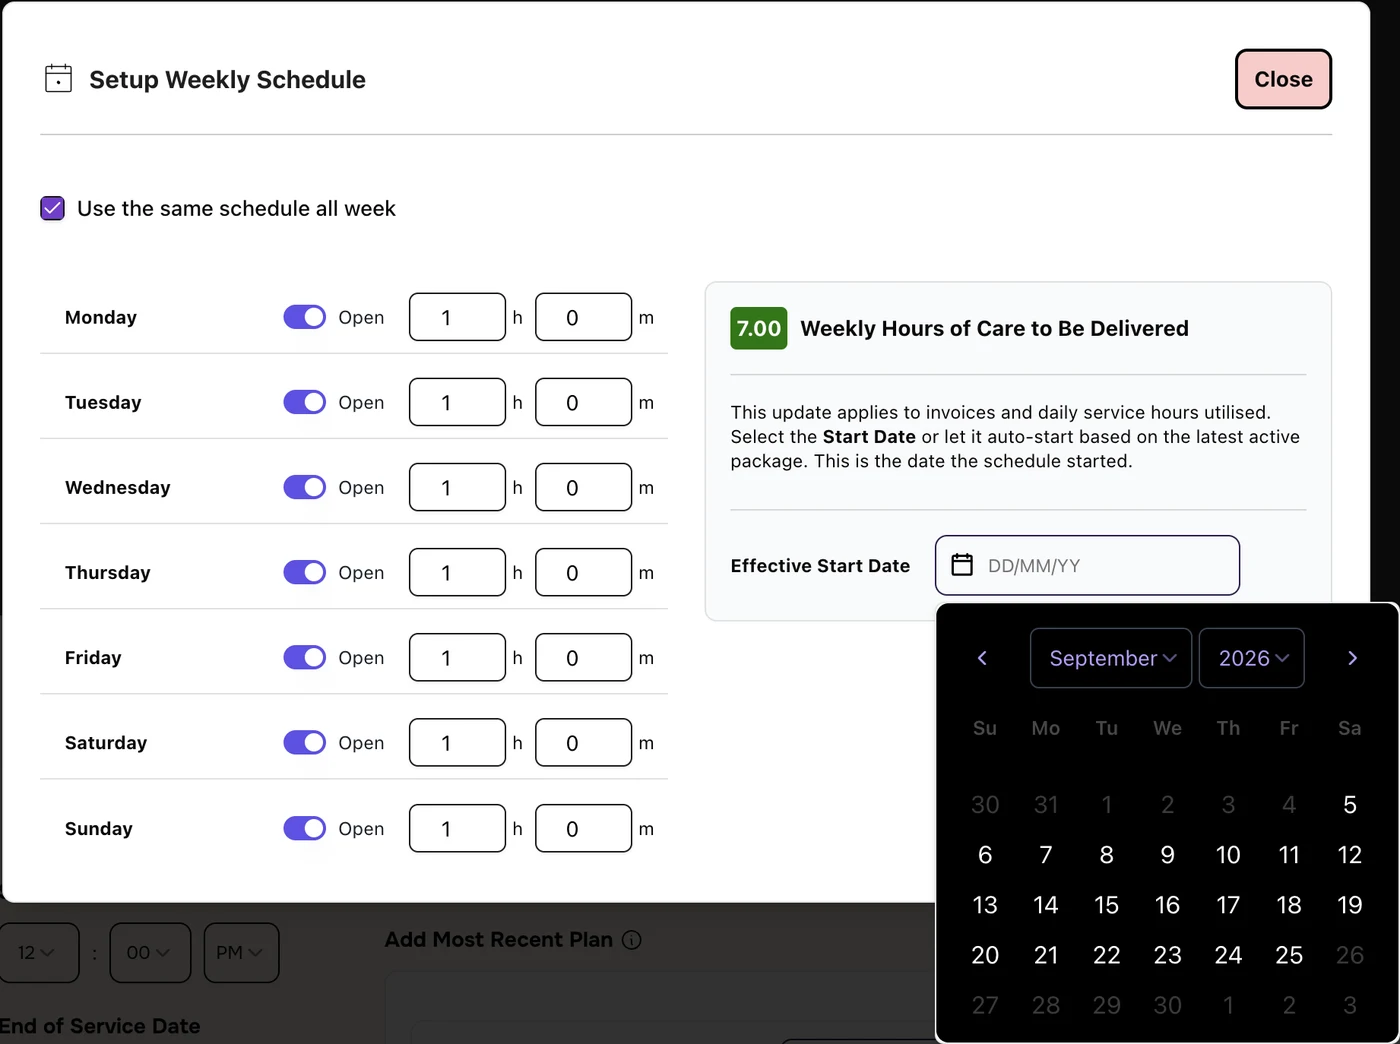
Switch on each day care was delivered and enter the hours and minutes. Tick Use the same schedule all week if every day was the same.
Under Effective Start Date, choose the date this schedule started. If you leave it empty, Enmero uses the date of the latest active package. Dates you can’t choose are greyed out.
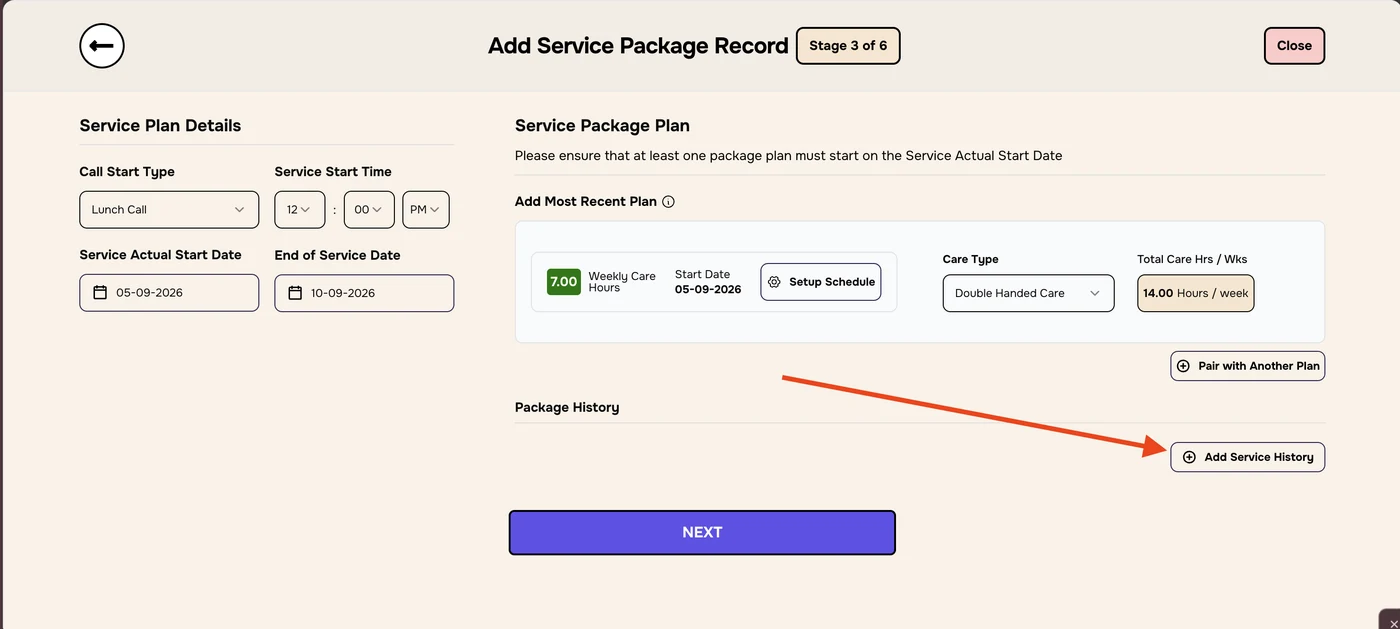
Close the schedule. The green box shows the Weekly Care Hours, for example 7.00.
Choose the Care Type. Total Care Hrs / Wks updates. For example, 7 hours with Double Handed Care is 14.00.
Click Setup Schedule.Set the hours and the Effective Start Date.
This affects invoicesThe weekly hours you save apply to invoices and to the daily service hours utilised.
To add a second plan that ran at the same time, click Pair with Another Plan. This works the same way as in Add service package.
6
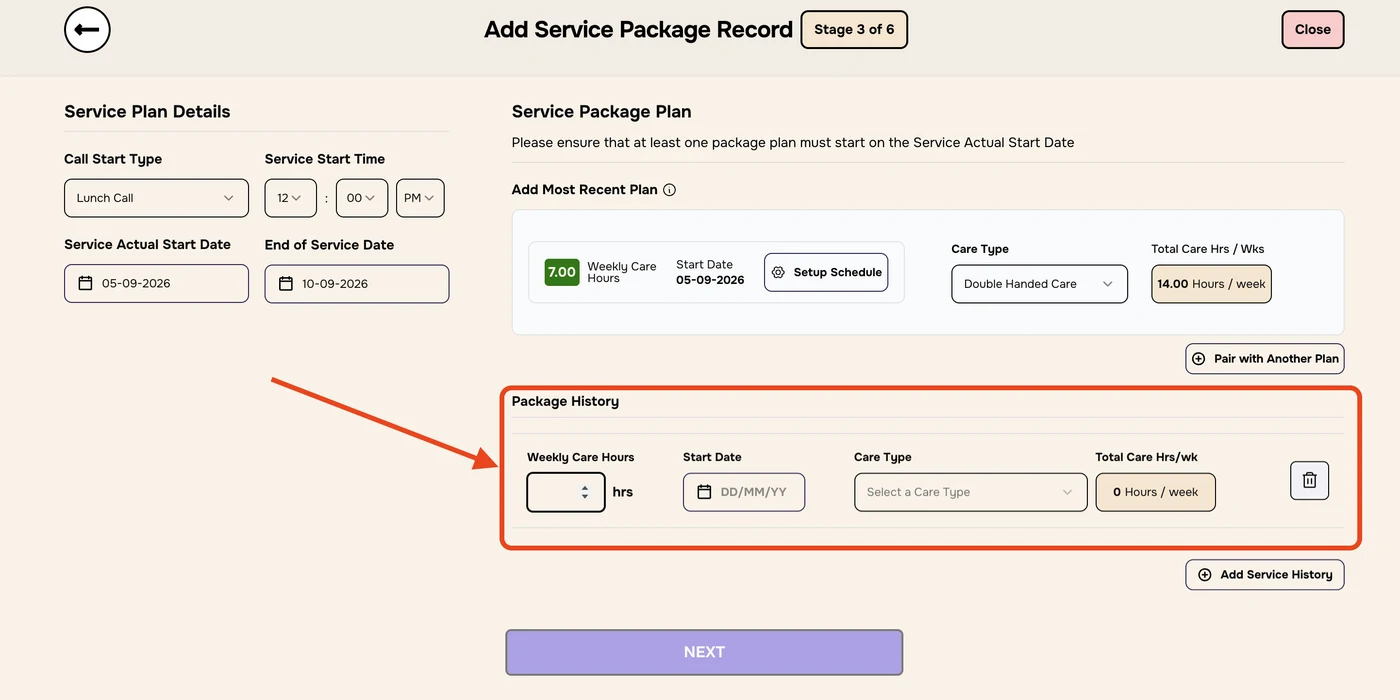
Stage 3: package history
If the package’s hours or care type changed over time, add the earlier plans under Package History.
Click Add Service History. A new row appears.
Enter the Weekly Care Hours, the Start Date of that plan and its Care Type. Total Care Hrs/wk is worked out for you.
To add another earlier plan, click Add Service History again. To remove a row, click its bin icon.
Click Add Service History.A Package History row.
When everything is filled in, click NEXT.
7
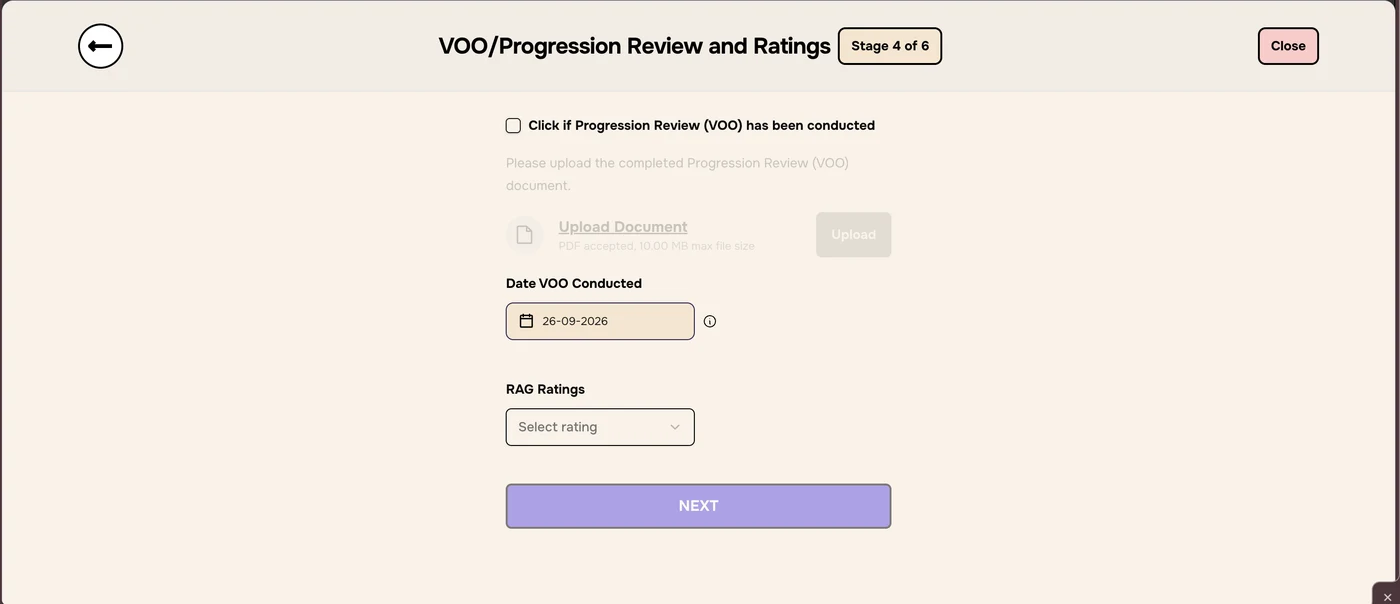
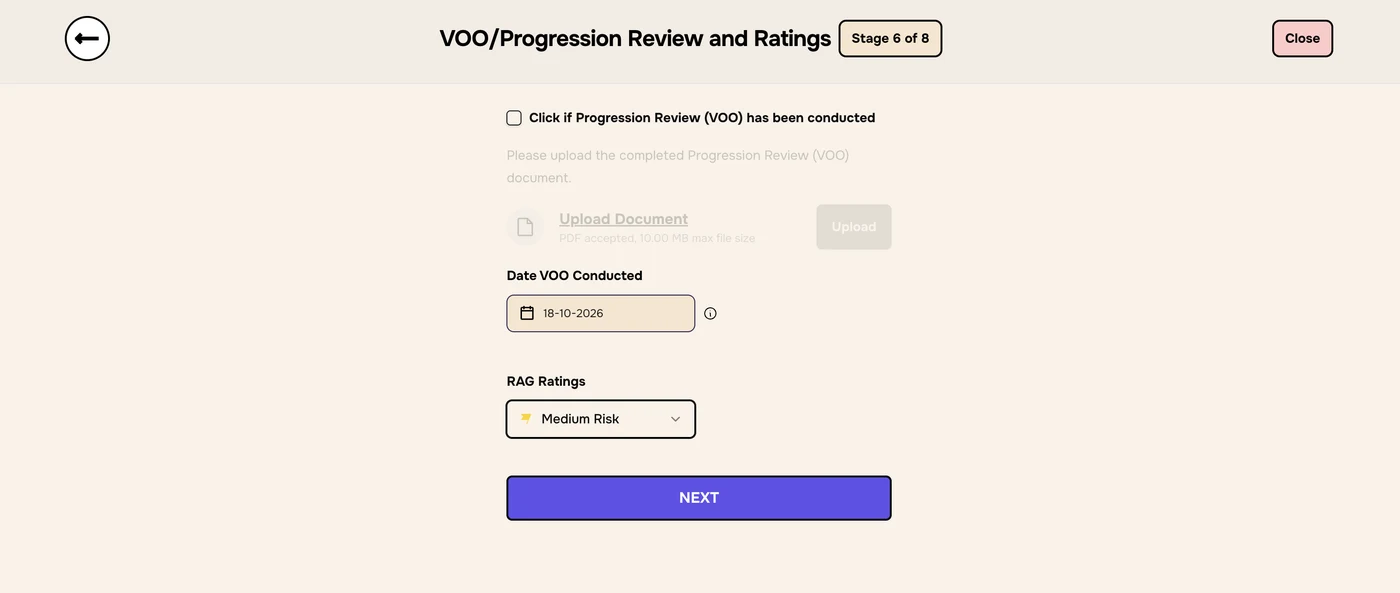
Stage 4: VOO and RAG rating
If the progression review (VOO) has already happened, tick Click if Progression Review (VOO) has been conducted. Then upload the completed VOO document, as a PDF of up to 10 MB.
Check the Date VOO Conducted. Enmero fills it in as 3 weeks after the Service Actual Start Date. For example, a start date of 05-09-2026 gives 26-09-2026.
Under RAG Ratings, choose a rating.
Click NEXT.
The upload turns on when you tick the box.
8
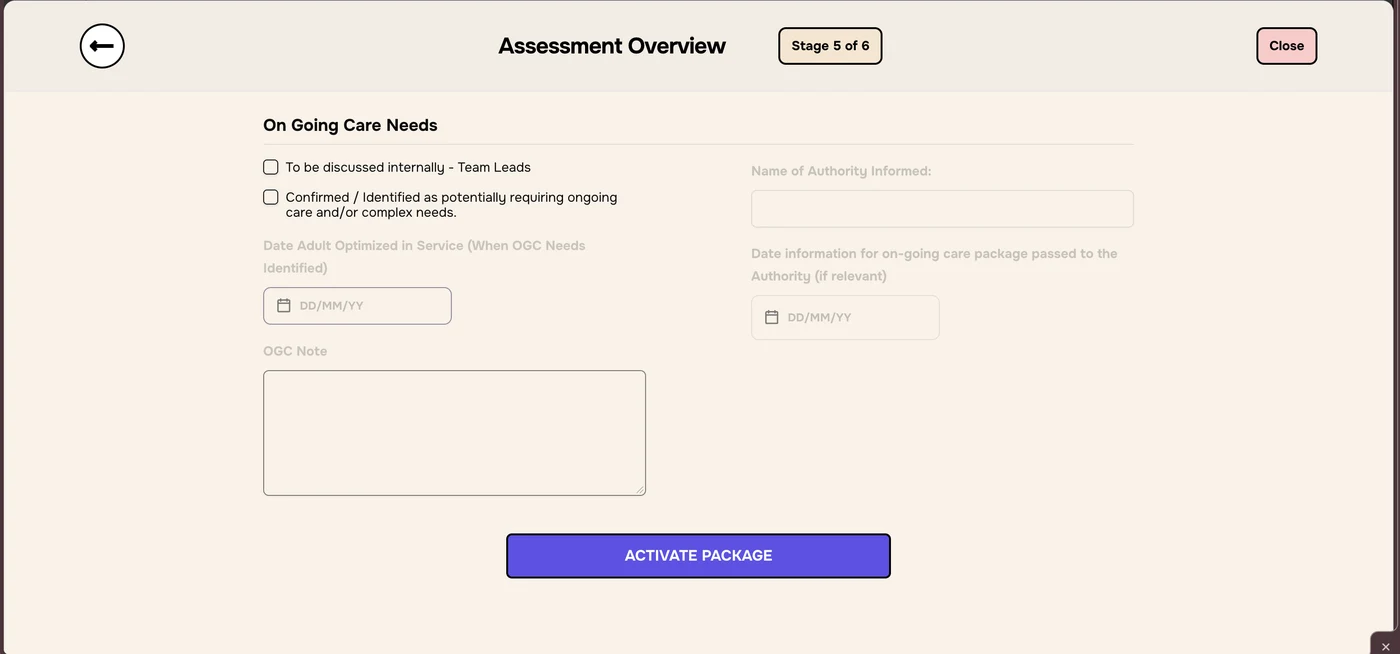
Stage 5: assessment overview
Fill in On Going Care Needs in the same way as for a new package:
tick To be discussed internally - Team Leads and Confirmed / Identified as potentially requiring ongoing care and/or complex needs if they apply.
add the Date Adult Optimized in Service, an OGC Note, and the authority details if they apply.
Stage 5 of 6.
Click ACTIVATE PACKAGE to go on to the last stage.
9
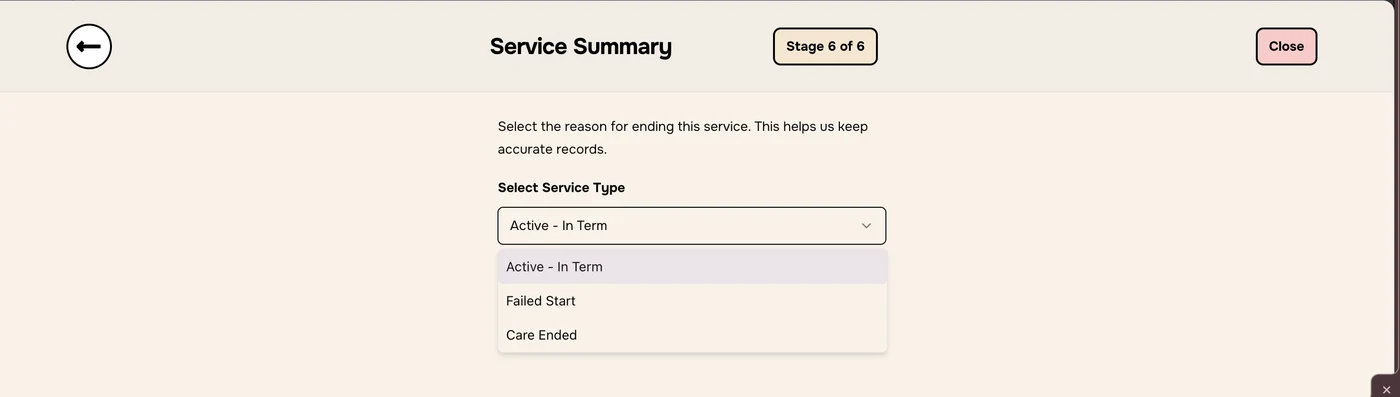
Stage 6: service summary
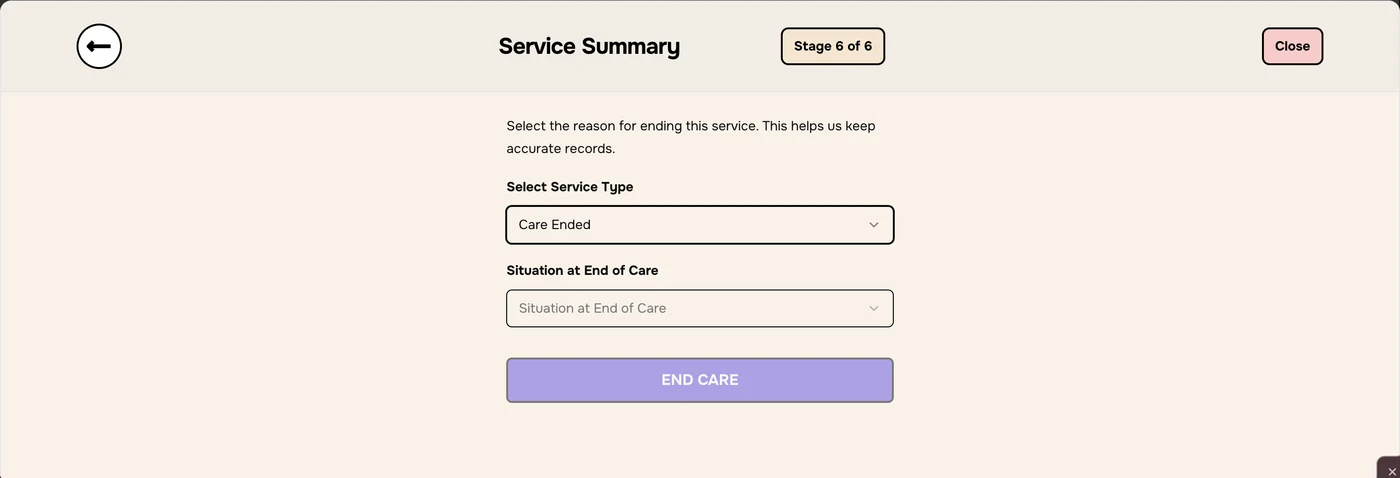
Stage 6 of 6 sets the package’s status. Under Select Service Type, choose one of these:
Active - In Term: the package started before it was entered and is still running.
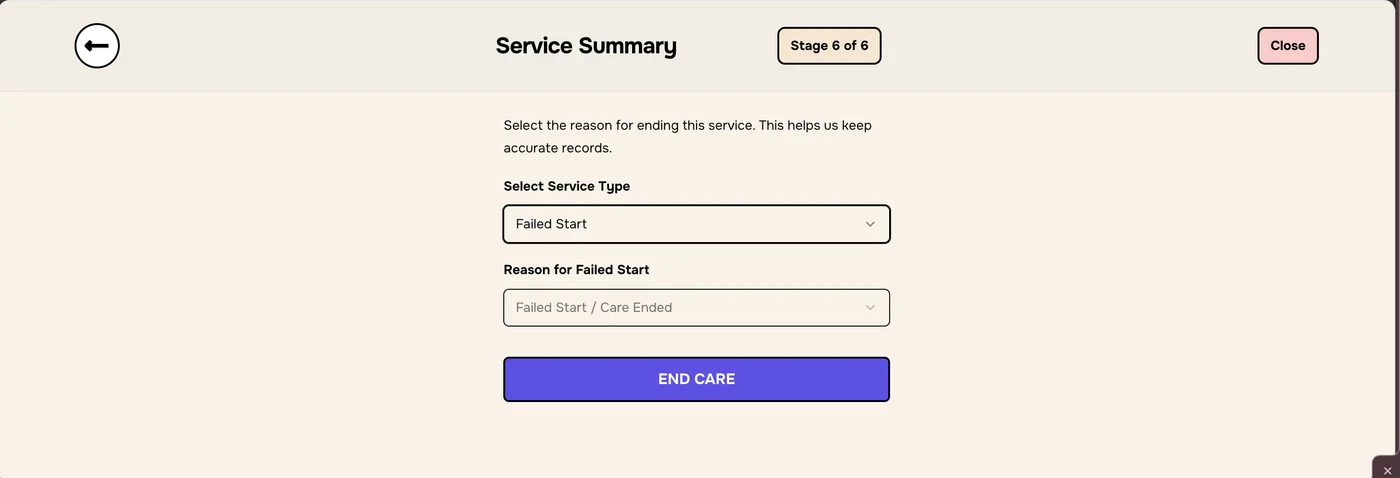
Failed Start: the package didn’t start. Choose a Reason for Failed Start, for example Declined by Adult at First Visit or Not Medically Fit. The full list is in Add service user record.
Care Ended: the package has finished. Choose the Situation at End of Care.
The three service types.
Situation at End of Care
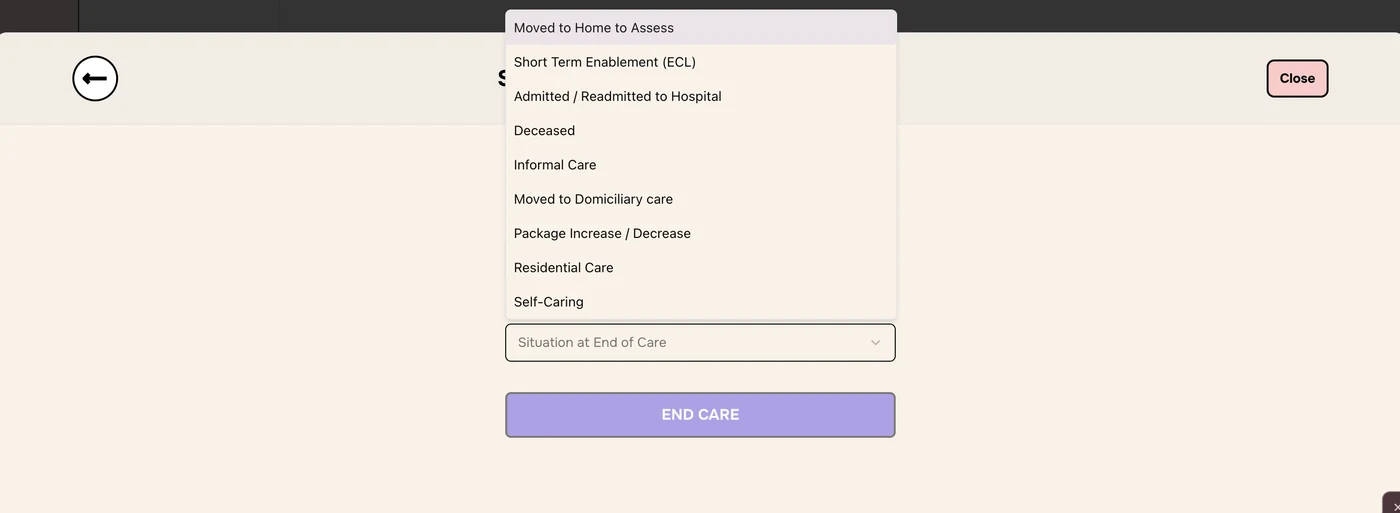
For Care Ended, choose one of these options:
Moved to Home to Assess
Short Term Enablement (ECL)
Admitted / Readmitted to Hospital
Deceased
Informal Care
Moved to Domiciliary care
Package Increase / Decrease
Residential Care
Self-Caring
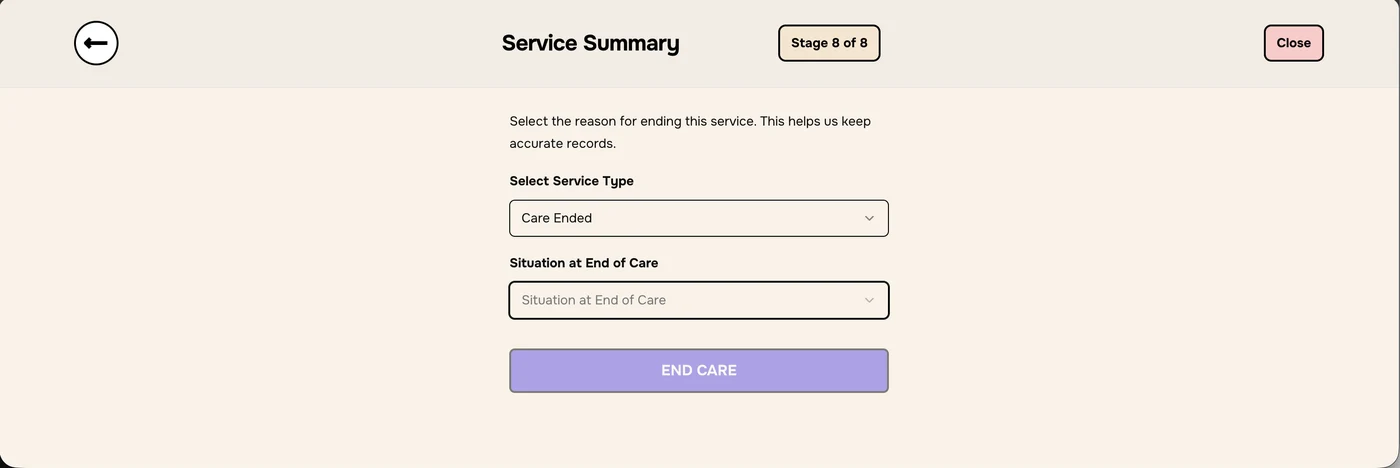
END CARE stays greyed out until you choose a situation.The Situation at End of Care options.
Failed Start asks for a reason.
For Active - In Term, click SAVE RECORD. For Failed Start or Care Ended, click END CARE (also called End Package of Care, or END POC). The record then appears in the package list with the status you chose.
Troubleshooting
Should I use Add Package Record or Add New Service Package?
Use Add Package Record for a package that has ended, was a failed start, or has already started. Use Add New Service Package for a new or upcoming package.
NEXT stays light purple on stage 3
Set up the most recent plan’s schedule and care type. At least one plan must start on the Service Actual Start Date. Complete any Package History row you added, or delete it.
I can’t choose a date in Effective Start Date
Some dates are greyed out and can’t be chosen. Choose a date within the package’s service period.
END CARE is greyed out
Choose a Situation at End of Care, or a Reason for Failed Start, first.
“User already has an active Reablement service package”
A service user can only have one active Reablement package at a time. You can’t record a second active one. Check the package list.
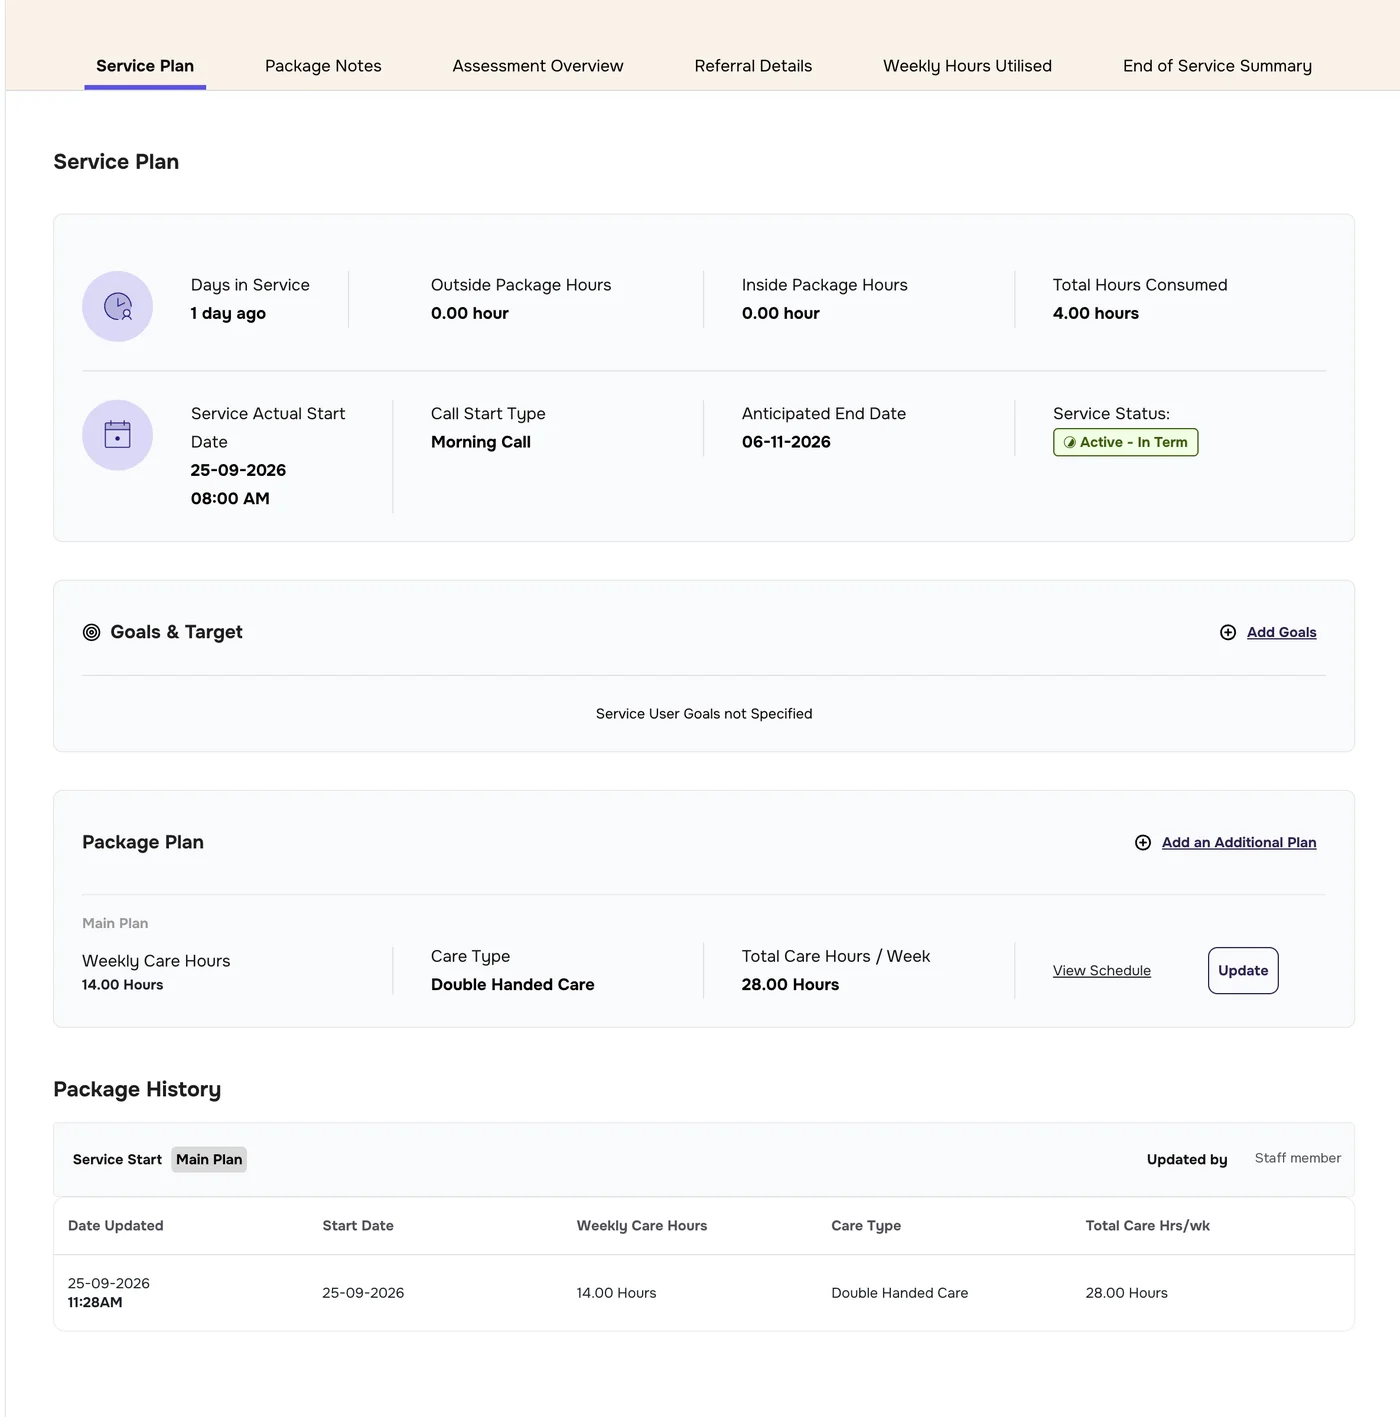
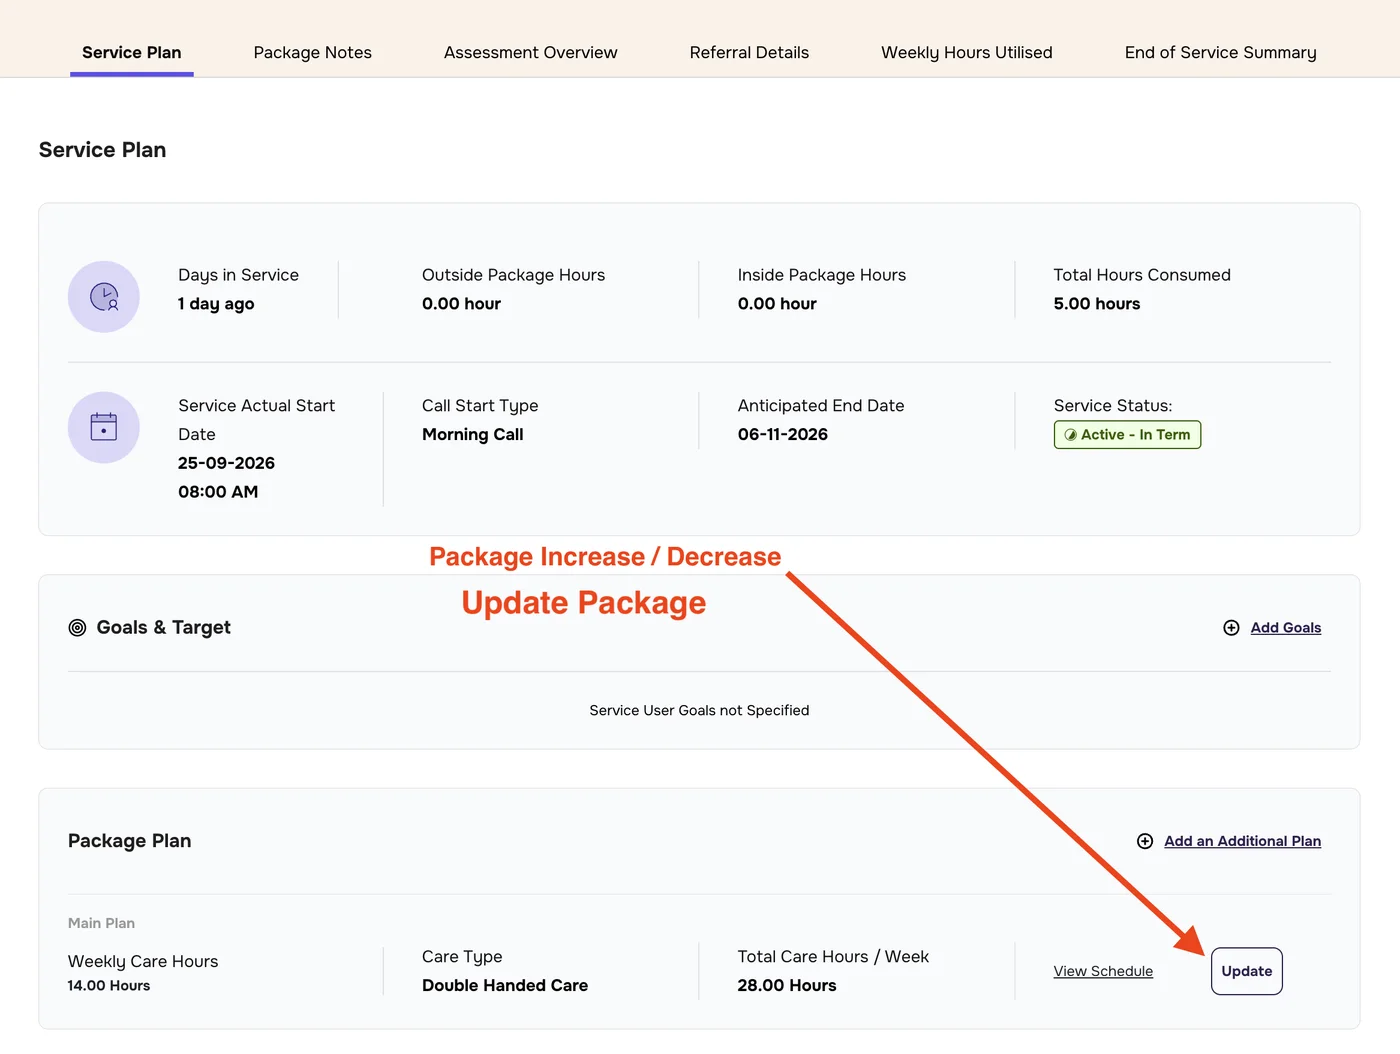
The Service Plan tab of a package: its summary, goals, plans and history. Use it to increase or decrease a package, add an additional plan, or deactivate a paired plan.
1
Open the Service Plan
Open the service user’s profile and click Service Package in the menu on the left.
Click View Package on the package you want.
The package opens on the Service Plan tab. The other tabs are Package Notes, Assessment Overview, Referral Details, Weekly Hours Utilised and End of Service Summary.
The Service Plan tab. The staff name is replaced.
2
Service summary
The box at the top of the Service Plan shows:
Figure
What it shows
Days in Service
How long ago care started
Outside Package Hours
Extra hours delivered outside the package
Inside Package Hours
Extra hours added inside the package
Total Hours Consumed
All care hours delivered so far
Service Actual Start Date
The date and time care actually started
Call Start Type
The first call, for example Morning Call
Anticipated End Date
When care is expected to end
Service Status
For example Active - In Term
3
Add goals and targets
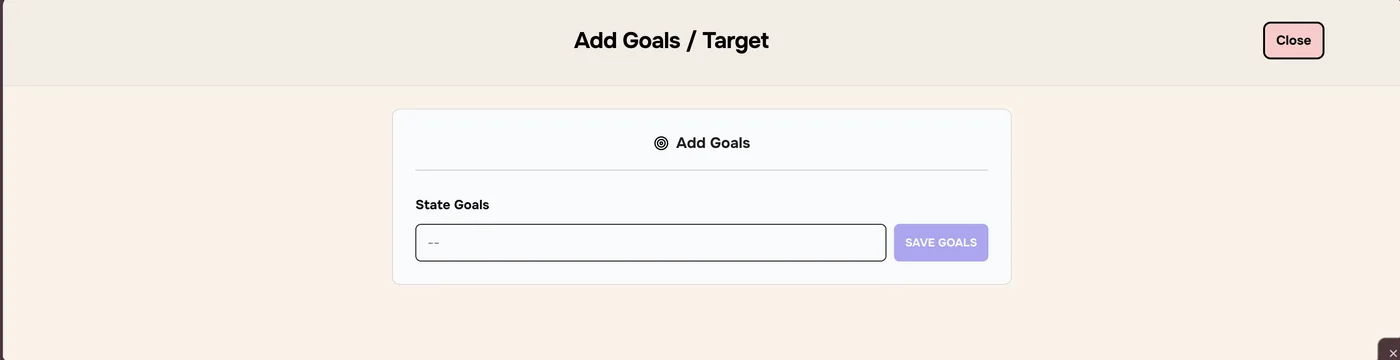
Goals & Target records what the service user is working towards. Until goals are added it says “Service User Goals not Specified”.
Click Add Goals at the top right of the Goals & Target box.
Type the goals in State Goals.
Click SAVE GOALS. It stays greyed out until you type something.
Click Add Goals.The Add Goals / Target window.
4
Read the Package Plan
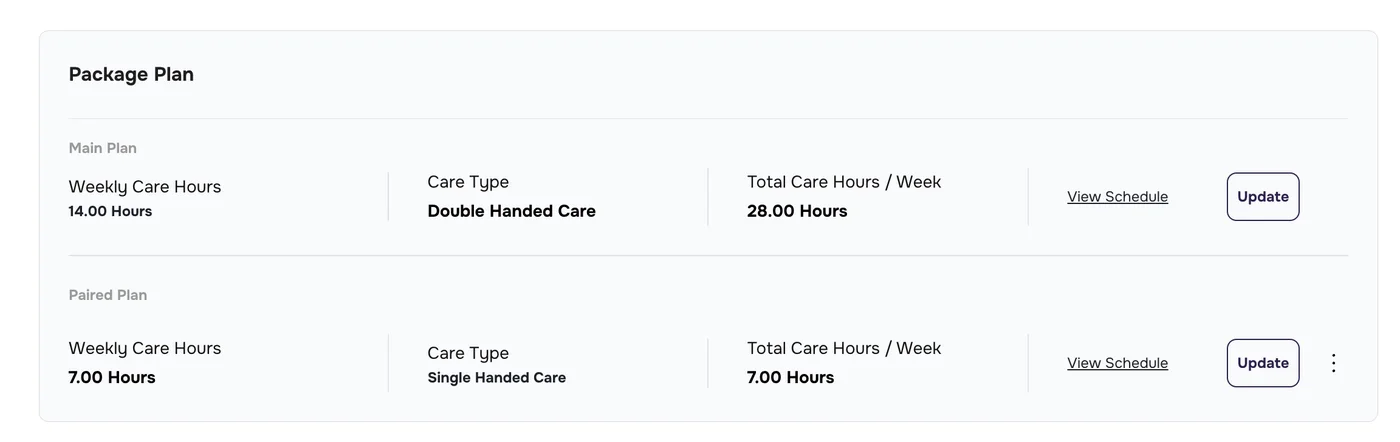
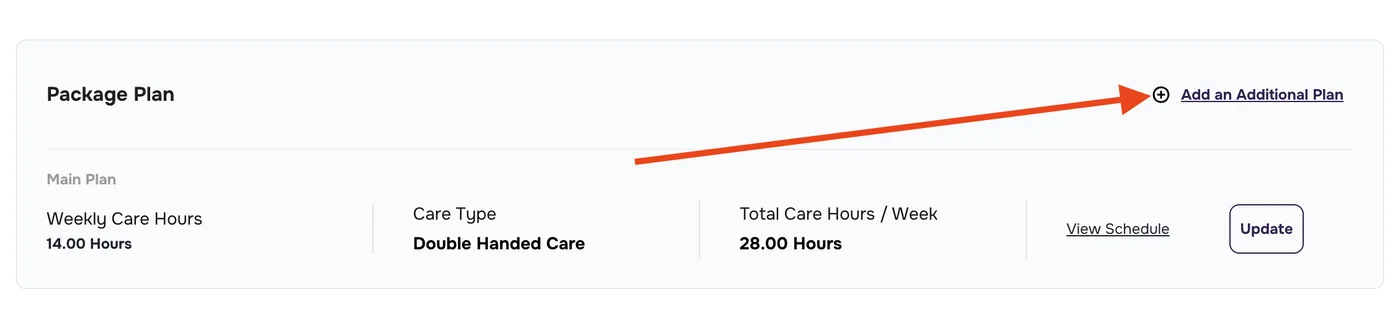
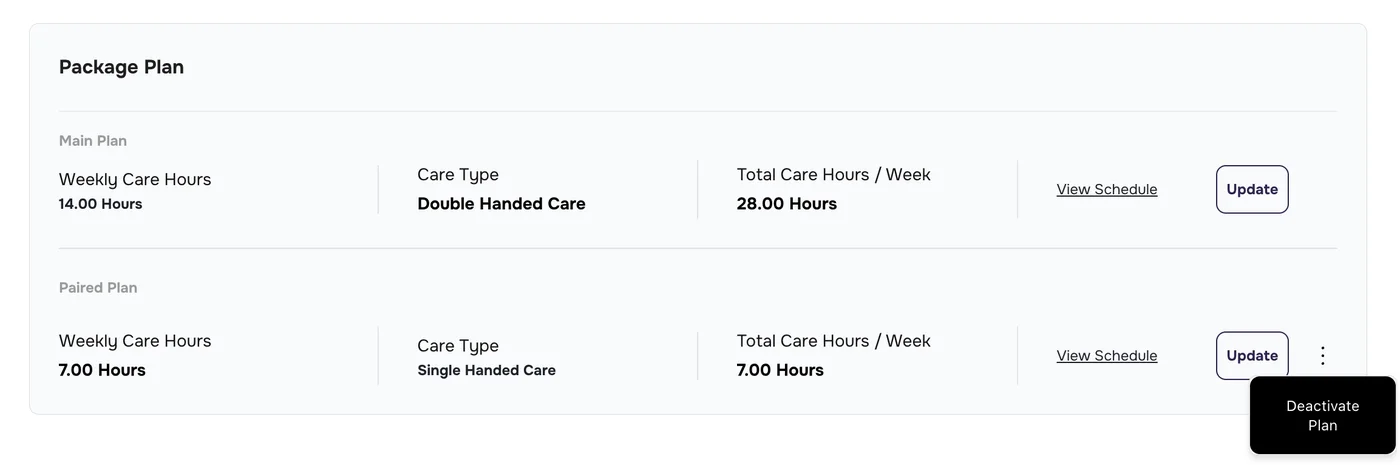
The Package Plan box lists the plans in this package. Every package has a Main Plan. It can also have a Paired Plan running at the same time.
Each plan shows:
Weekly Care Hours: the hours in its weekly schedule.
Care Type: Single, Double or Triple Handed Care.
Total Care Hours / Week: weekly hours multiplied by the number of carers. For example, 14 hours of Double Handed Care is 28 hours.
A Main Plan and a Paired Plan.
View a plan’s schedule
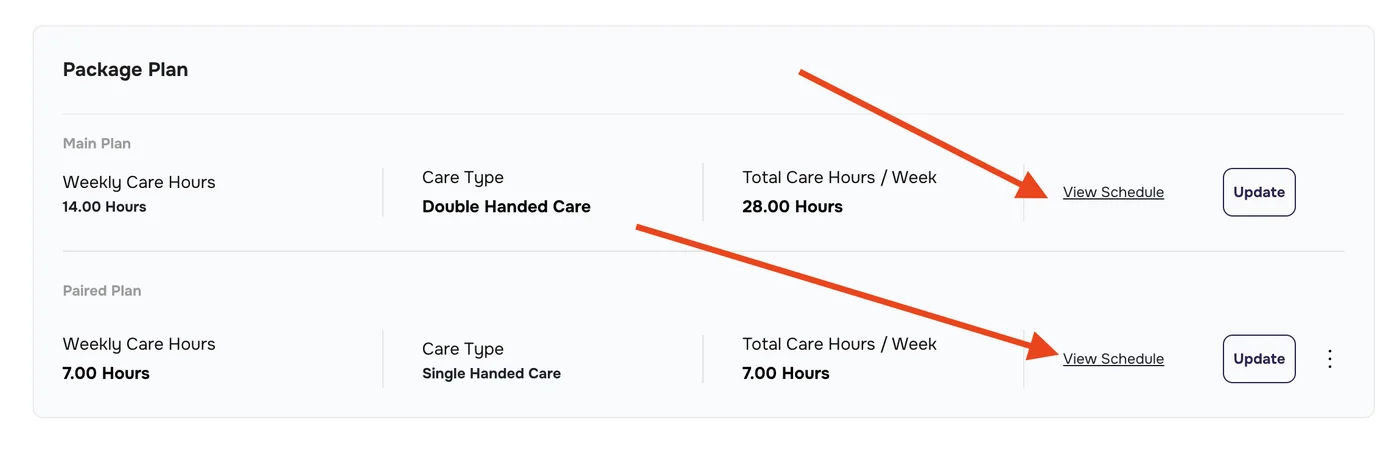
Click View Schedule on the plan.
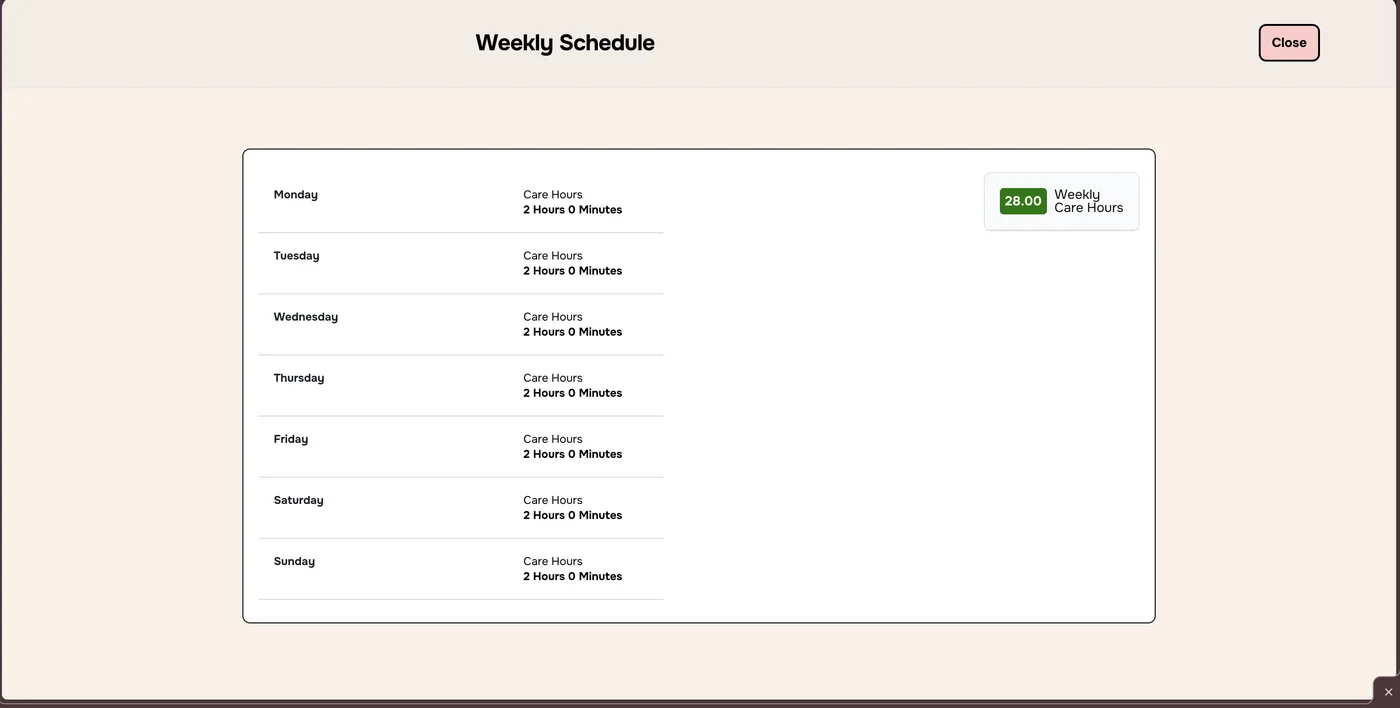
The Weekly Schedule shows the care hours for each day and the weekly total. Click Close when you’ve finished.
Each plan has its own View Schedule link.A plan’s weekly schedule.
5
Increase or decrease a package
Use this when a service user needs more or fewer care hours, or a change to which days they get care. This is a package increase or decrease.
In the Package Plan, click Update on the plan you want to change.
Click Update on the plan to change it.
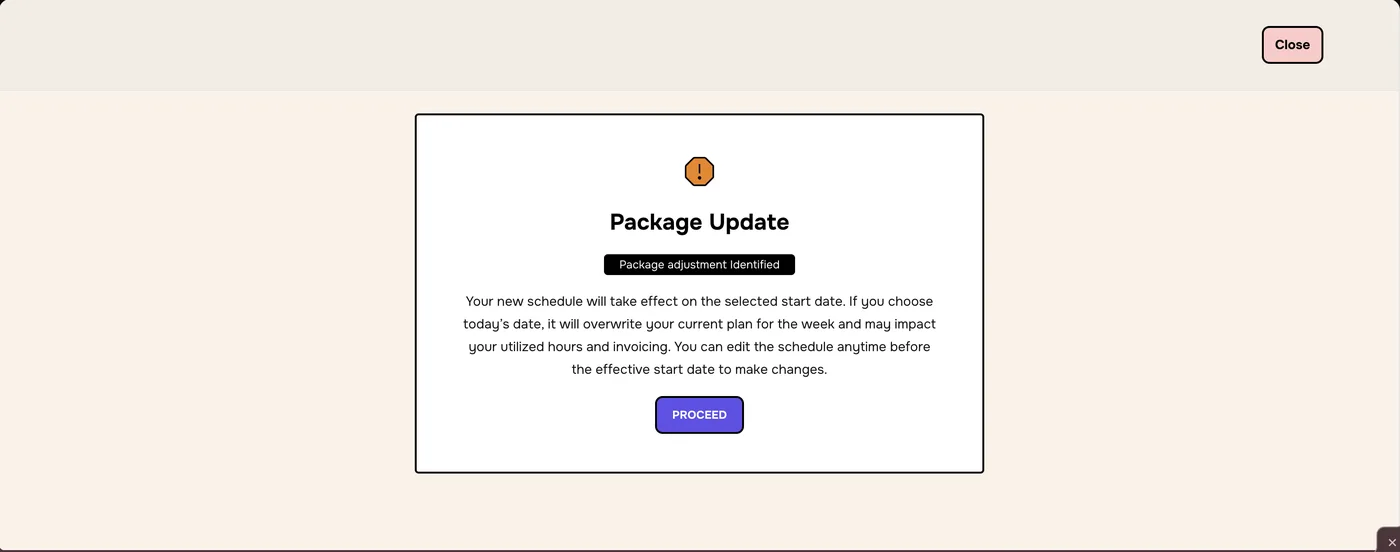
The Package Update notice explains that the new schedule starts on the start date you choose. Read it, then click PROCEED.
Read the notice before you change the schedule.
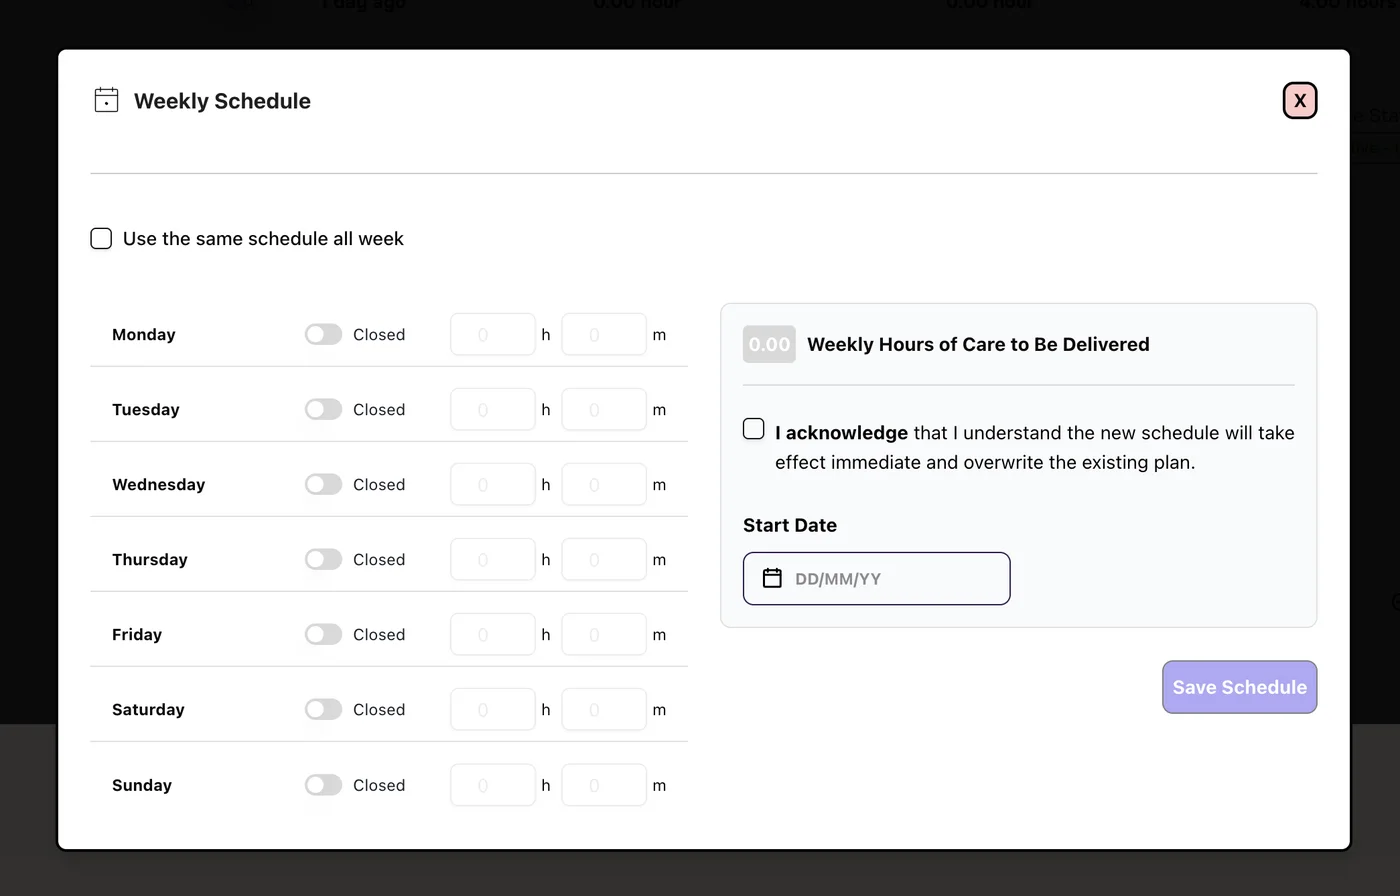
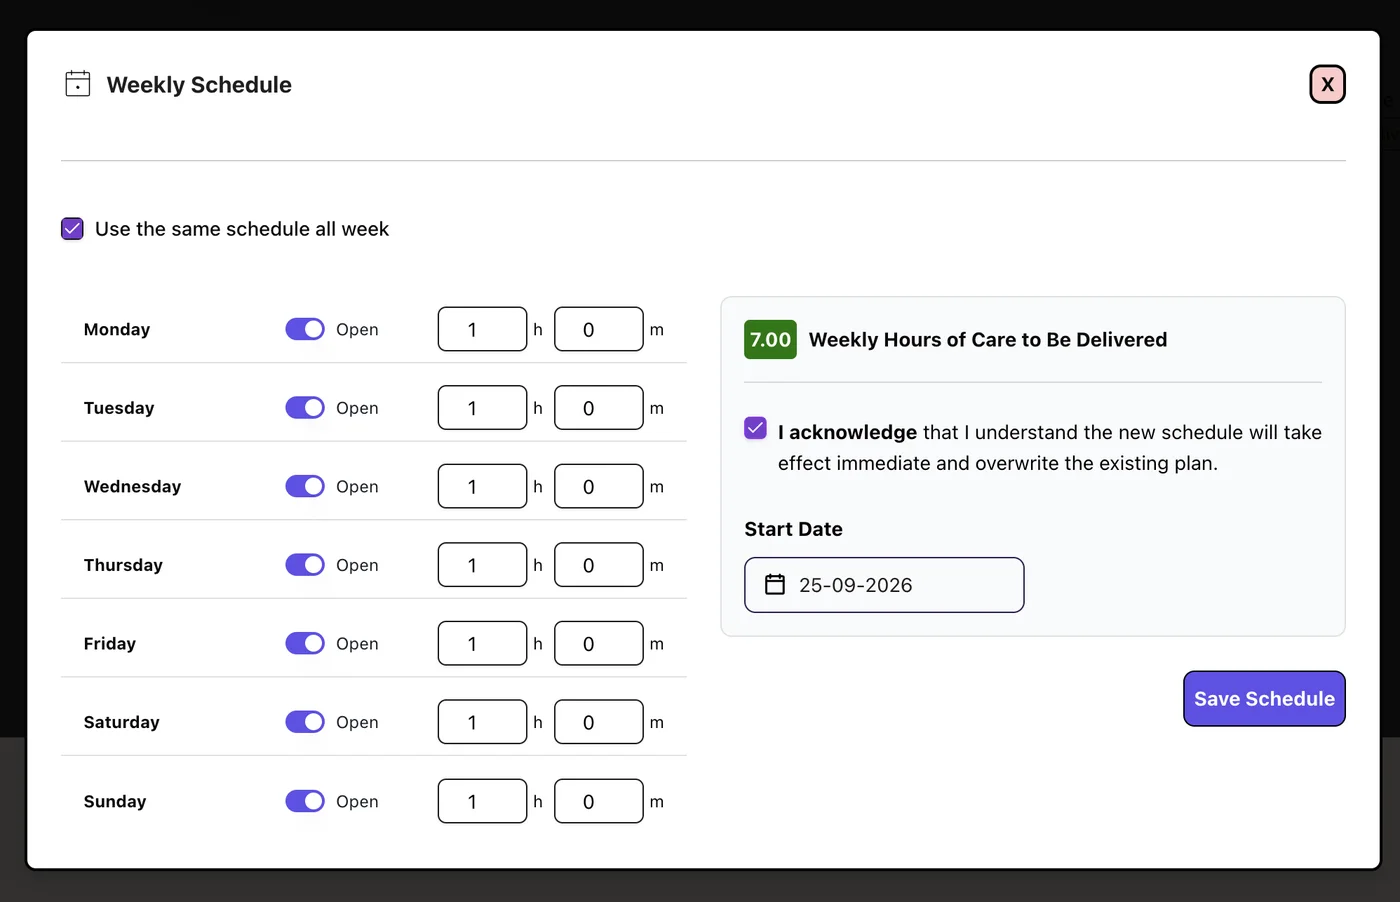
In the Weekly Schedule, set the new hours:
Switch each care day to Open and enter its hours (h) and minutes (m). Leave days with no care as Closed.
Tick Use the same schedule all week if every day is the same.
Check the new total in Weekly Hours of Care to Be Delivered.
Tick I acknowledge to confirm you understand the new schedule overwrites the existing plan.
Choose the Start Date: the date the new hours take effect.
Click Save Schedule. It stays greyed out until you’ve ticked I acknowledge and chosen a start date.
Before: every day closed.After: 1 hour a day, 7 hours a week.
This affects invoices and utilised hoursIf you choose today as the start date, the new schedule overwrites the current plan for this week and may change utilised hours and invoicing. Choose a future date if the change starts later. You can edit the schedule any time before the start date.
The change is recorded in .
6
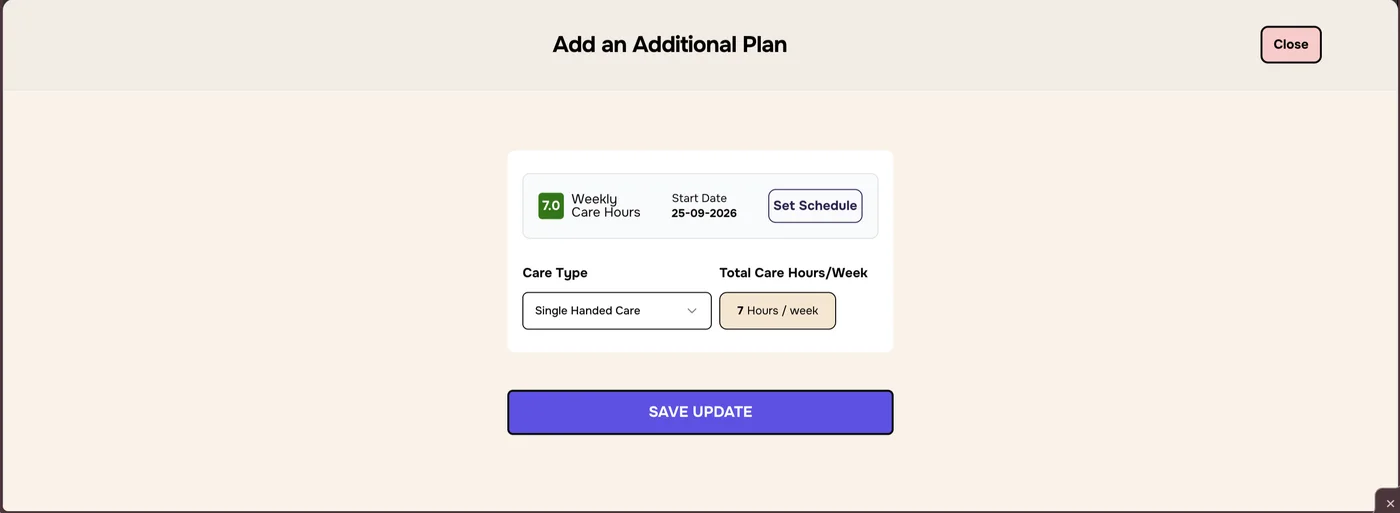
Add an additional plan
Add a second plan when the service user needs care that runs alongside the main plan, for example some calls with a different care type. The new plan shows as a Paired Plan. A manager needs to approve it.
In the Package Plan box, click Add an Additional Plan at the top right.
Click Add an Additional Plan.
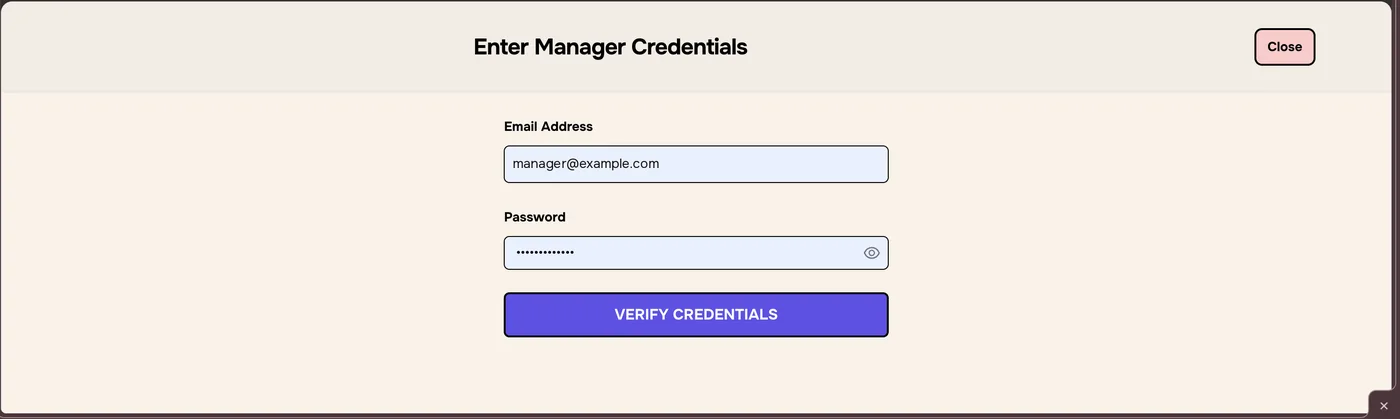
In Enter Manager Credentials, a manager enters their email address and password, then clicks VERIFY CREDENTIALS.
A manager approves the new plan. The email is an example.
In Add an Additional Plan, click Set Schedule.
Set the plan’s days and hours in the Weekly Schedule, the same way as for a . Choose the start date and save.
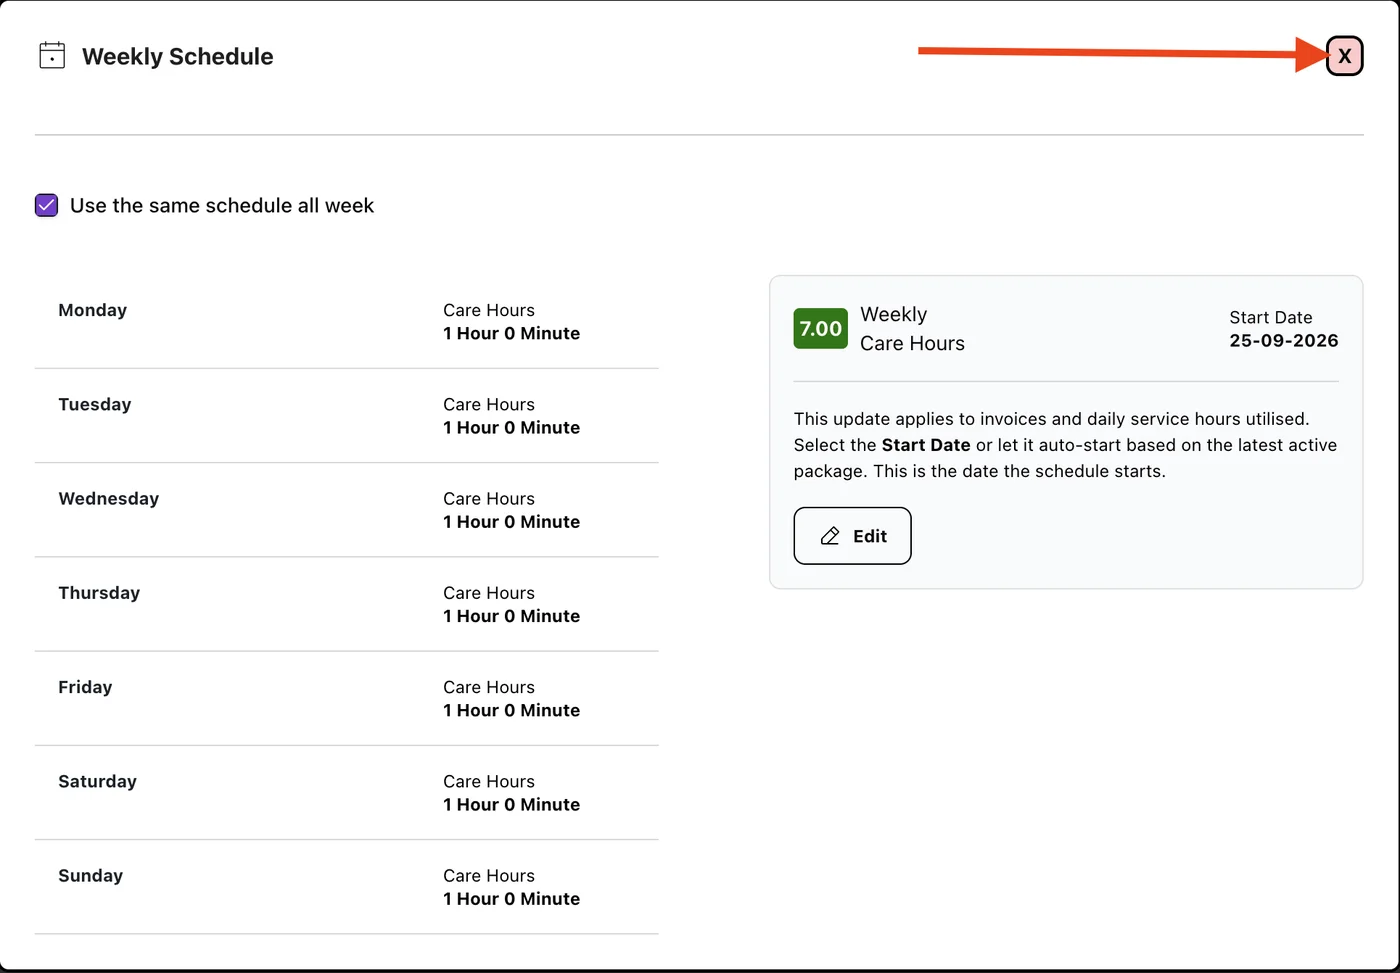
Check the schedule. To change it, click Edit. When it’s right, close it with the X at the top right.
Check the schedule, then click X.
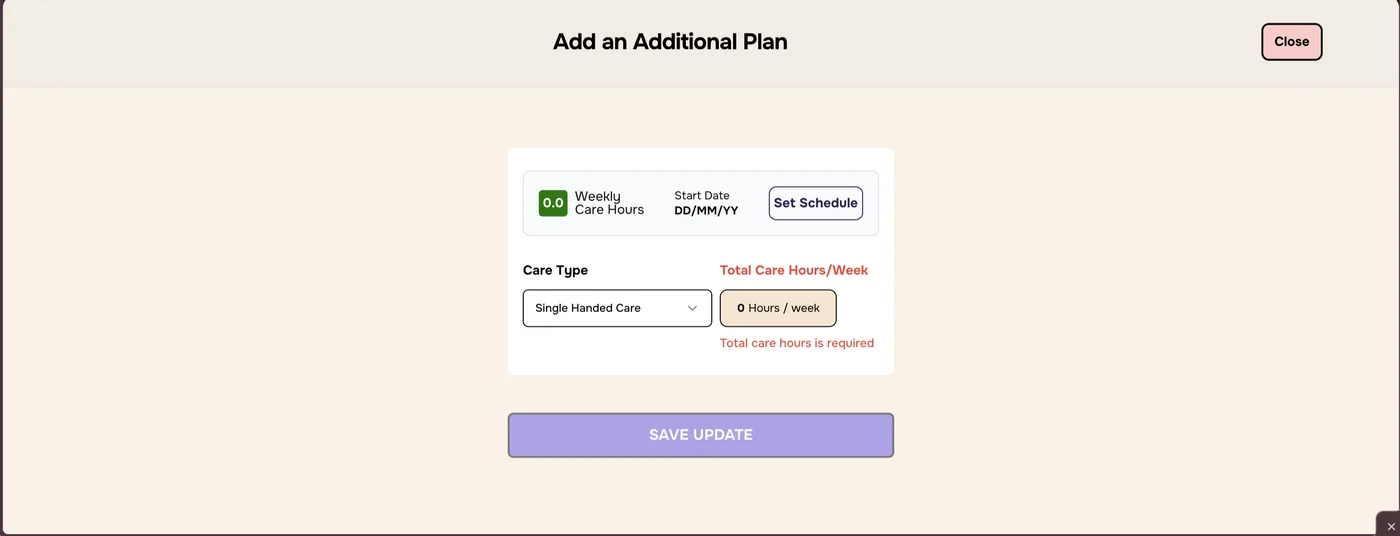
Choose the Care Type. Total Care Hours/Week updates automatically.
Click SAVE UPDATE. The Paired Plan appears in the Package Plan.
Before a schedule is set: “Total care hours is required”.Ready to save.
7
Deactivate a paired plan
Stop a paired plan when it’s no longer needed. Only paired plans have this option. The Main Plan doesn’t.
Click the ⋮ menu on the Paired Plan, then Deactivate Plan.
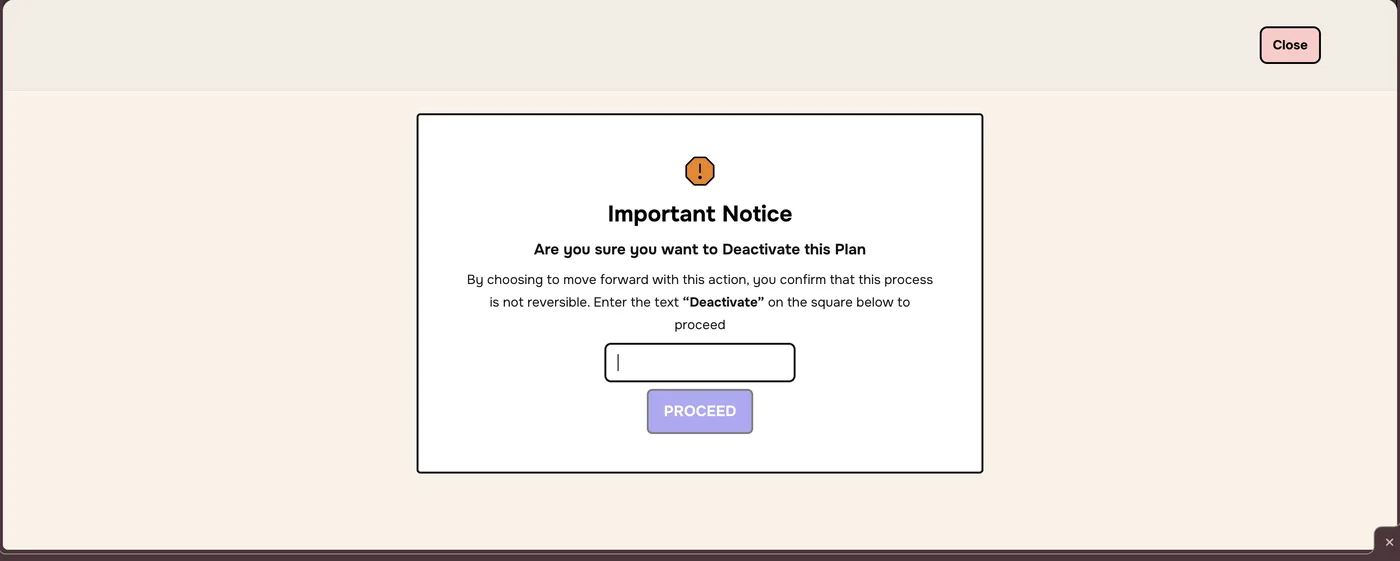
The Important Notice asks you to confirm. Type Deactivate in the box.
Click PROCEED. It stays greyed out until you type Deactivate exactly.
This can’t be undoneOnce deactivated, the paired plan stops. To restart that care, add a new additional plan.
Deactivate Plan is in the ⋮ menu of a paired plan.Type Deactivate to confirm.
8
Package History
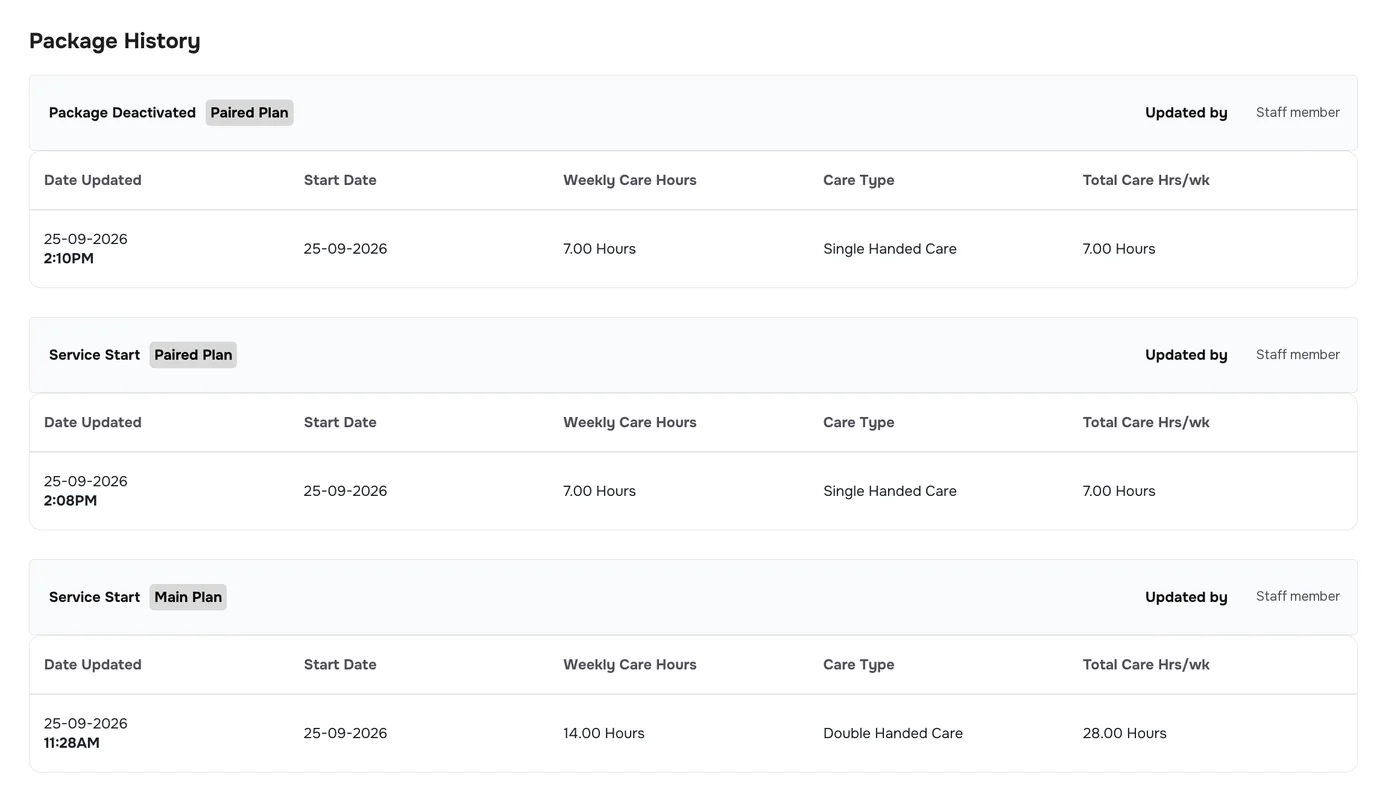
Package History, at the bottom of the Service Plan, records every change to the package, newest first. Each entry shows:
what happened, for example Service Start or Package Deactivated, and which plan it applies to: Main Plan or Paired Plan.
Updated by: who made the change.
Date Updated, Start Date, Weekly Care Hours, Care Type and Total Care Hrs/wk.
Package History. Staff names are replaced.
Troubleshooting
Save Schedule is greyed out
Tick I acknowledge and choose a Start Date. At least one day must be Open with hours entered.
“Total care hours is required”
Click Set Schedule and add the plan’s days and hours before saving the additional plan.
I can’t add an additional plan
A manager must verify with their email and password. Ask a manager to approve it.
There’s no Deactivate Plan option
Only paired plans can be deactivated. The Main Plan has no ⋮ menu.
Will changing the hours affect invoices?
Yes. The new schedule applies to invoices and daily utilised hours from the start date you choose.
The service provider’s internal notes on a package: changes and requests such as package increases or decreases, additional hours, assessment notes and reinstating a package. Editing and deleting notes is restricted to users with access.
1
Open Package Notes
Open the service user’s profile, click Service Package, then View Package on the package.
Click the Package Notes tab, next to Service Plan.
Package notes are internal notes from the service provider. Use them to record all changes and requests on a package, such as a package increase or decrease, additional hours, assessment notes, or reinstating a package. Each package has its own notes.
Package notes or ECC notes?Use package notes for anything the provider changes or requests on a package. ECC notes are for ECC teams to track service updates. See ECC Internal Note.
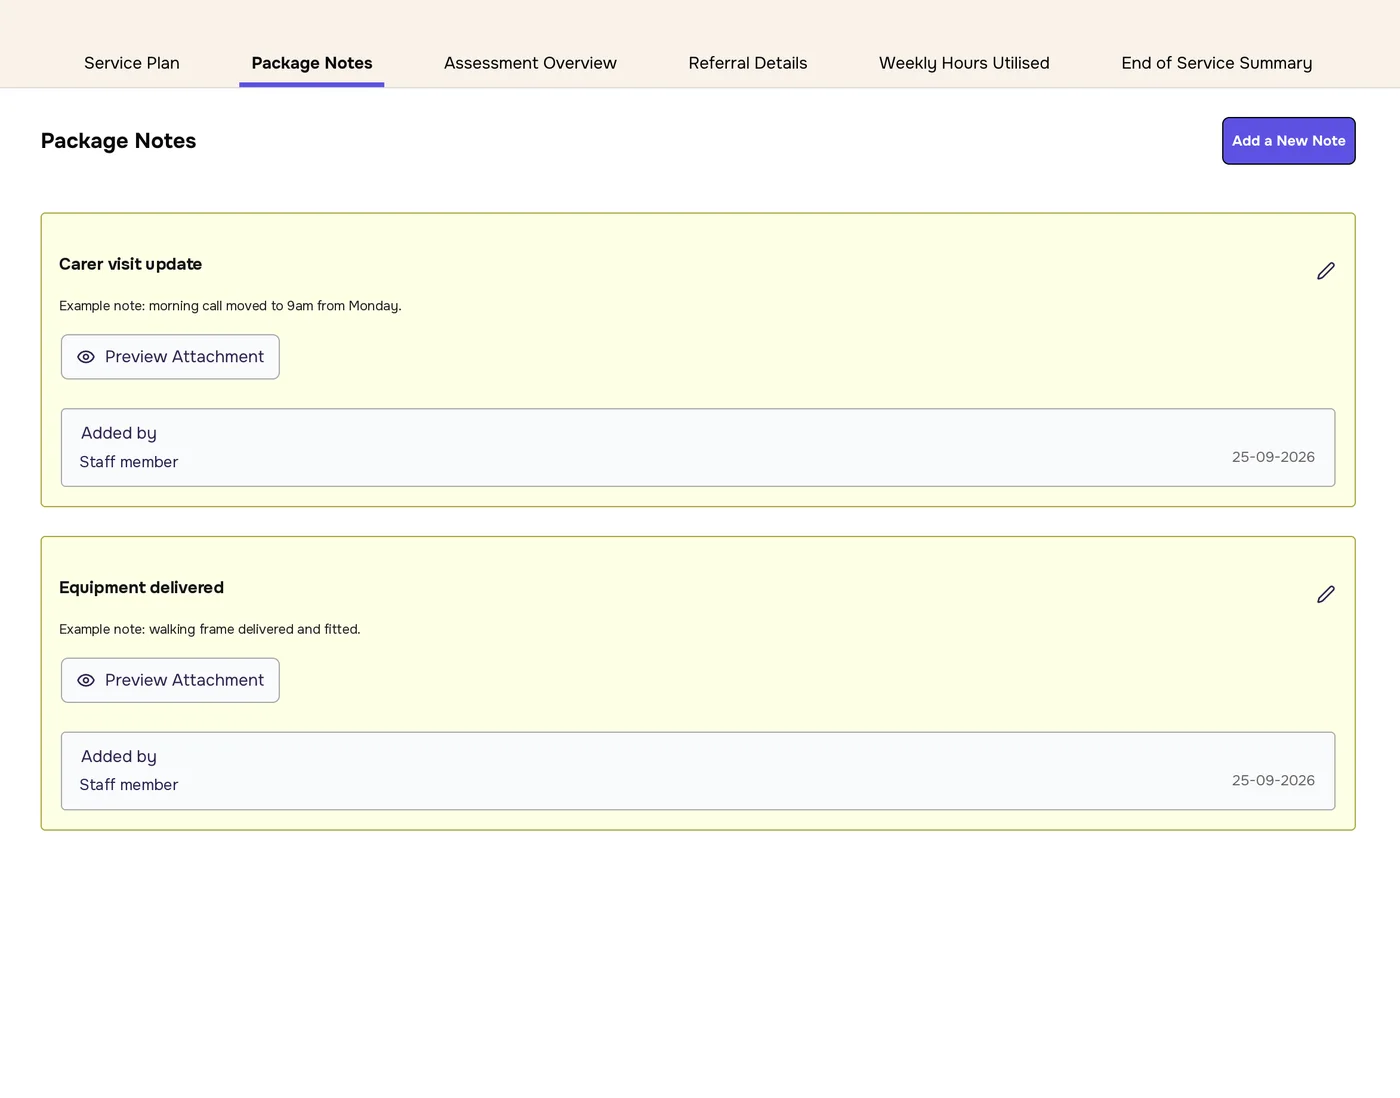
The Package Notes tab. Note text and names are examples.
2
Read a note
Notes are listed as cards. Each card shows:
the note’s title in bold, and the note underneath.
Preview Attachment: opens a file attached to the note.
Added by: who wrote the note, and the date on the right.
3
Add a note
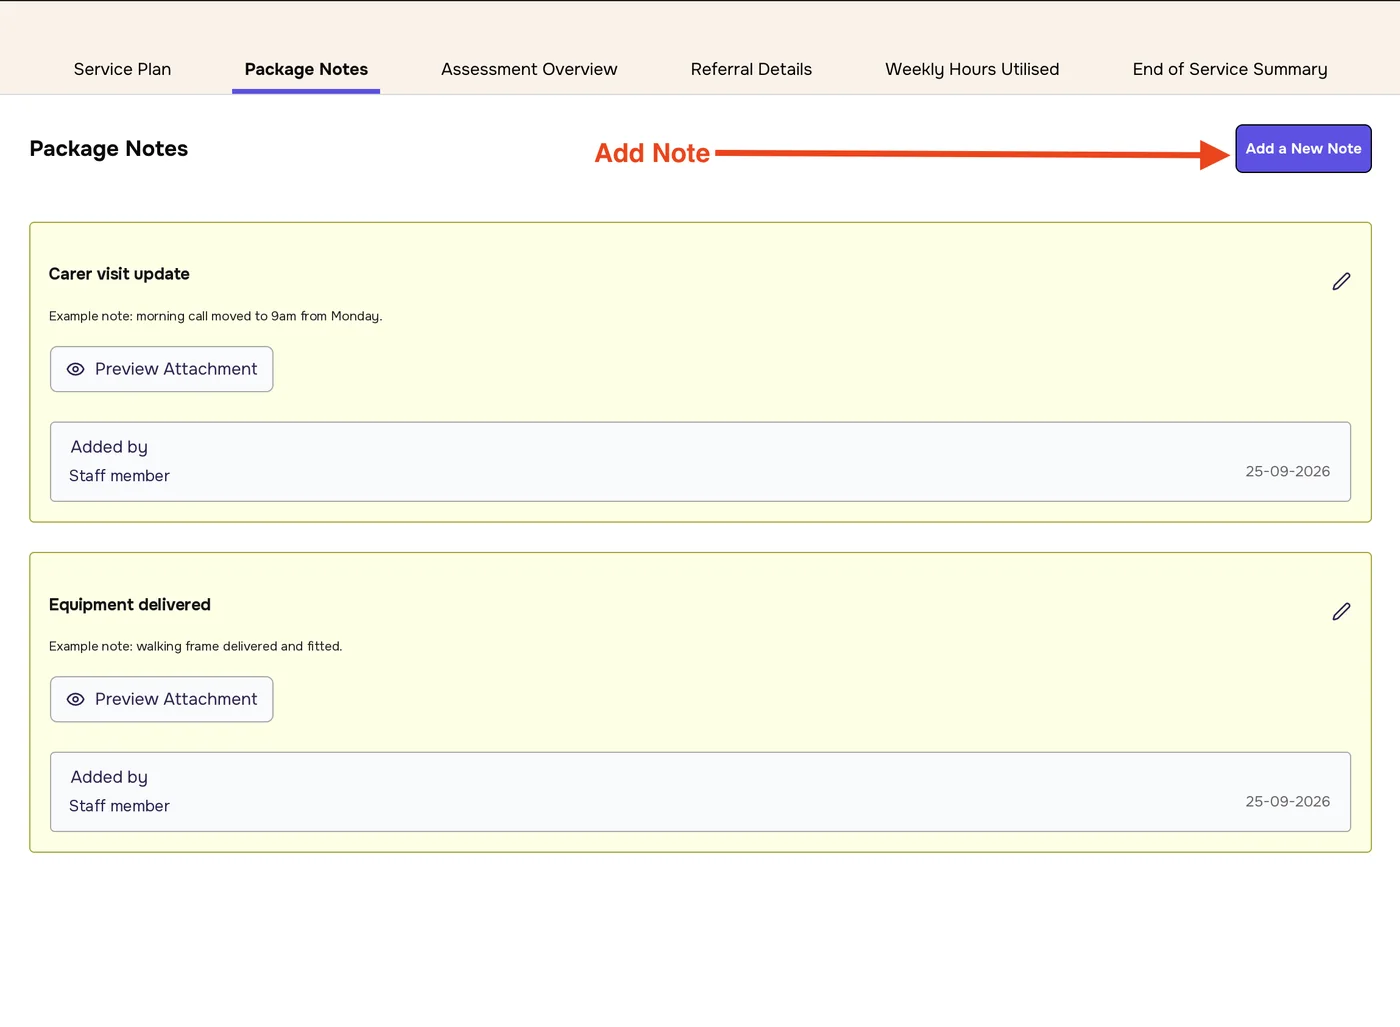
On the Package Notes tab, click Add a New Note at the top right.
Click Add a New Note. Note text and names are examples.
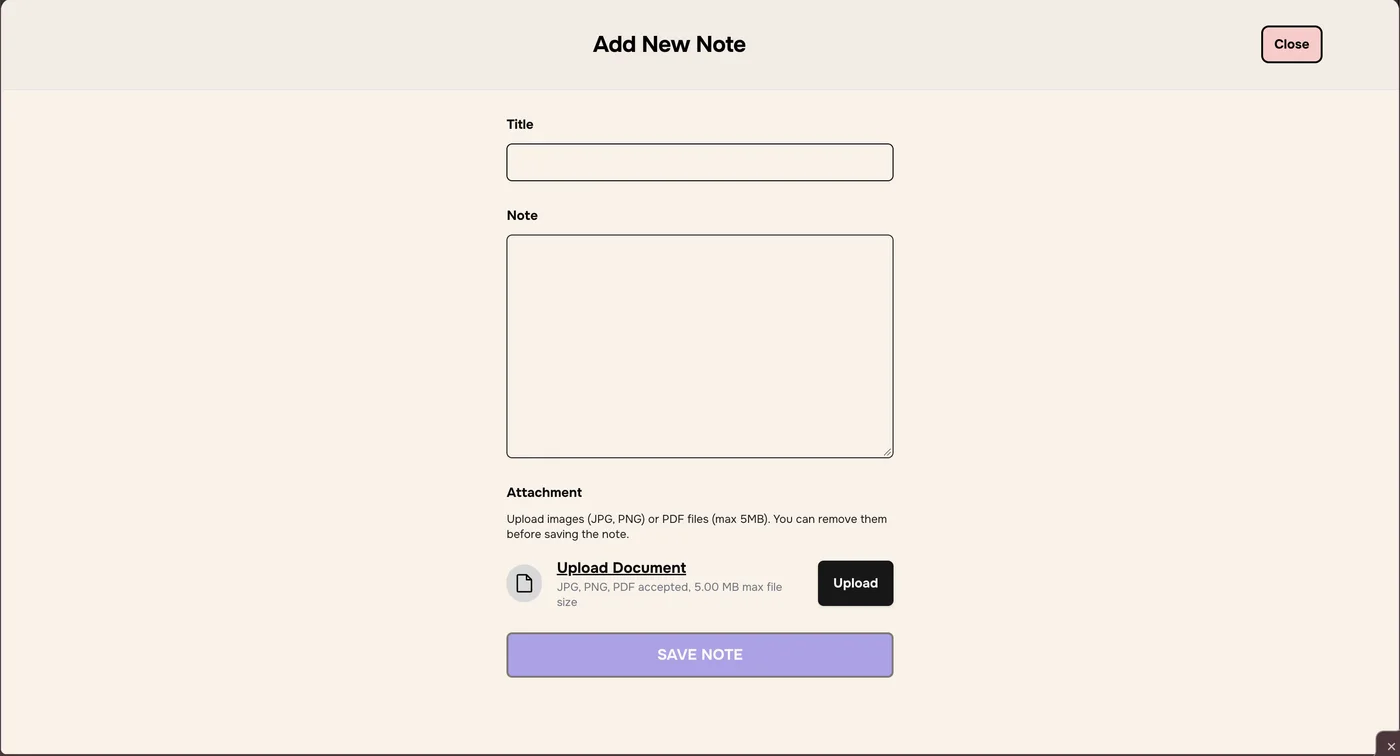
The Add New Note window opens. Type a short Title, for example “Carer visit update”.
Type the note in Note.
Optional: add an Attachment. Click Upload or Upload Document and choose the file. You can attach JPG or PNG images, or PDFs, up to 5 MB each. You can remove an attachment before you save.
Click SAVE NOTE. It stays greyed out until the title and note are filled in.
The Add New Note window.
The note appears as a new card on the Package Notes tab, with your name and today’s date. To close the window without saving, click Close.
Edit or delete a note
Restricted accessOnly a few users have access to edit or delete package notes. If you don’t see the pencil icon, or can’t save changes, ask the person who manages your organisation’s Enmero access.
If you have access, click the pencil icon at the top right of the note’s card, make your changes and save.
Troubleshooting
What’s the difference between Package Notes and ECC notes?
Package notes are the service provider’s internal notes on a package: changes and requests such as package increases or decreases, additional hours, assessment notes and reinstating a package. ECC notes are for ECC teams, mainly to track updates on the service.
The attachment won’t open
Click Preview Attachment again. If nothing opens, check whether your browser is blocking pop-ups.
My attachment won’t upload
Only JPG, PNG and PDF files up to 5 MB are accepted. Save the file in one of those formats, or reduce its size, and try again.
SAVE NOTE is greyed out
Fill in both the Title and the Note.
I can’t edit or delete a note
Editing and deleting package notes is restricted to a few users. Ask the person who manages your organisation’s Enmero access.
I can’t find a note
Notes belong to a package. Check you’ve opened the right package from the Service Package page.
The assessment tab on a service package: the assigned assessor, the progression review, On Going Care (OGC) needs, and the care plan and risk assessments.
1
Open Assessment Overview
Open the service user’s profile, click Service Package, then View Package on the package.
Click the Assessment Overview tab.
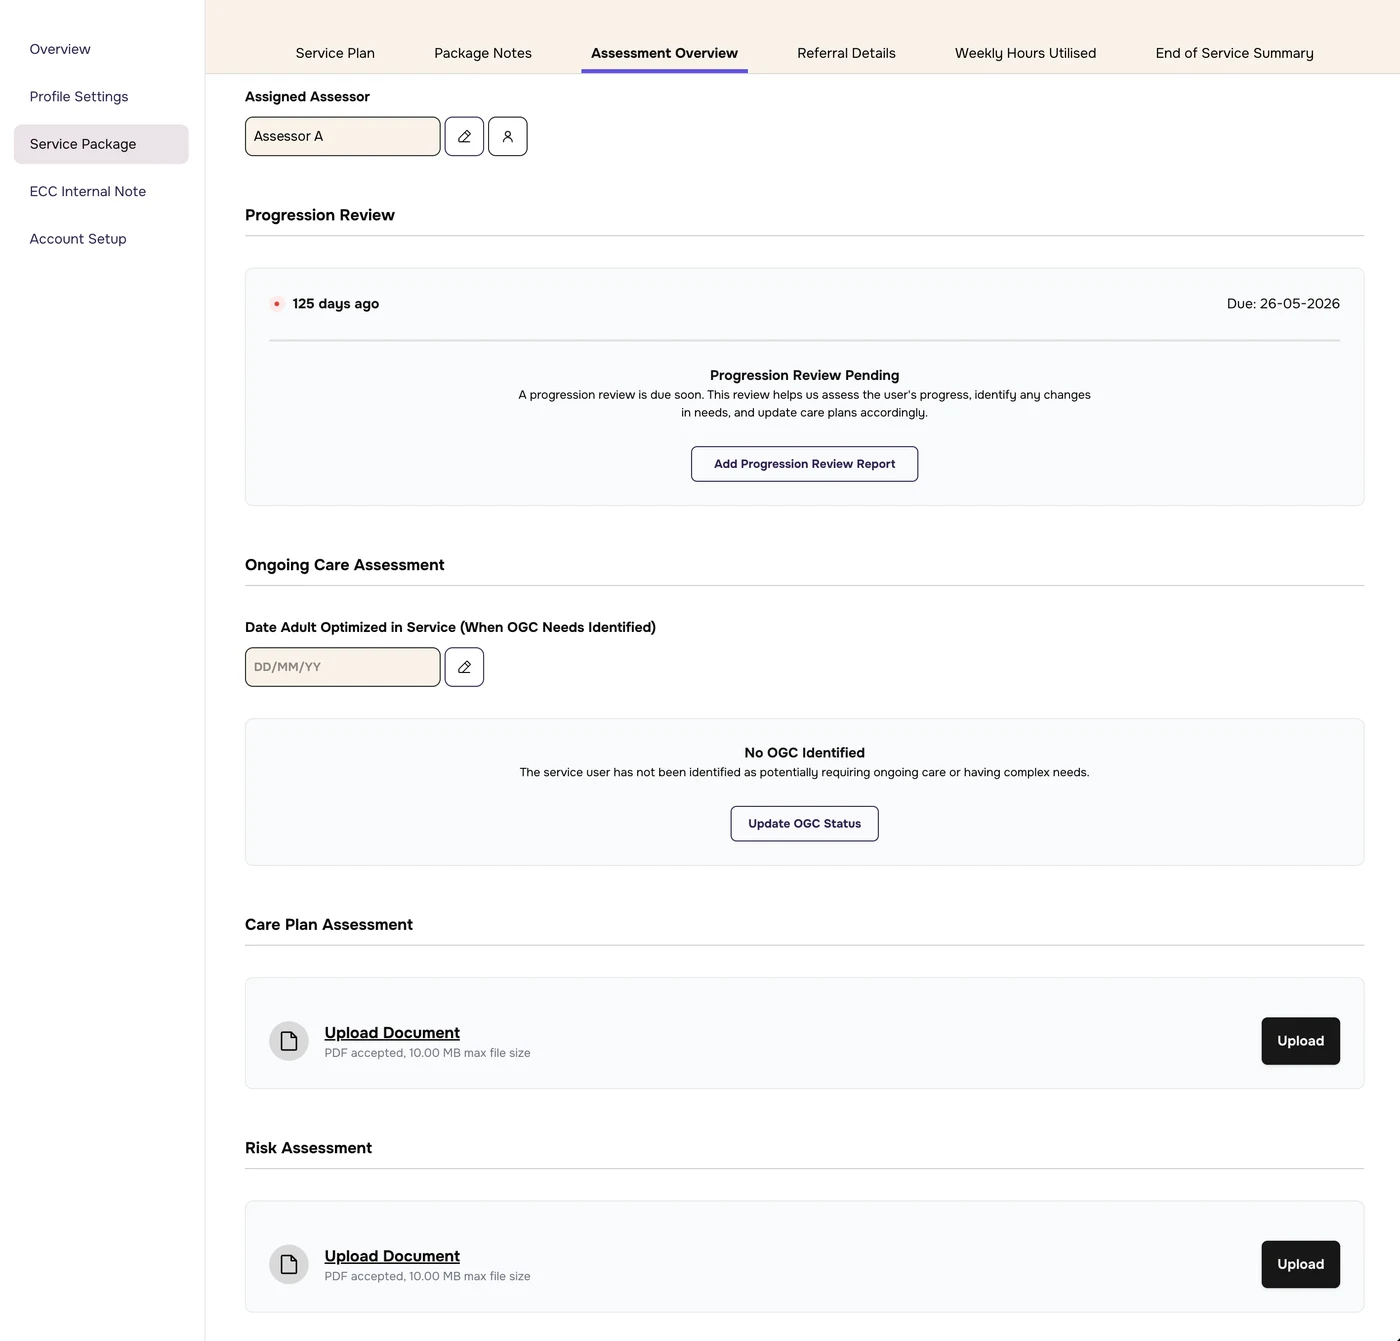
The tab has five parts, from top to bottom:
Assigned Assessor
Progression Review: the VOO
Ongoing Care Assessment: On Going Care (OGC)
Care Plan Assessment
Risk Assessment
Assessment Overview before anything has been added. The assessor’s name is replaced.
2
Change the assessor
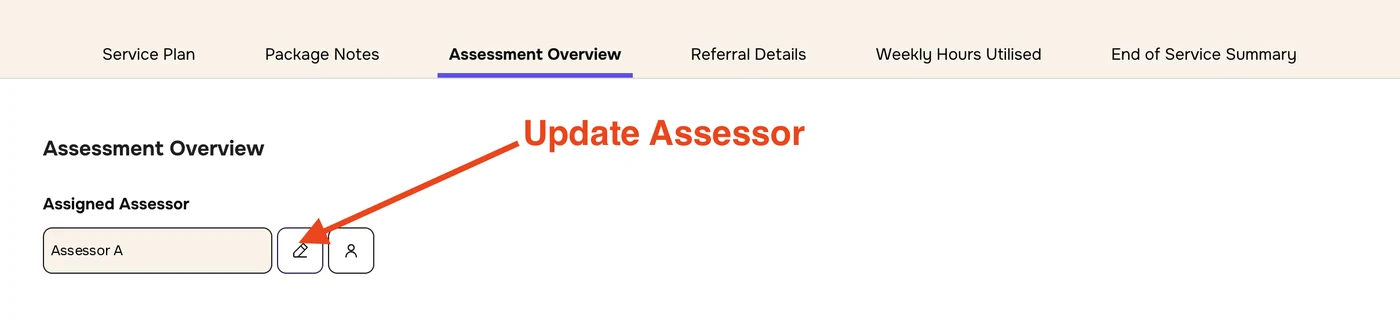
Click the pencil icon next to the assessor’s name.
The field turns into a Select assessor menu. Choose the new assessor.
Click Save Changes.
A green message confirms: “Account Updated successfully”.
Click the pencil icon.Choose the assessor, then Save Changes.
3
Contact the assessor
Click the person icon next to the assessor’s name.
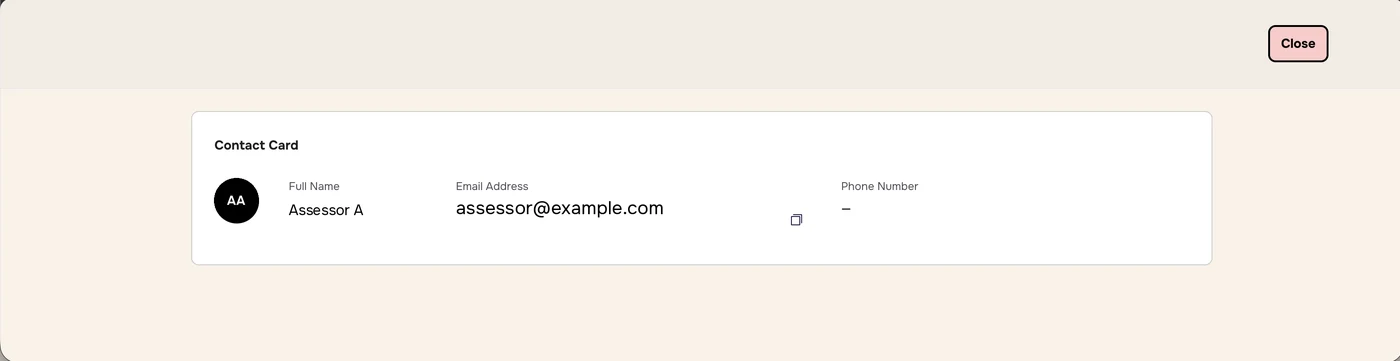
The Contact Card shows their Full Name, Email Address and Phone Number. A “–” means no phone number is saved.
Click the copy icon to copy the email address. Click Close when you’re done.
Click the person icon.The Contact Card. Details are replaced.
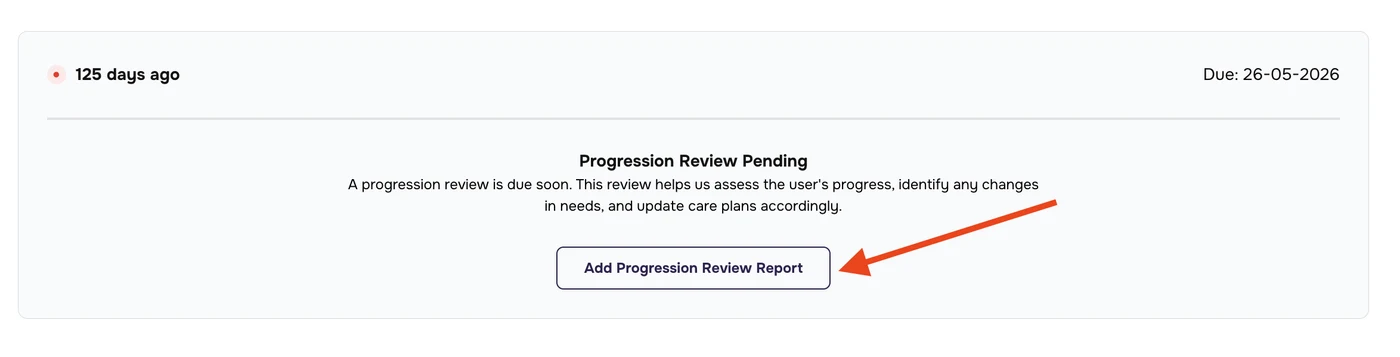
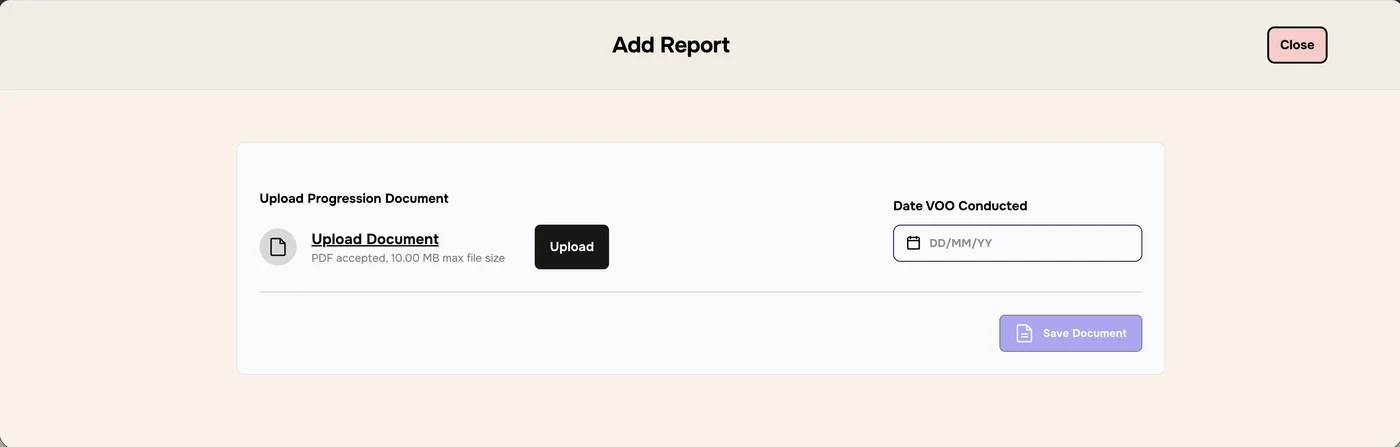
Until a review is added, the card shows Progression Review Pending and the due date. A red dot and a count, for example “125 days ago”, mean the review is overdue.
Click Add Progression Review Report.
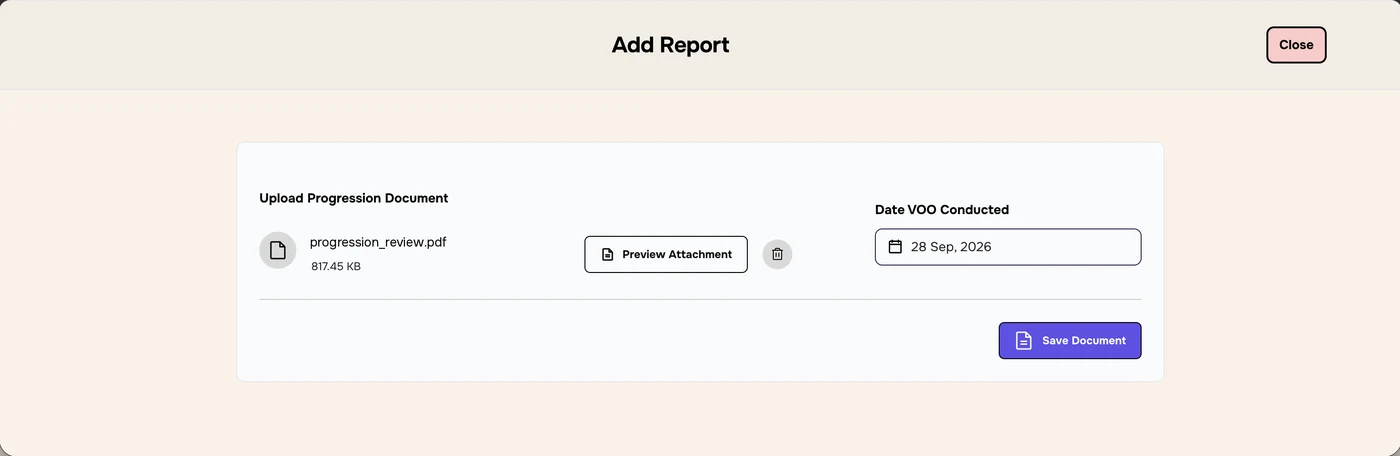
In Add Report, click Upload Document, choose the progression review (PDF, up to 10 MB), then click Upload.
Check the file. Click Preview Attachment to open it, or the bin icon to remove it.
Choose the Date VOO Conducted.
Click Save Document. It stays greyed out until you add both the document and the date.
An overdue progression review.
Before: Save Document is greyed out.After: ready to save.
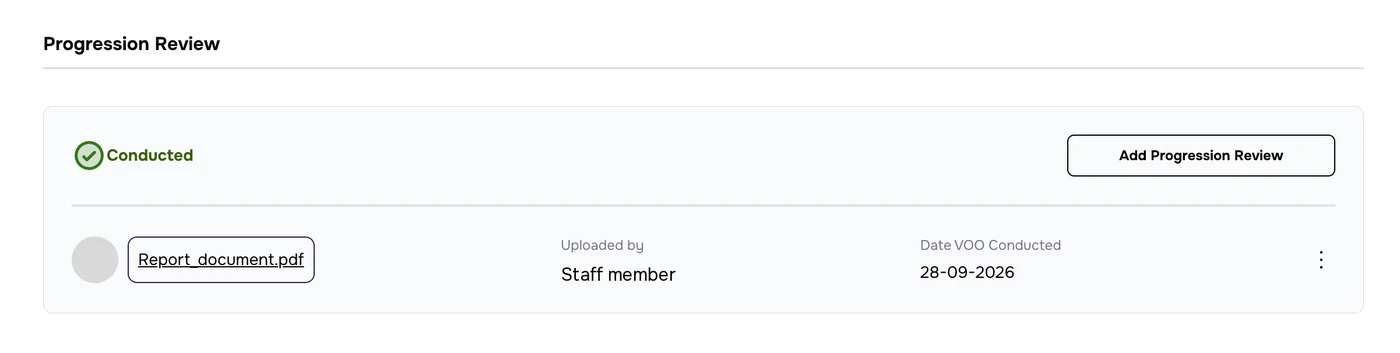
Once it’s saved, the card shows a green Conducted tick. It lists the report, who uploaded it and the Date VOO Conducted. Click the file name to open the report. Use Add Progression Review at the top right to add another review.
A conducted review. The uploader’s name is replaced.
5
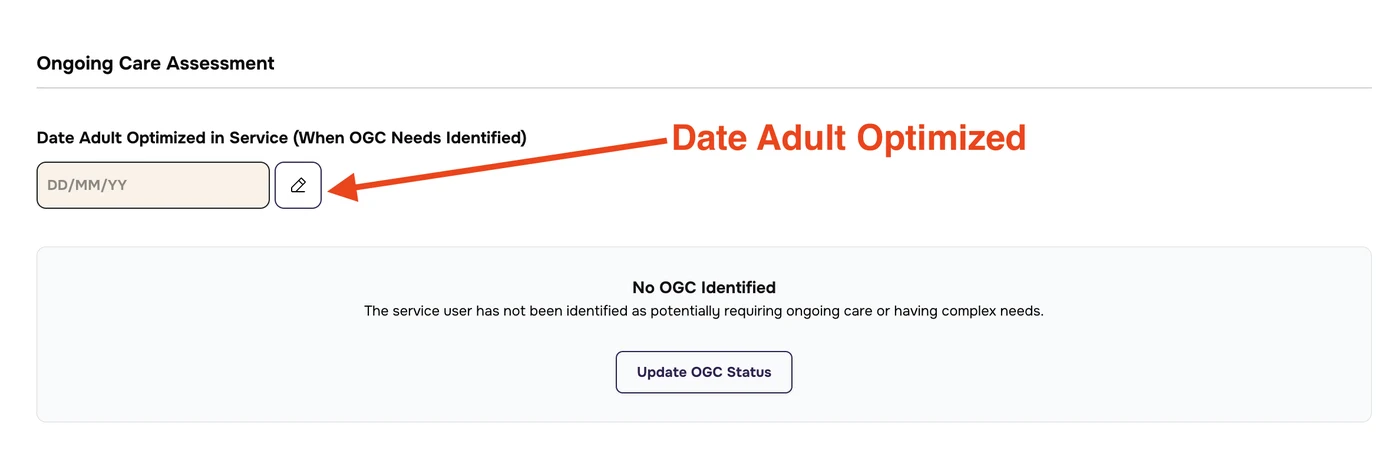
Date adult optimized
Date Adult Optimized in Service records the date the service user was optimised. Fill it in when On Going Care (OGC) needs are identified.
Click the pencil icon next to the date.
Choose the date, then click Save Changes. Clear empties the field.
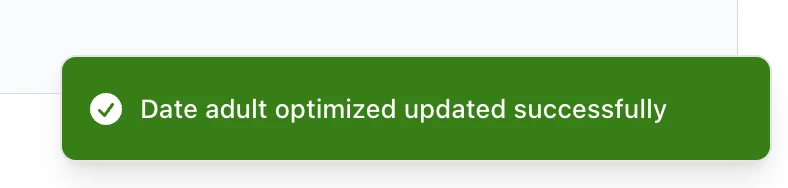
A green message confirms: “Date adult optimized updated successfully”.
Click the pencil icon.Choose the date, then Save Changes.
6
Update the On Going Care status
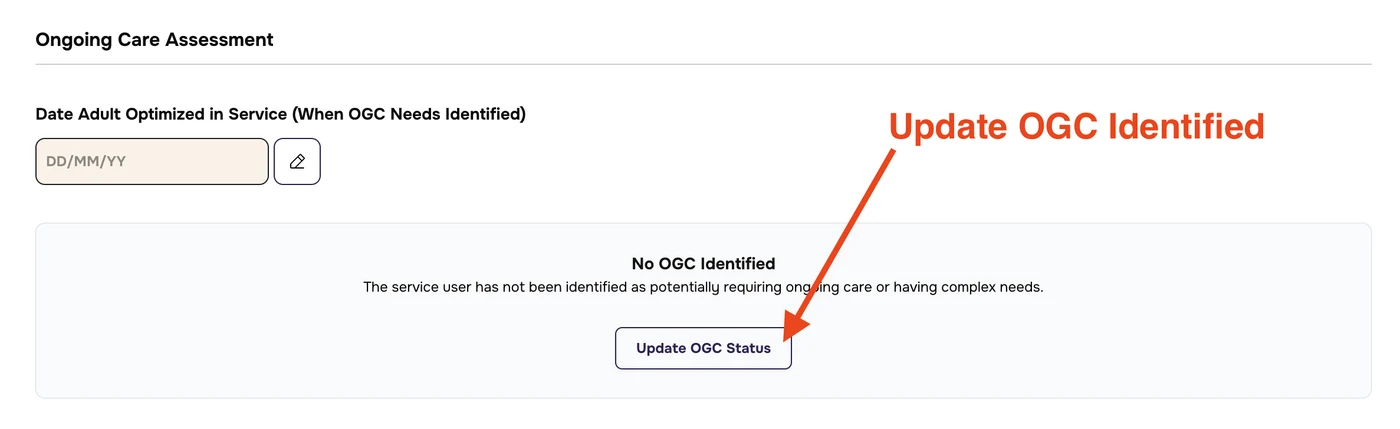
While nothing has been recorded, the card says No OGC Identified.
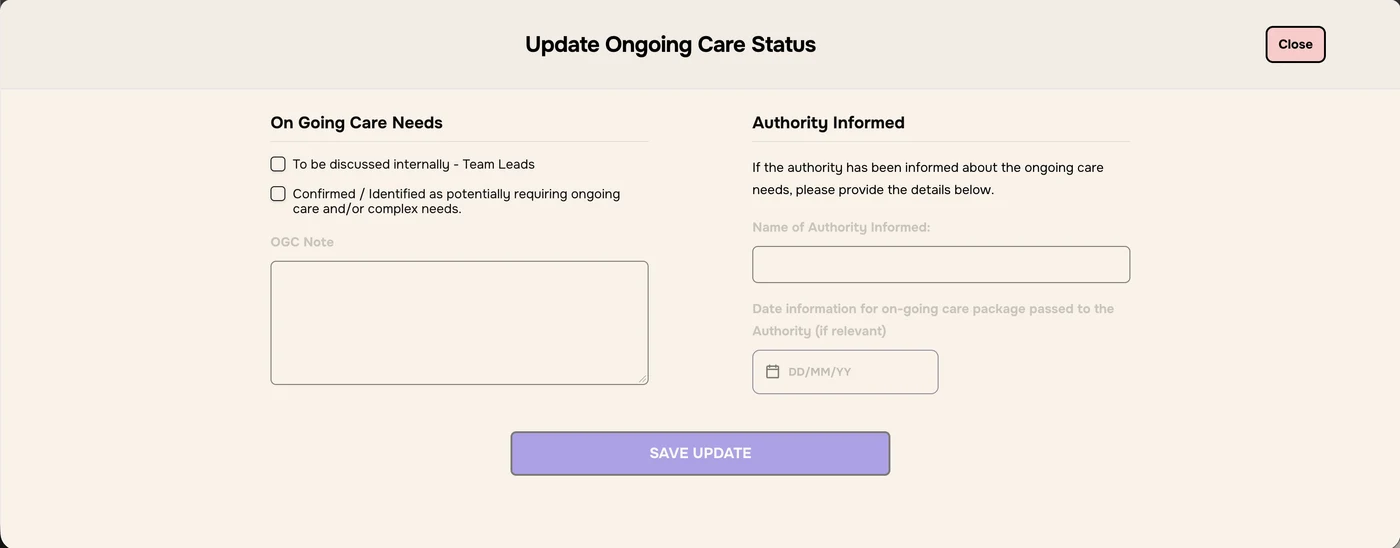
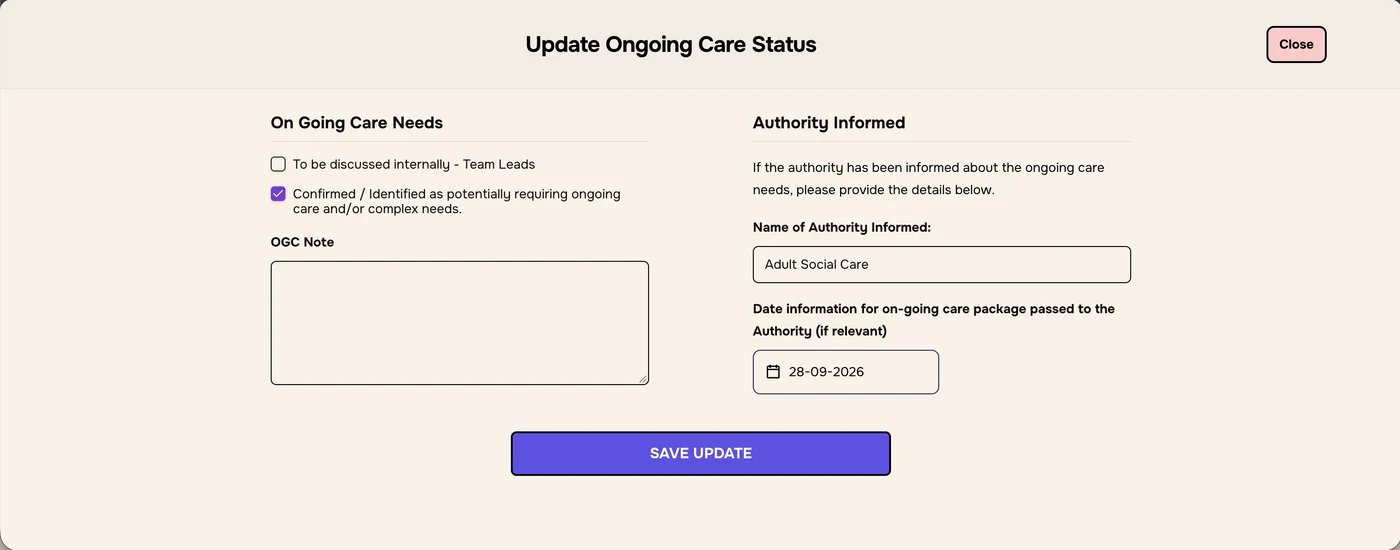
Click Update OGC Status. The Update Ongoing Care Status window opens.
Under On Going Care Needs, tick the box that applies:
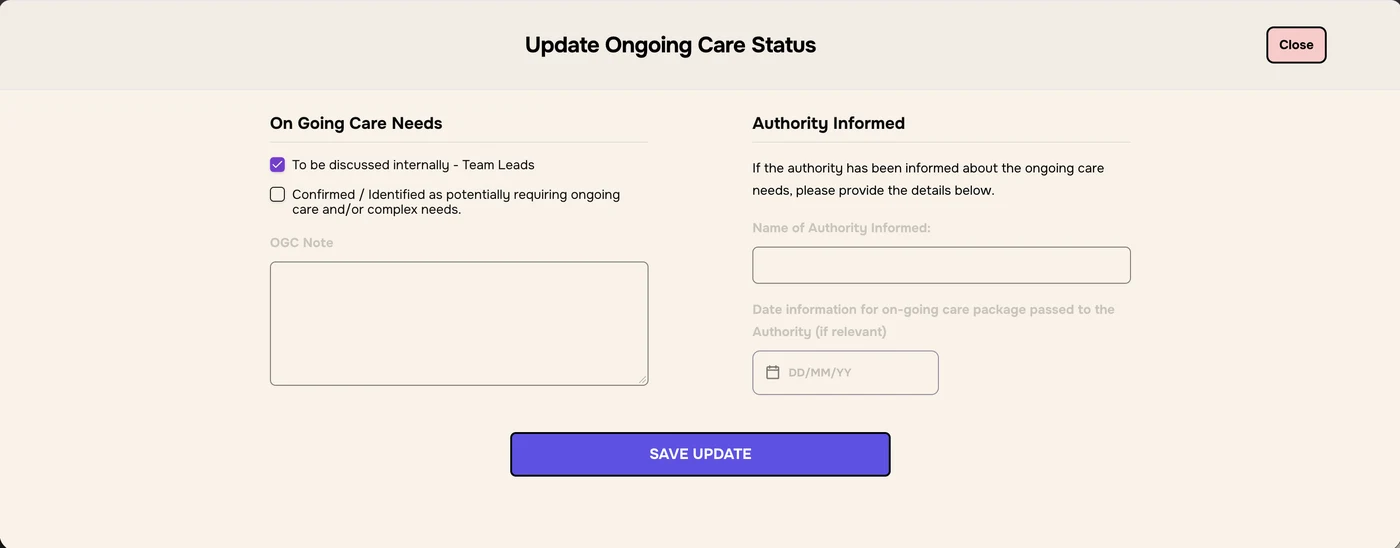
To be discussed internally - Team Leads: team leads still need to discuss it. The note and authority fields stay greyed out.
Confirmed / Identified as potentially requiring ongoing care and/or complex needs: this turns on the OGC Note and the Authority Informed fields.
Add an OGC Note if you need to.
If the authority has been told, enter the Name of Authority Informed, for example Adult Social Care. Also enter the Date information for on-going care package passed to the Authority.
Click SAVE UPDATE. It stays greyed out until you tick a box.
Click Update OGC Status.
Nothing ticked: SAVE UPDATE is greyed out.To be discussed internally.
Confirmed, with the authority details filled in.
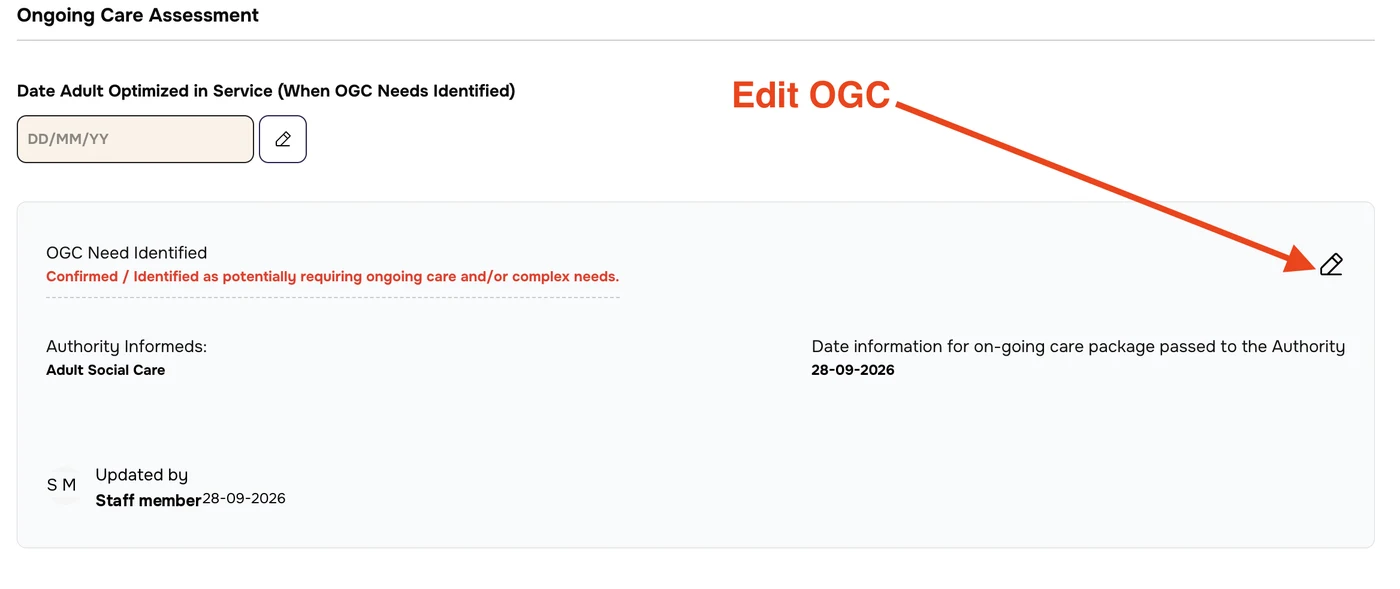
After saving, the card shows OGC Need Identified with the status, the authority informed, the date passed on, and who updated it and when.
7
Edit or delete the OGC log
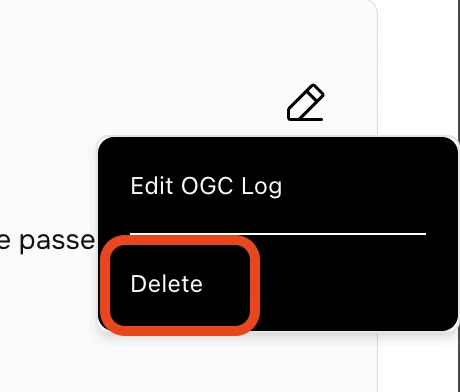
Click the pencil icon at the top right of the OGC card. A menu opens.
Edit OGC Log opens Update Ongoing Care Status with the saved details. Change them and click SAVE UPDATE.
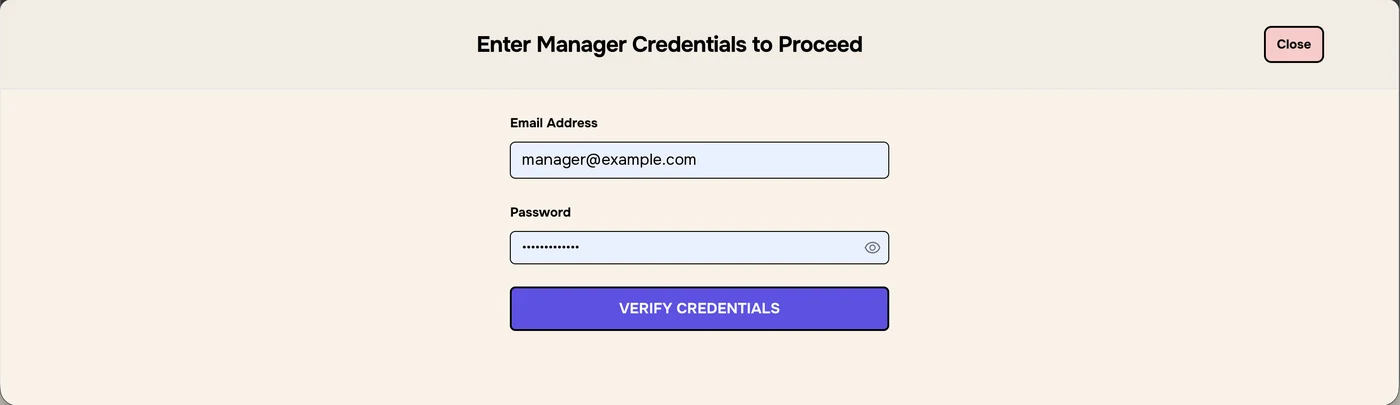
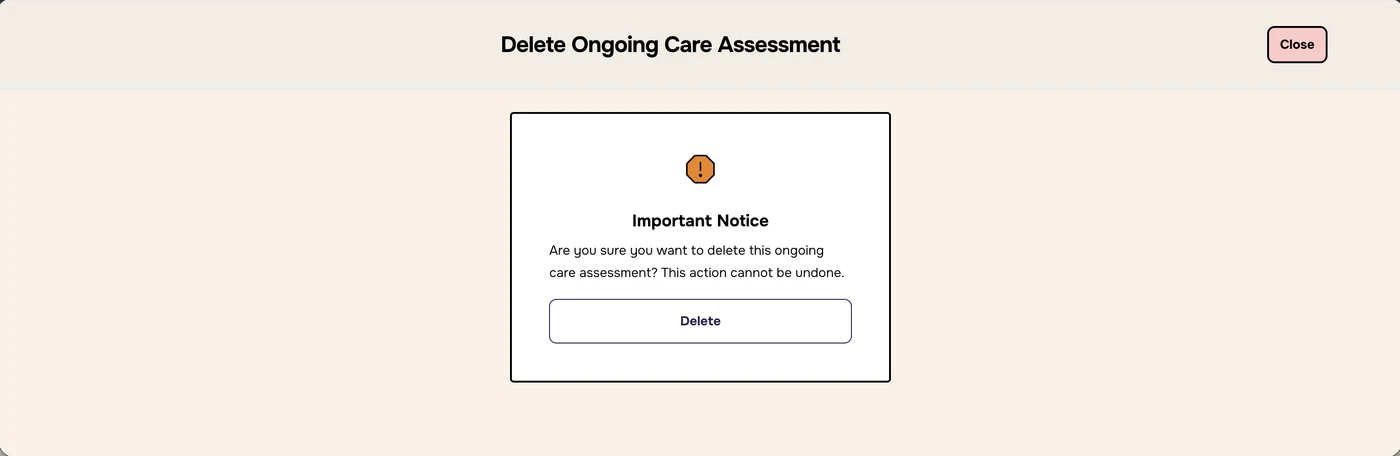
Delete removes the record. First, a manager enters their email address and password and clicks VERIFY CREDENTIALS.
An Important Notice asks you to confirm. Click Delete, or Close to keep the record.
Deleting can’t be undoneOnly a manager can approve a delete. Check with your manager before you delete an On Going Care (OGC) assessment.
The saved OGC card. The name is replaced.Edit OGC Log or Delete.
A manager approves the delete. The email is replaced.Confirm the delete.
8
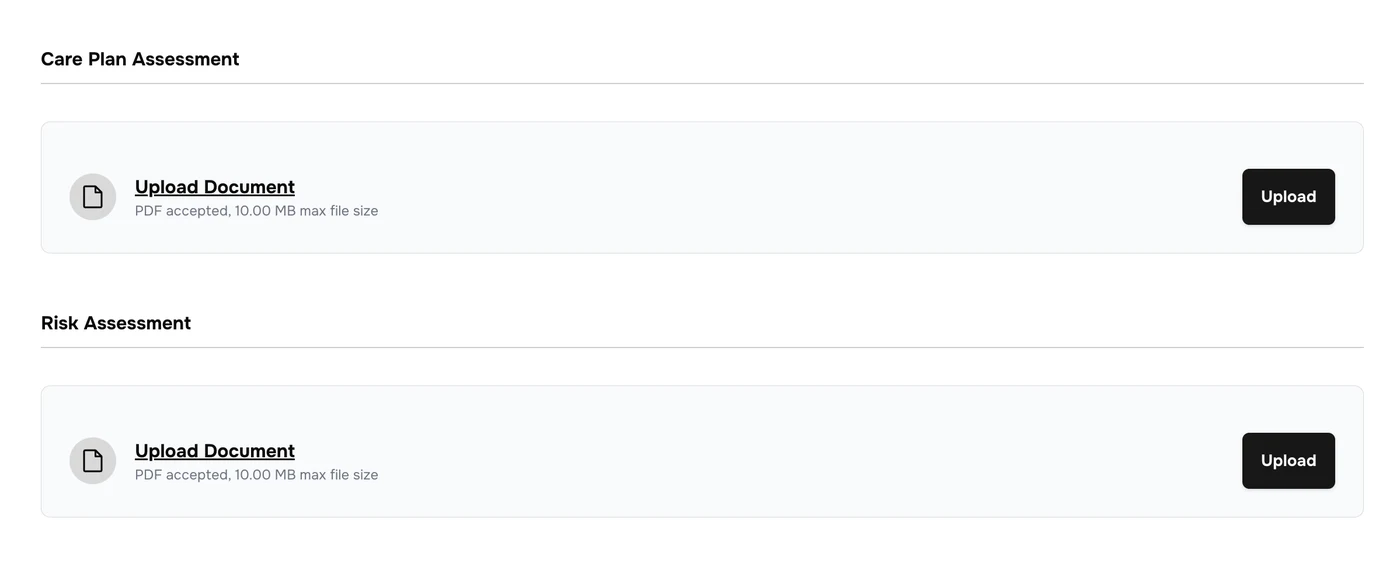
Care plan and risk assessments
Under Care Plan Assessment or Risk Assessment, click Upload Document.
Choose the file. Only PDFs of up to 10 MB are accepted.
Click Upload.
Upload each assessment in its own section.
Troubleshooting
The progression review shows a red dot
The review is overdue. Add the progression review report as soon as it’s done.
Save Document stays greyed out
Upload the progression review PDF and choose the Date VOO Conducted. You need both.
SAVE UPDATE stays greyed out
Tick one of the On Going Care Needs boxes first.
I can’t type in the OGC Note or authority fields
They only turn on when you tick Confirmed / Identified as potentially requiring ongoing care and/or complex needs.
Delete asks for manager credentials
Deleting an On Going Care (OGC) assessment needs a manager’s approval. Ask a manager to enter their email address and password.
The referral a service package came from: where it came from, when it arrived and was answered, the requested start, and the referral document. You can also edit these details.
1
Open Referral Details
Open the service user’s profile, click Service Package, then View Package on the package.
Click the Referral Details tab, next to Assessment Overview.
2
What the tab shows
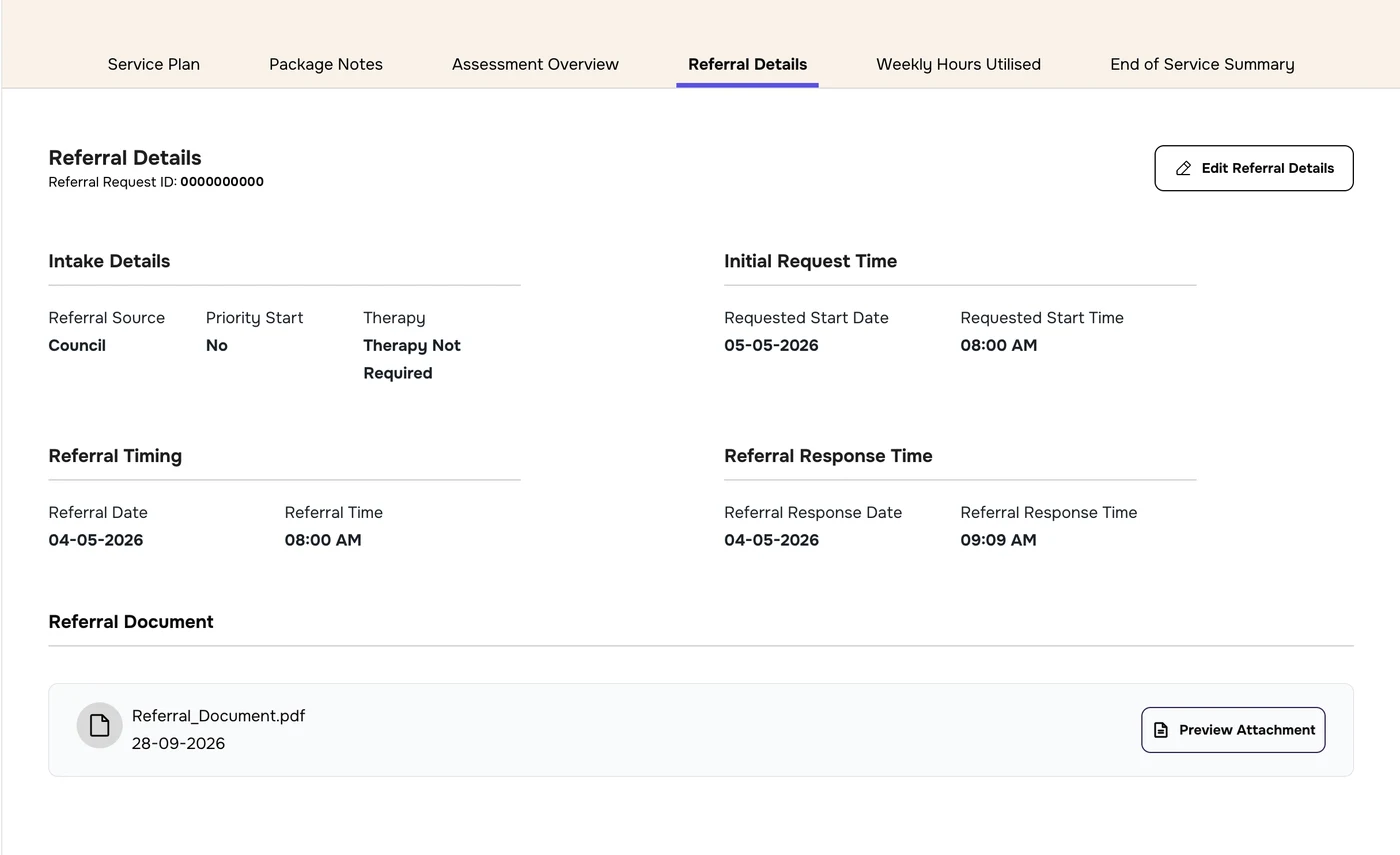
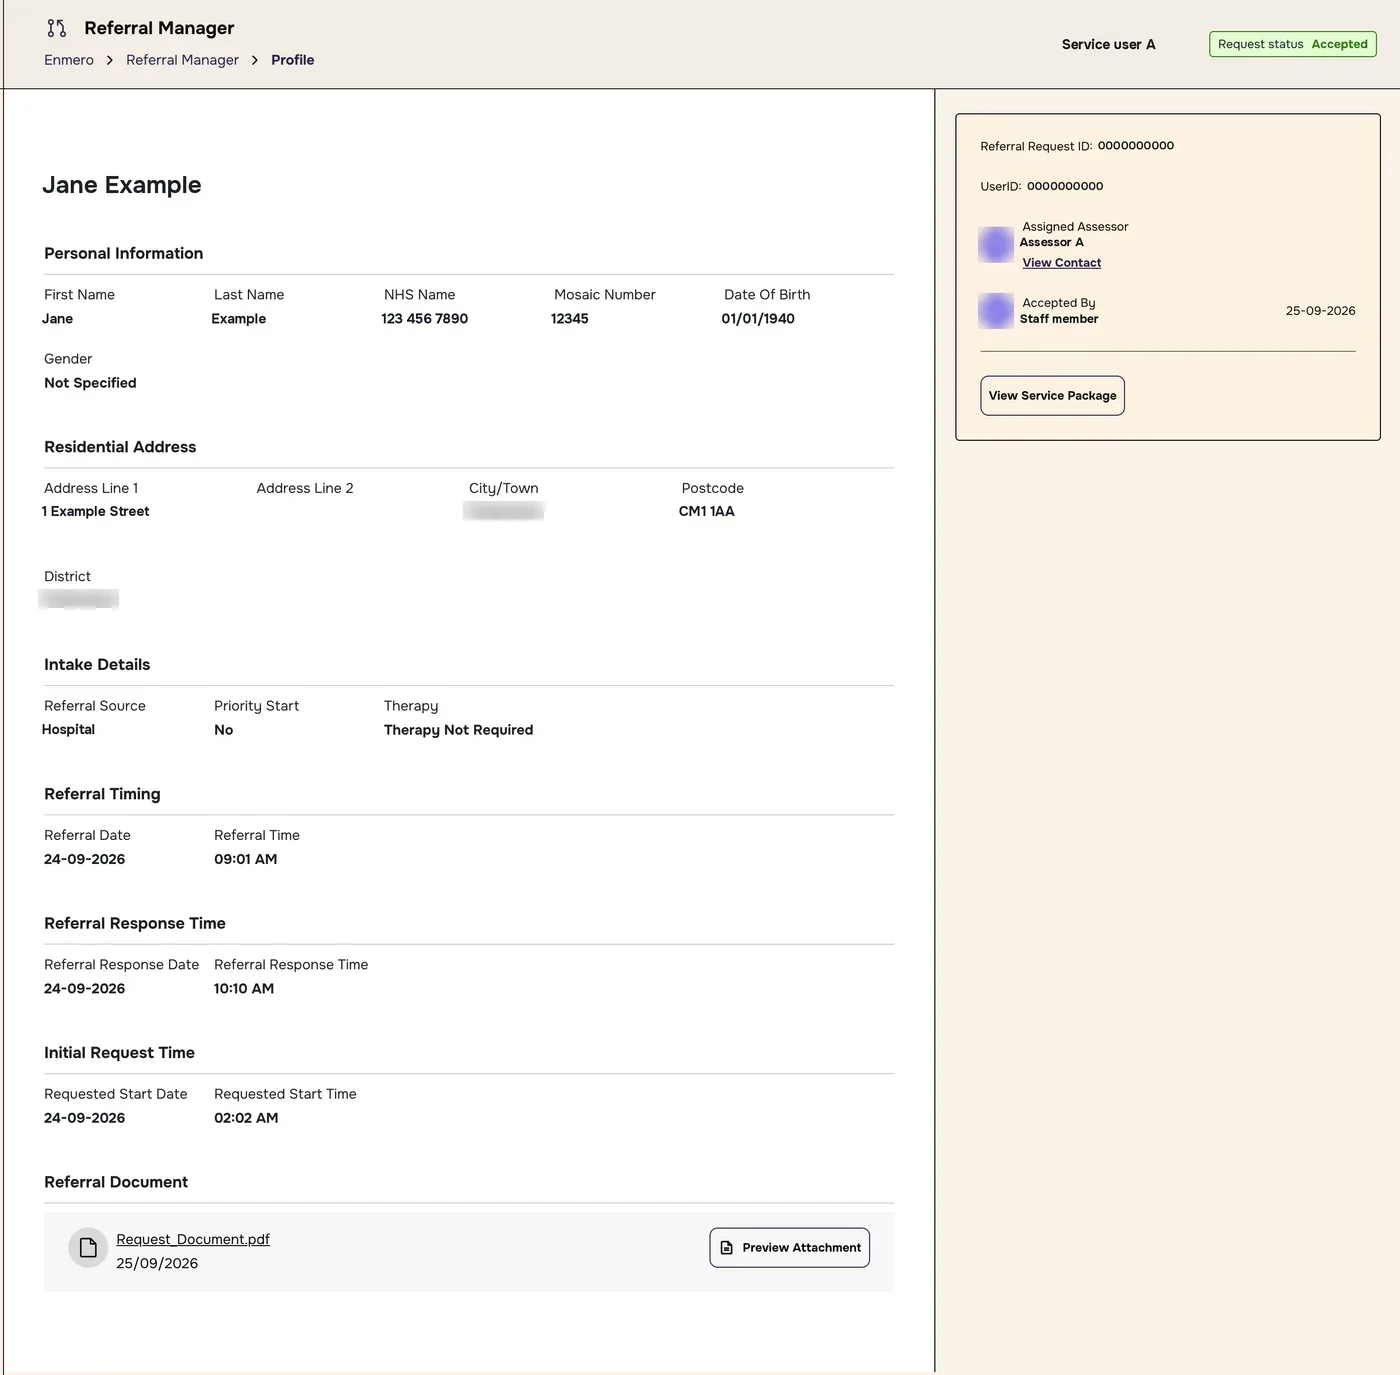
The Referral Request ID is shown under the heading. Below it:
Section
What it shows
Intake Details
Referral Source (for example Council), Priority Start (Yes or No) and Therapy (for example Therapy Not Required)
Initial Request Time
The Requested Start Date and Requested Start Time the referrer asked for
Referral Timing
The Referral Date and Referral Time the referral arrived
Referral Response Time
The Referral Response Date and Referral Response Time you responded
Referral Document
The uploaded referral and its upload date. Click Preview Attachment to open it.
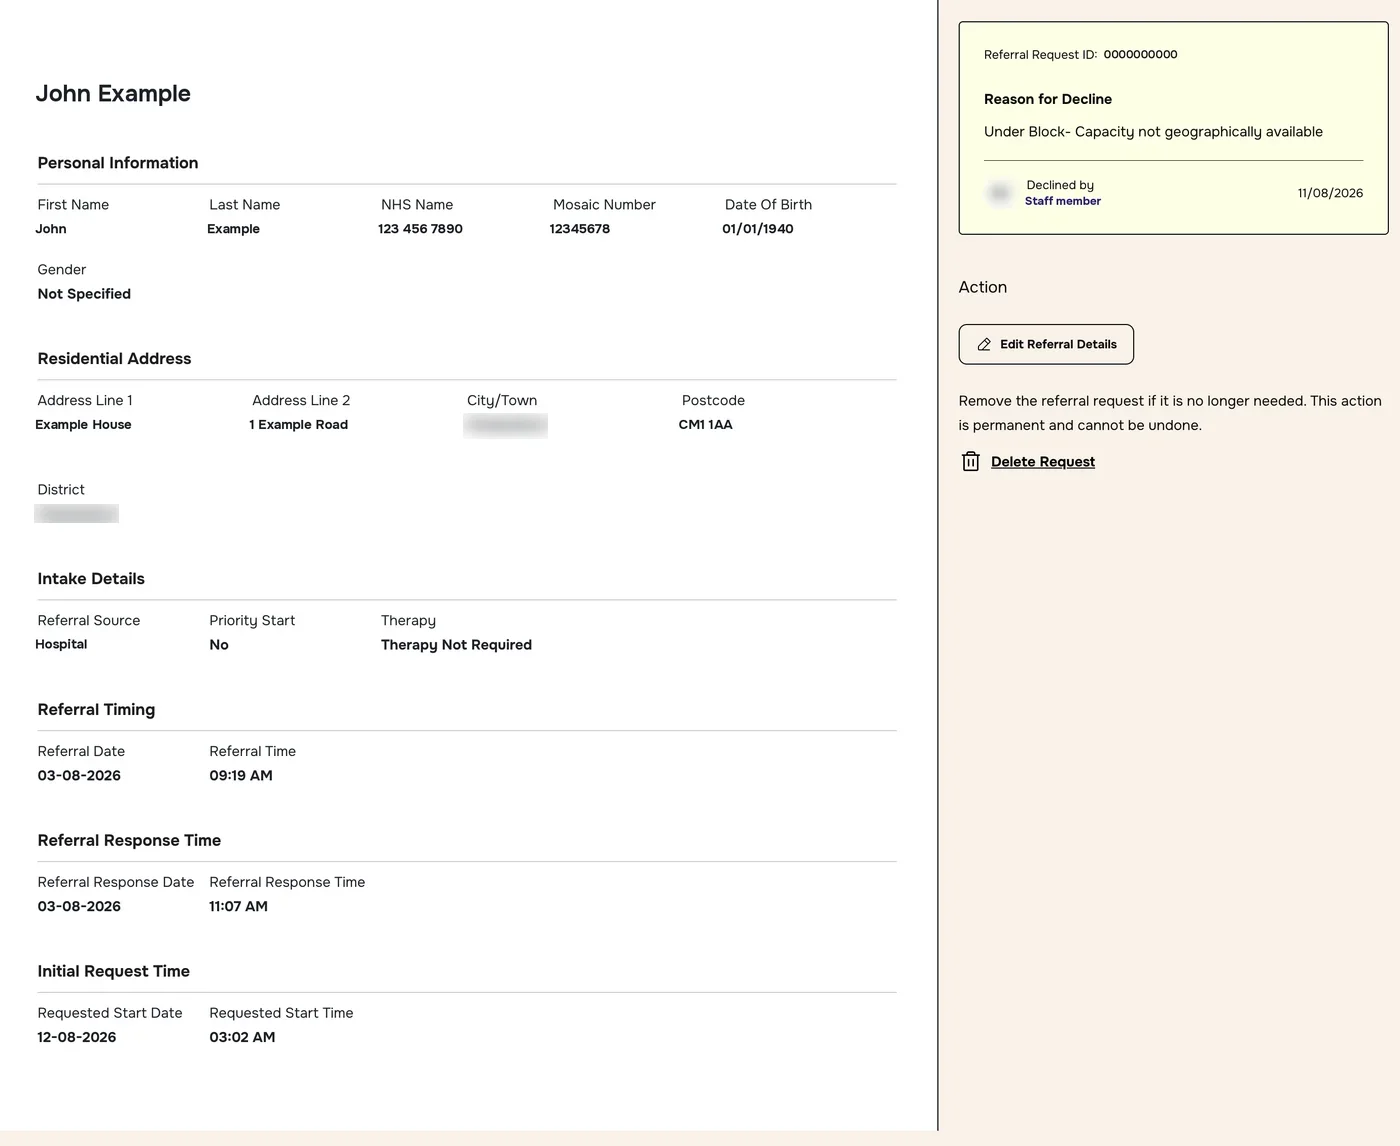
The Referral Details tab. The Referral Request ID is replaced.
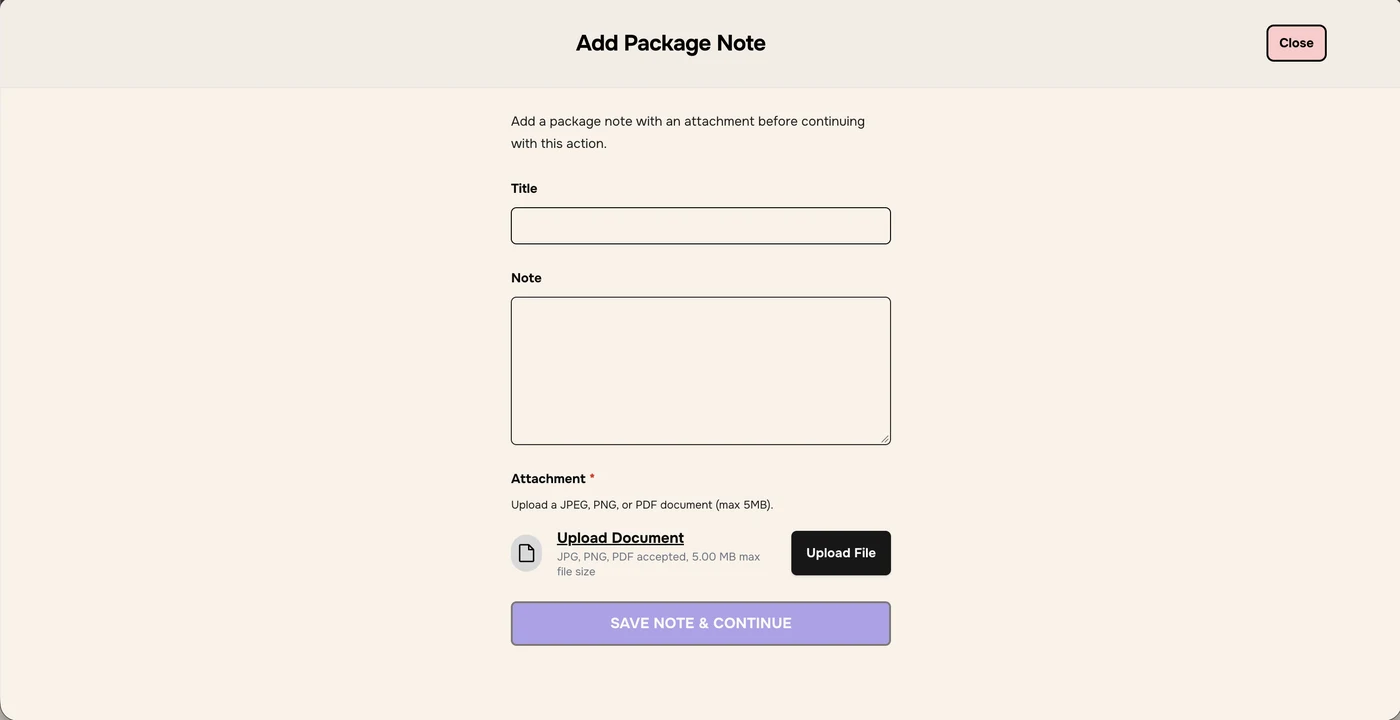
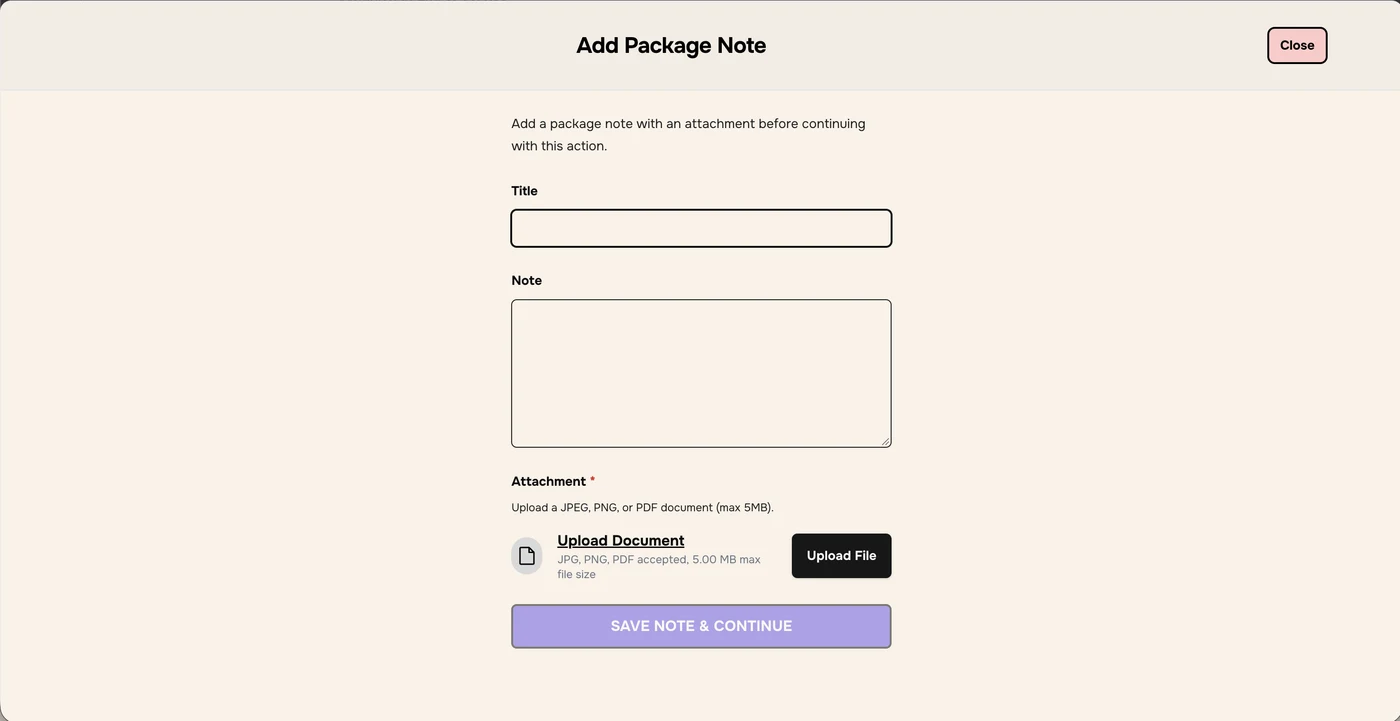
Every edit to the referral details needs a package note with an attachment explaining the change.
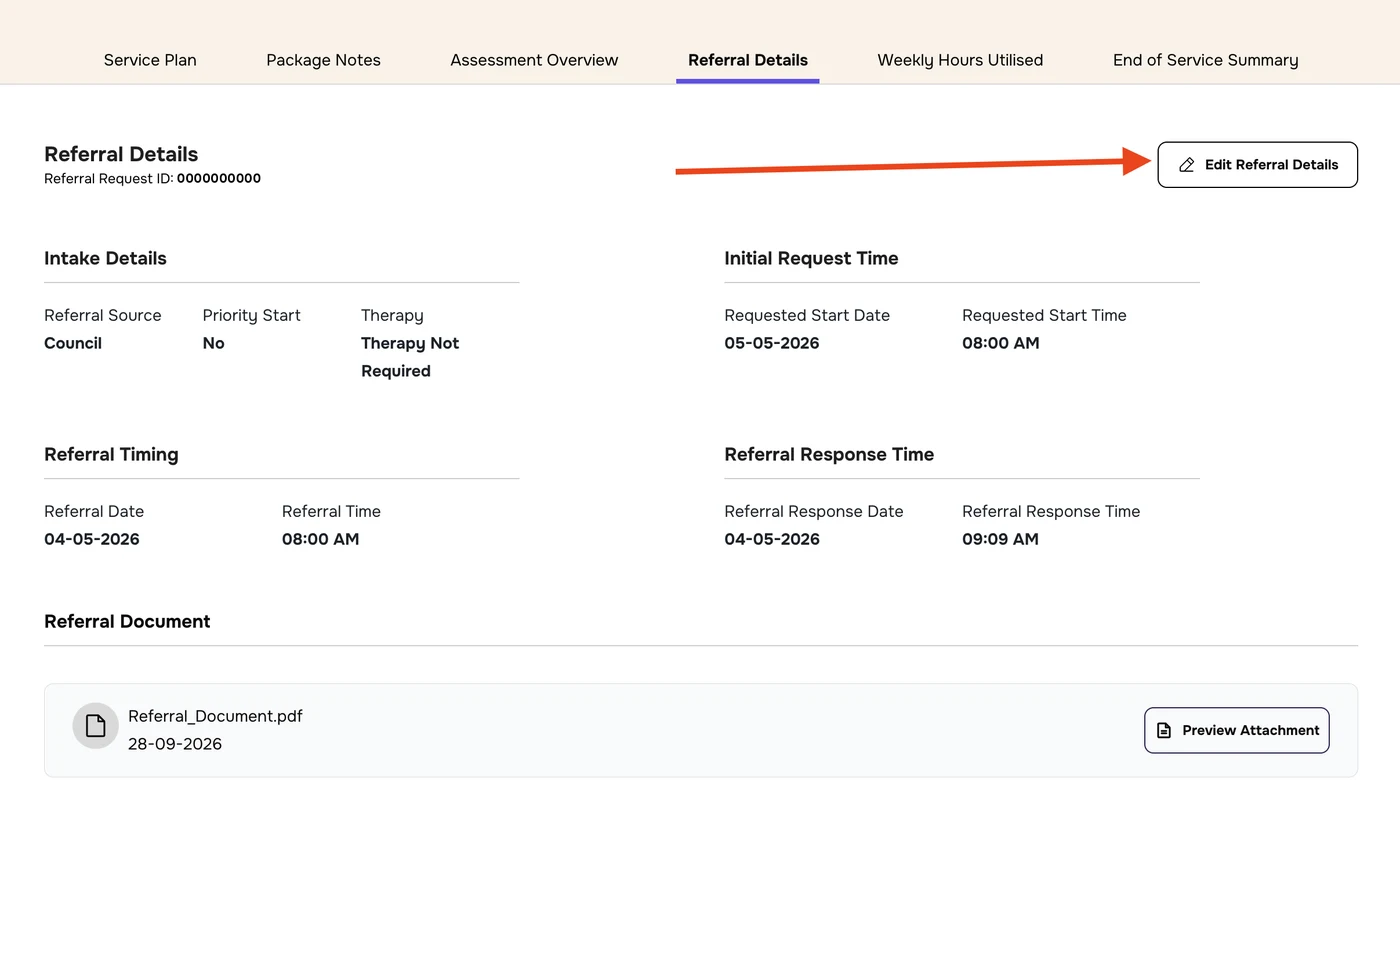
Click Edit Referral Details at the top right of the tab.
In Add Package Note, enter a Title and a Note explaining the change.
Under Attachment, click Upload Document, choose the file, then click Upload File. JPG, PNG or PDF, up to 5 MB. The attachment is required.
Click SAVE NOTE & CONTINUE. It stays greyed out until the attachment is added.
Click Edit Referral Details.Add a package note with an attachment.
The note is saved to the package’s Package Notes, so there’s a record of why the referral changed.
4
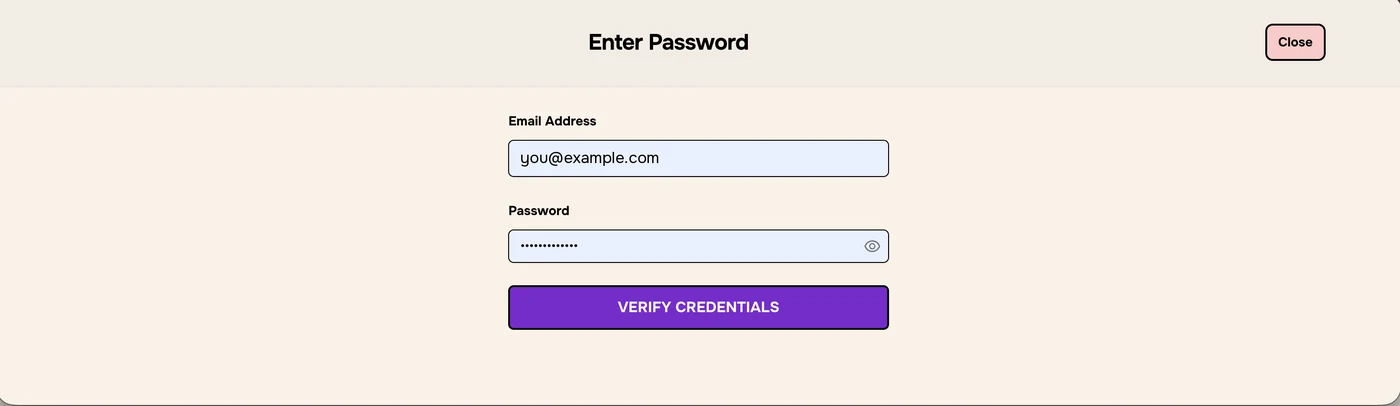
Edit: enter your password
In Enter Password, enter your own email address and password.
Click VERIFY CREDENTIALS.
Confirm it’s you. The email is an example.
5
Edit: change the details
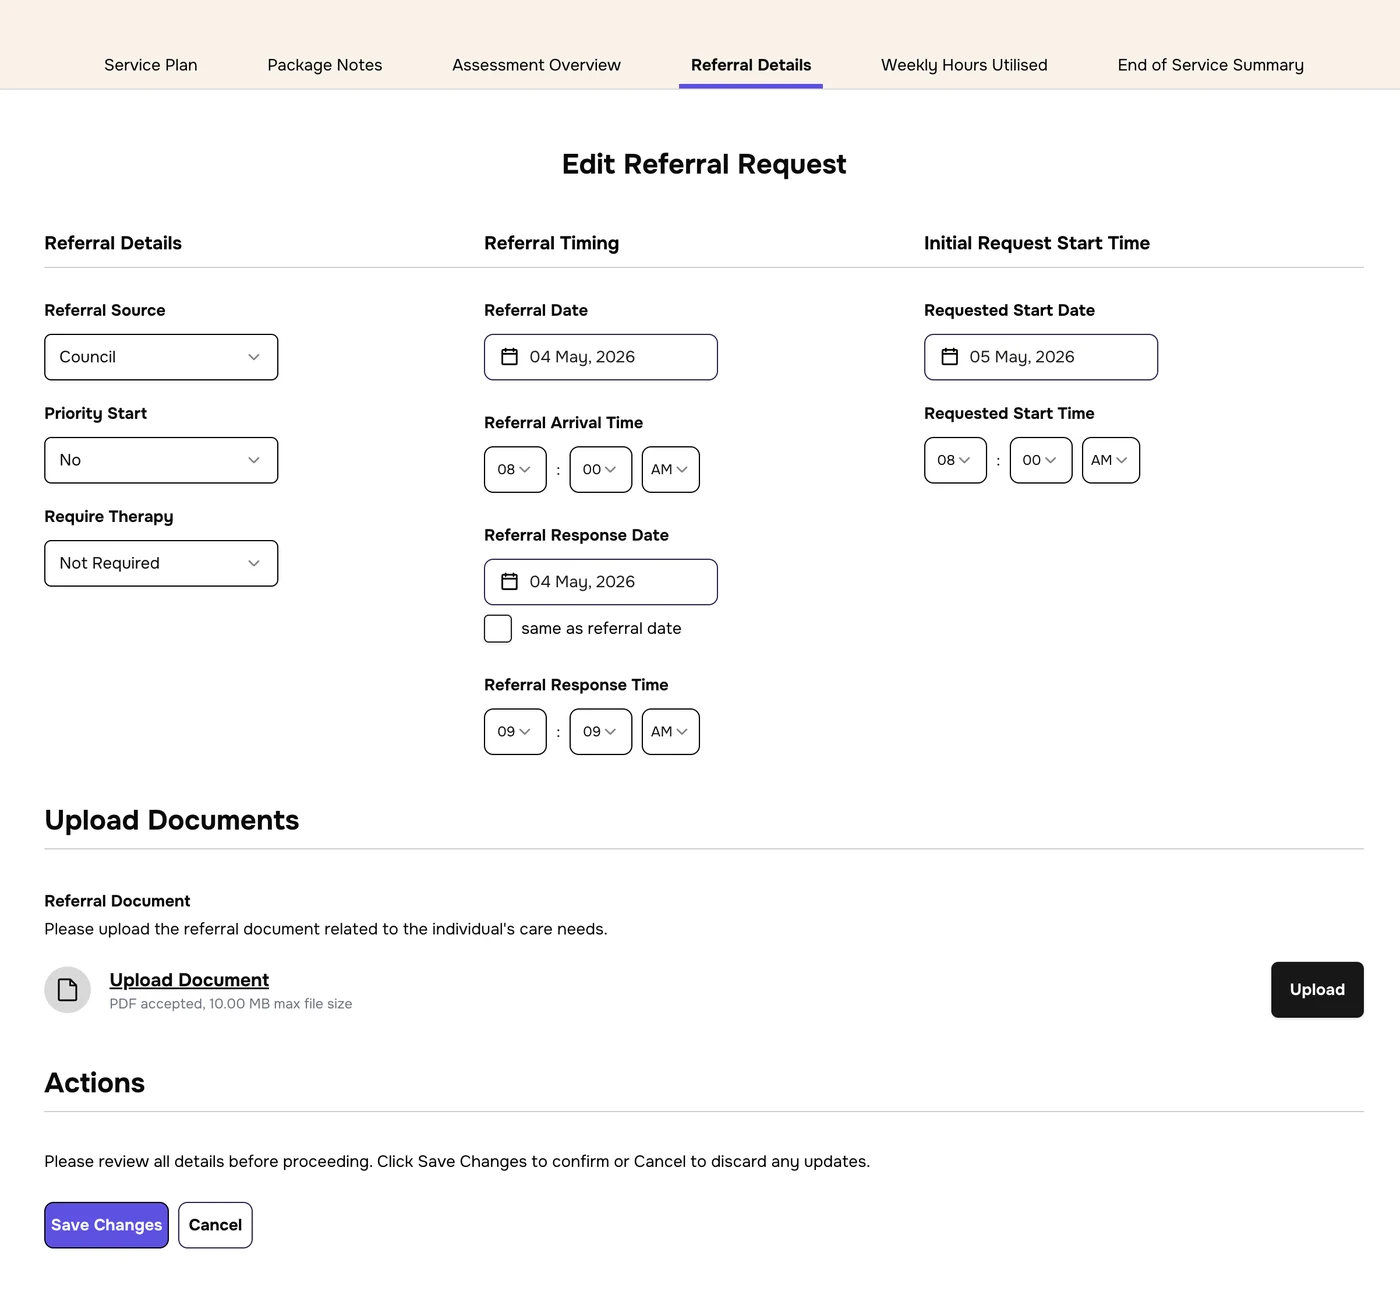
The tab changes to Edit Referral Request, filled in with the current details.
Referral Details: change the Referral Source, Priority Start or Require Therapy.
Referral Timing: change the Referral Date, Referral Arrival Time, Referral Response Date or Referral Response Time. Tick same as referral date if you responded on the same day.
Initial Request Start Time: change the Requested Start Date or Requested Start Time.
Upload Documents: to replace the referral document, click Upload Document, choose the PDF (up to 10 MB), then click Upload.
Check everything, then click Save Changes. To discard your changes, click Cancel.
The Edit Referral Request form.
Troubleshooting
SAVE NOTE & CONTINUE stays greyed out
Add an attachment. It’s required, and must be a JPG, PNG or PDF of 5 MB or less.
Whose password do I enter?
Your own. Enter the email address and password you log in with.
My referral document won’t upload
Only PDF files of 10 MB or smaller are accepted for the referral document.
I changed something by mistake
Click Cancel before saving. If you’ve already saved, edit the referral details again and put the correct values back.
The hours delivered on a package, week by week, and any additional hours inside or outside the package. Add, edit or delete additional hours here.
1
Open Weekly Hours Utilised
Open the service user’s profile, click Service Package, then View Package on the package.
Click the Weekly Hours Utilised tab.
2
Read the weekly table
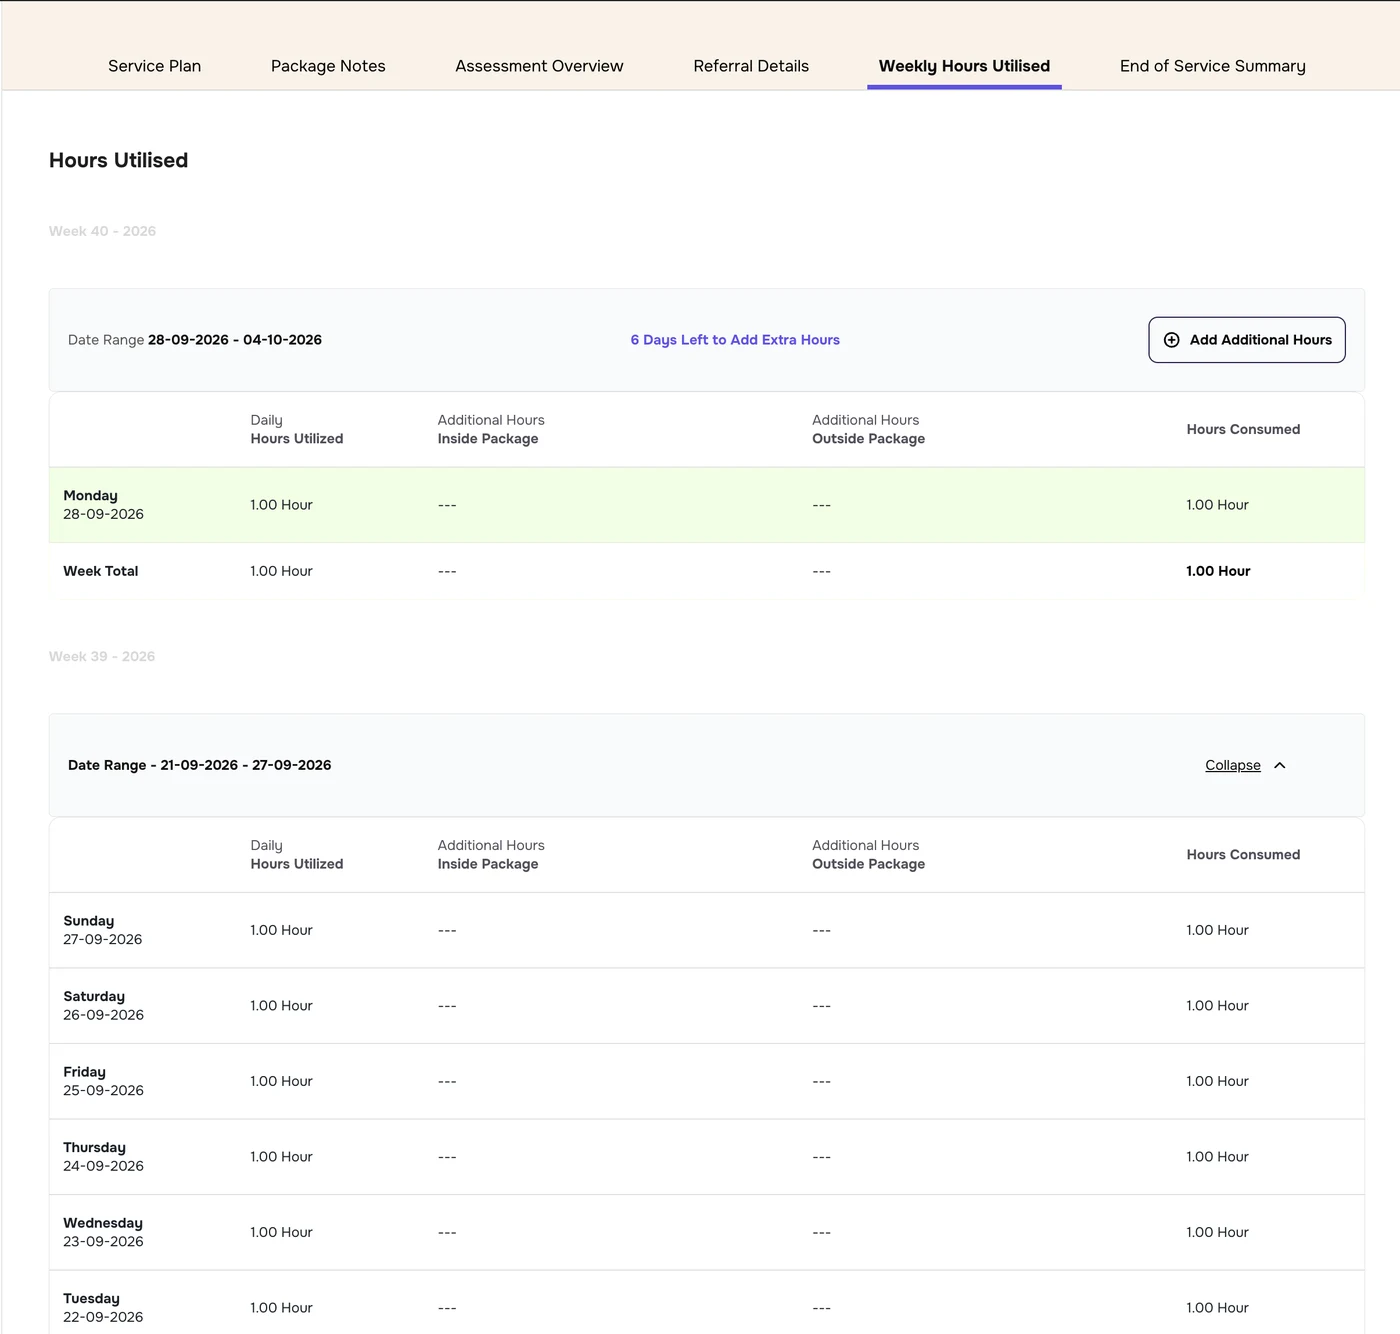
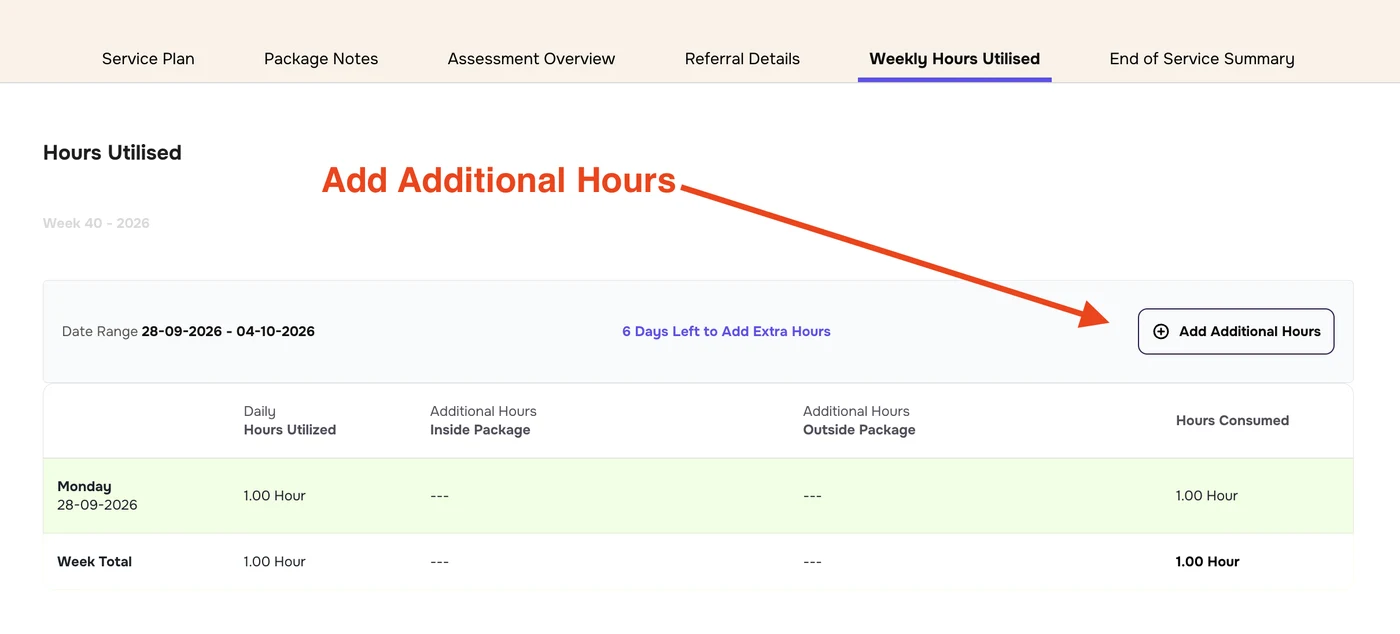
Under Hours Utilised, each week has its own table, newest first, for example Week 40 - 2026 with its Date Range. Today’s row is highlighted in green.
Column
What it shows
Daily Hours Utilized
The hours delivered that day under the package’s weekly schedule
Additional Hours Inside Package
Extra hours added that count within the package
Additional Hours Outside Package
Extra hours added that fall outside the package
Hours Consumed
The day’s total: daily hours plus any additional hours
The Week Total row adds up each column. For past weeks, click Expand or Collapse to show or hide the days.
The current week at the top, and a past week expanded below it.
The weekly schedule set on the Service Plan drives the daily hours, which feed into invoices.
3
Add additional hours
You can only add extra hours to the current week. The counter, for example 6 Days Left to Add Extra Hours, shows how long you have left.
Click Add Additional Hours on the current week.
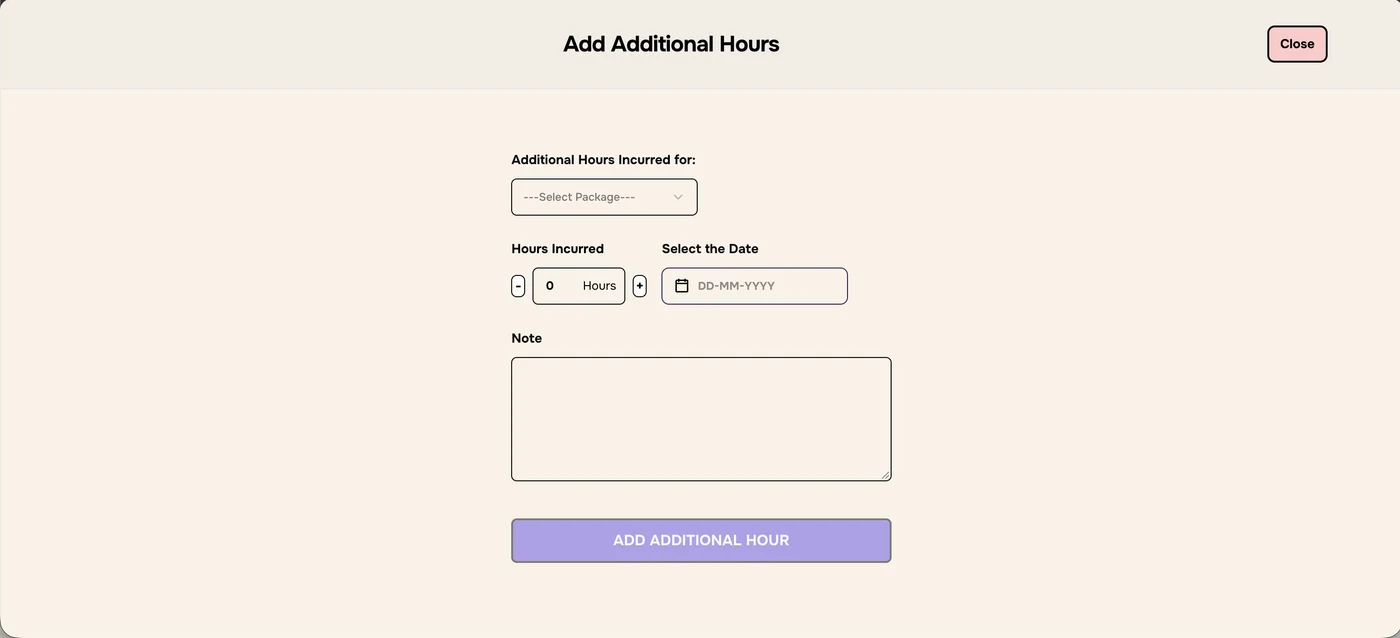
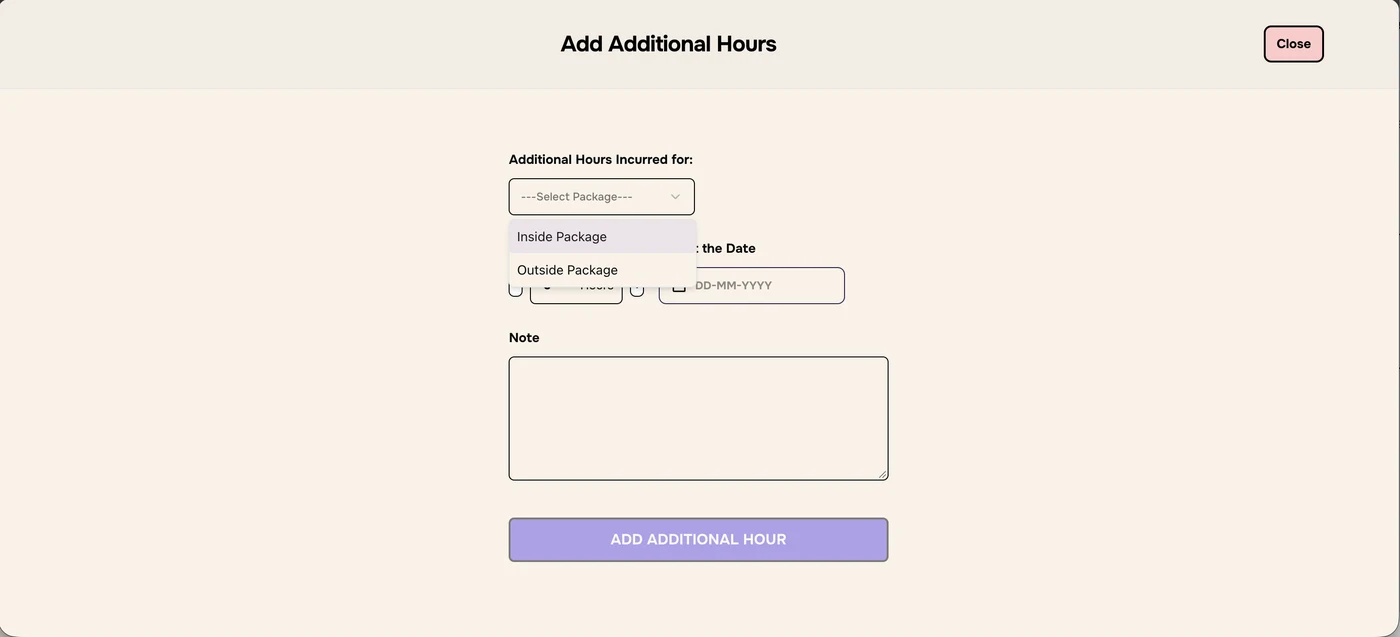
Under Additional Hours Incurred for, choose Inside Package or Outside Package.
Set the Hours Incurred. Type the number or use − and +.
Choose the date under Select the Date.
Add a Note explaining the extra hours.
Click ADD ADDITIONAL HOUR. It stays greyed out until the form is complete.
Click Add Additional Hours.
The Add Additional Hours form.Inside or outside the package.
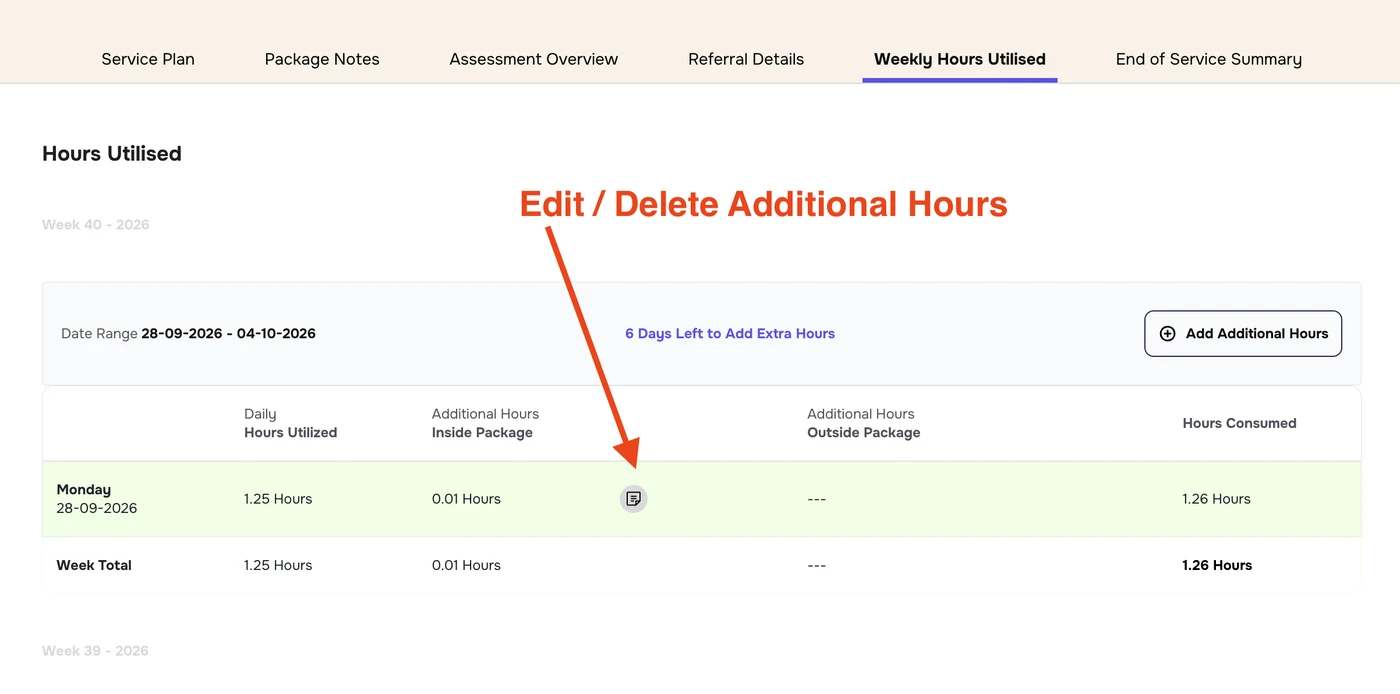
The hours appear in the matching column, and Hours Consumed and the Week Total update. For example, 1.25 daily hours plus 0.01 additional hours gives 1.26 hours.
4
Edit or delete additional hours
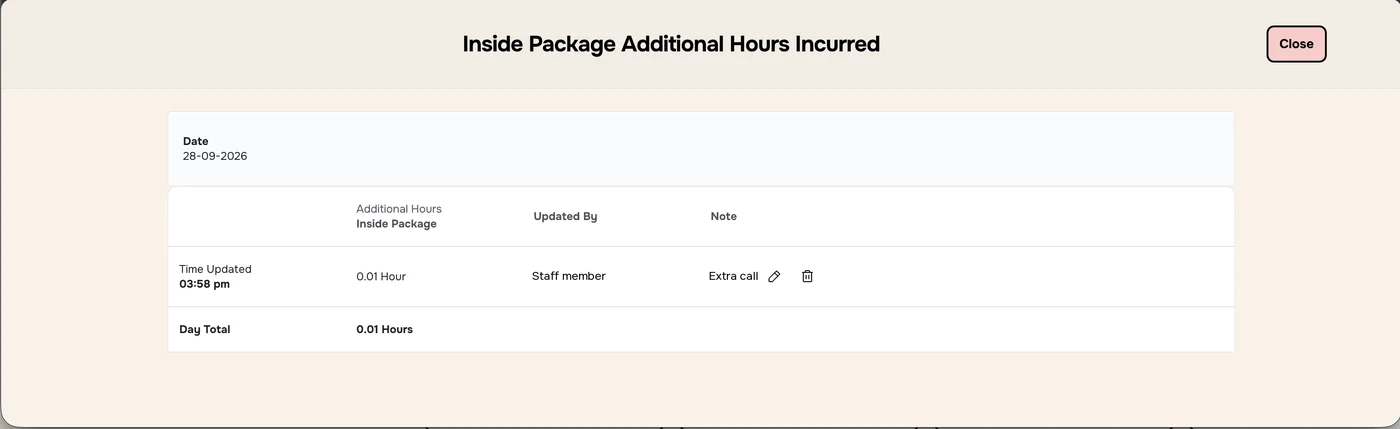
On the day with additional hours, click the note icon next to the hours.
A window lists each entry for that day, with the Time Updated, hours, Updated By and Note. The Day Total is at the bottom.
Next to the entry you want to change, click the pencil icon to edit it, or the bin icon to delete it.
Click the note icon next to the hours.The pencil and bin icons are next to each entry. The name and note are replaced.
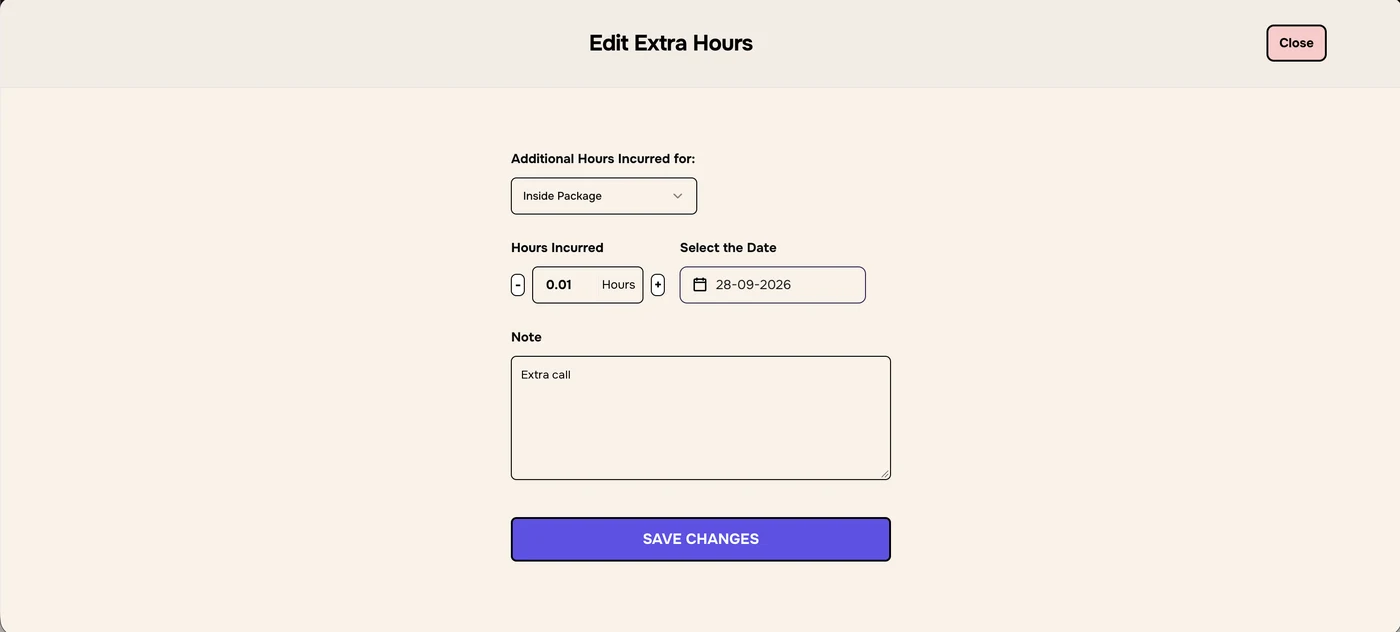
Edit
Click the pencil icon. Edit Extra Hours opens with the saved details.
Change the package type, hours, date or note.
Click SAVE CHANGES.
The Edit Extra Hours form.
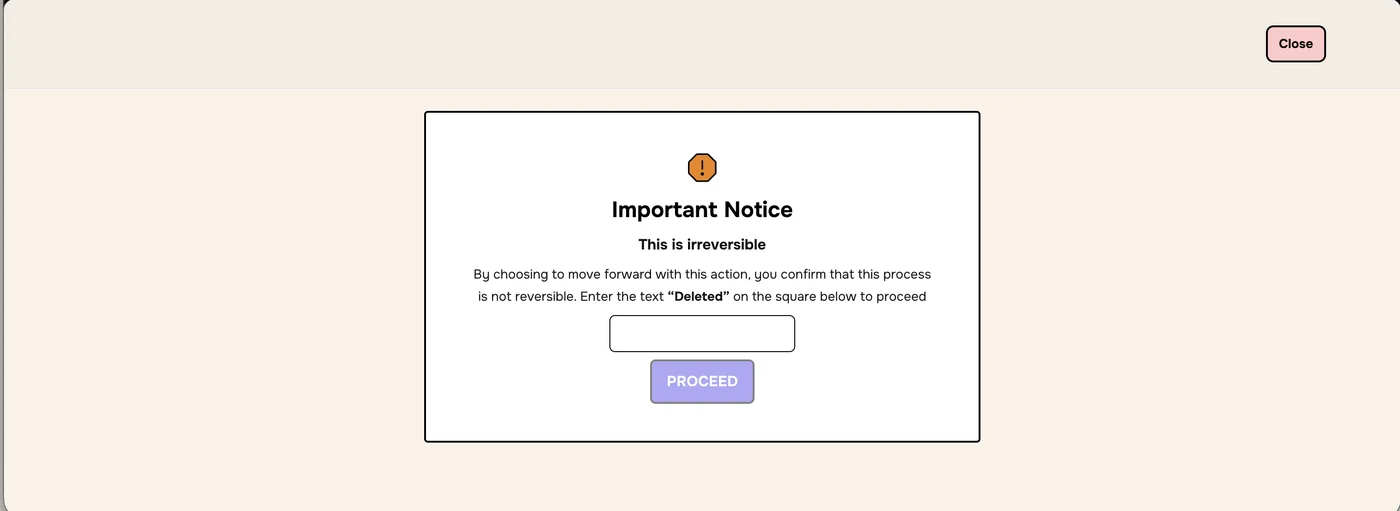
Delete
Click the bin icon. An Important Notice warns that this is irreversible.
Type Deleted in the box.
Click PROCEED. It stays greyed out until you type the word exactly. To keep the entry, click Close.
Deleting can’t be undoneCheck you have the right entry before you delete it.
Type Deleted, then Proceed.
Troubleshooting
There’s no Add Additional Hours button on a week
You can only add extra hours to the current week. Once the days left run out, that week can no longer be changed.
ADD ADDITIONAL HOUR stays greyed out
Choose Inside or Outside Package, set hours above 0, and choose a date.
What’s the difference between inside and outside the package?
Inside Package hours count within the service user’s package. Outside Package hours are extra to it. Both are added to Hours Consumed.
End a service package as Care Ended or Failed Start, read the summary once it has ended, and change the status or outcome later if needed.
1
Open End of Service Summary
Open the service user’s profile, click Service Package, then View Package on the package.
Click the End of Service Summary tab.
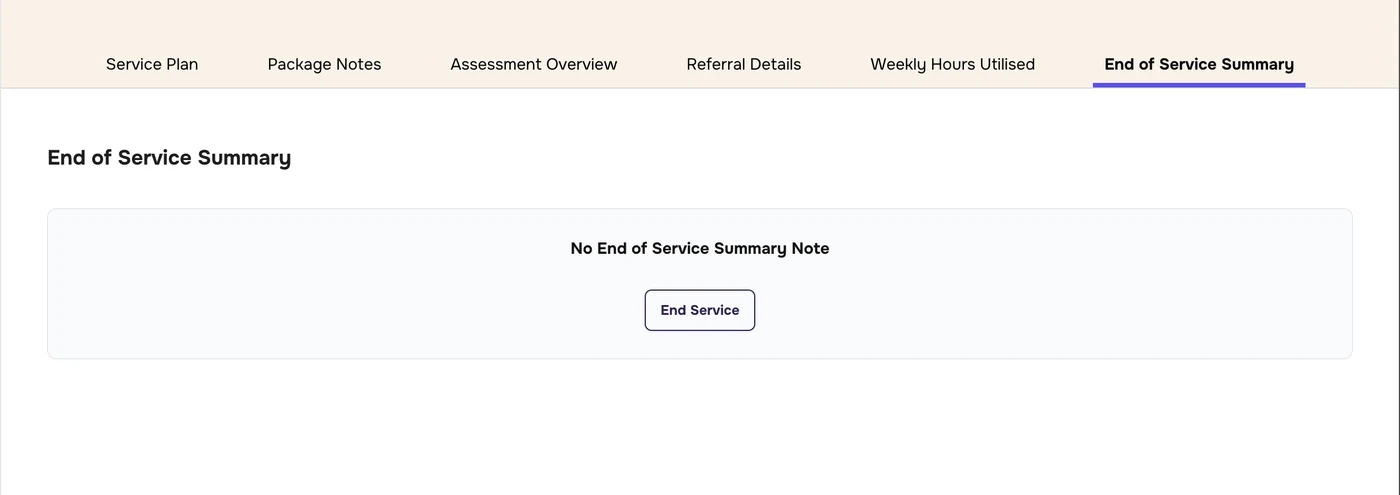
While the package is still running, the tab says No End of Service Summary Note and shows an End Service button.
A package that hasn’t ended yet.
2
End a service
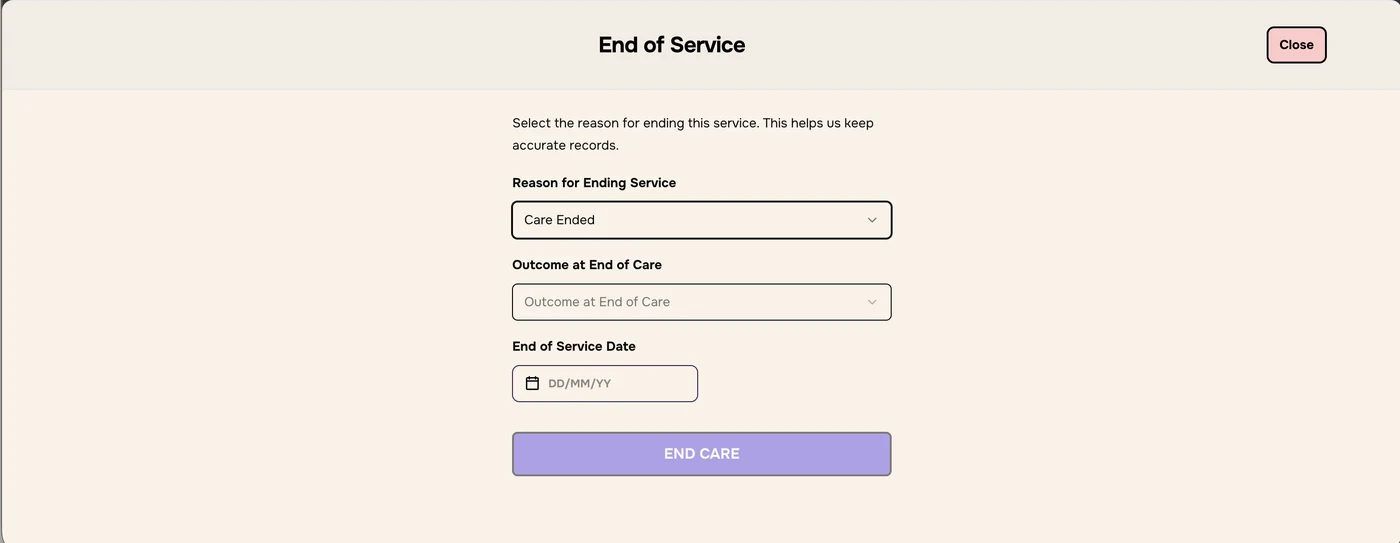
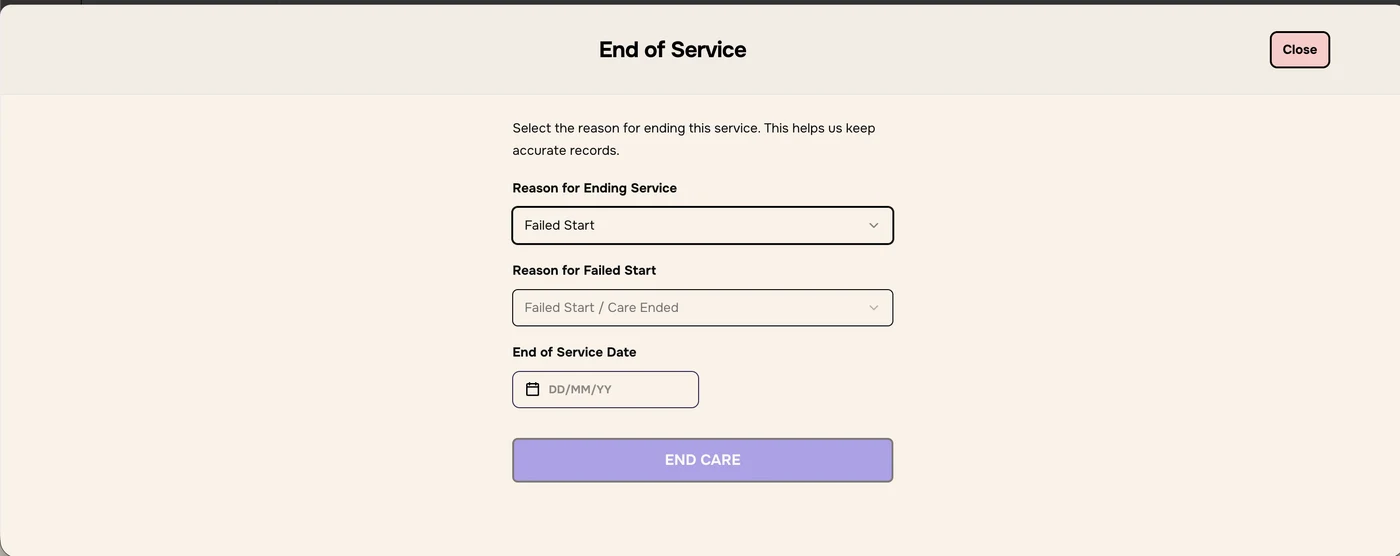
Click End Service. The End of Service window opens.
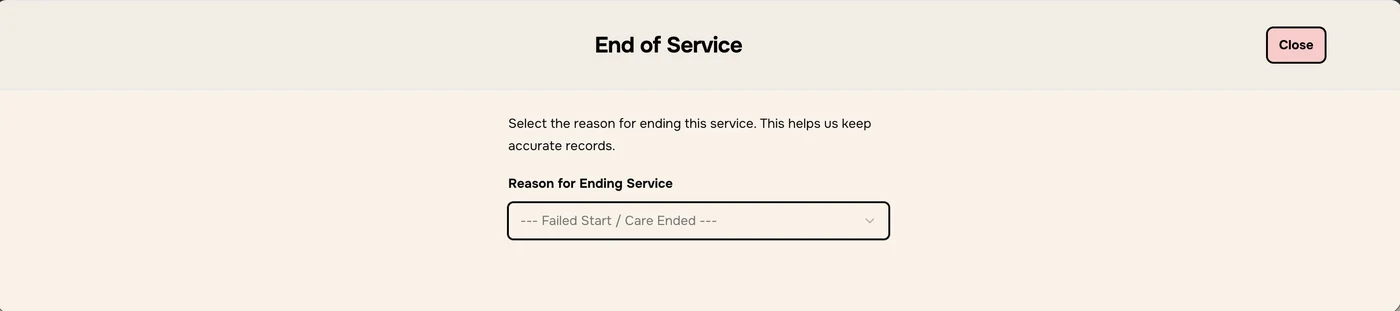
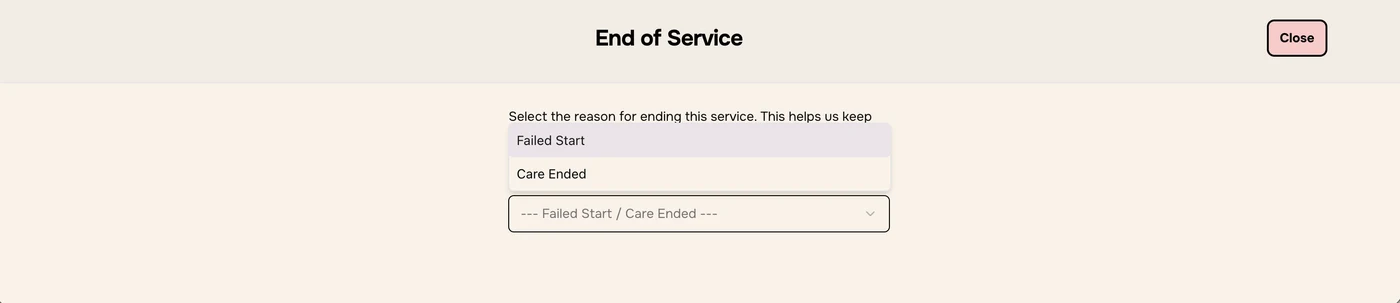
Under Reason for Ending Service, choose Care Ended or Failed Start.
Choose the outcome or reason (see below).
Choose the End of Service Date.
Click END CARE. It stays greyed out until every field is filled in.
END CARE, End Package of Care and END POCThese all mean the same thing: ending the service user’s package of care (POC). You may hear any of them from your team.
Choose the reason for ending.Failed Start or Care Ended.
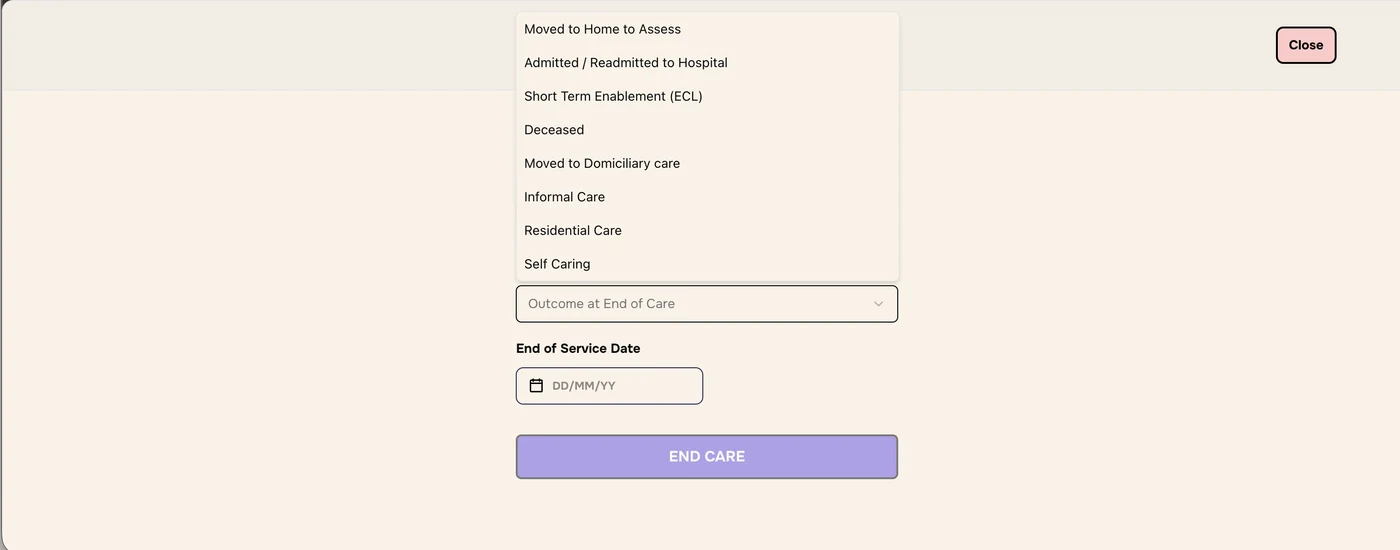
Care Ended: Outcome at End of Care
Moved to Home to Assess
Admitted / Readmitted to Hospital
Short Term Enablement (ECL)
Deceased
Moved to Domiciliary care
Informal Care
Residential Care
Self Caring
Care Ended.The outcomes.
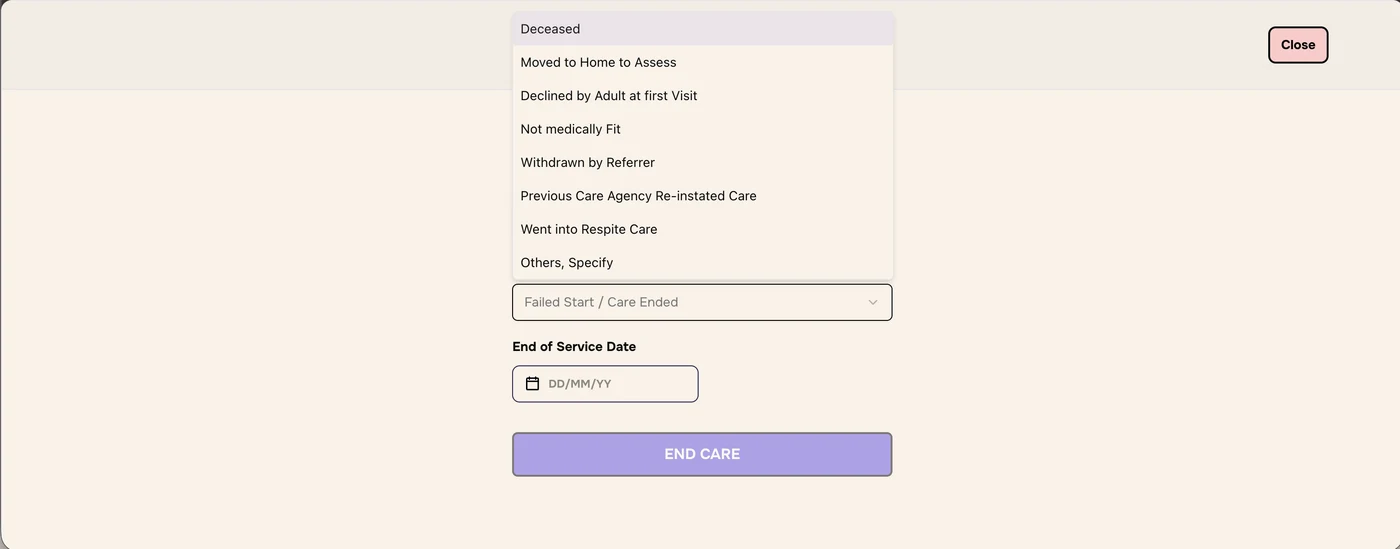
Failed Start: Reason for Failed Start
Deceased
Moved to Home to Assess
Declined by Adult at first Visit
Not medically Fit
Withdrawn by Referrer
Previous Care Agency Re-instated Care
Went into Respite Care
Others, Specify
Failed Start.The failed start reasons.
3
Approve and confirm
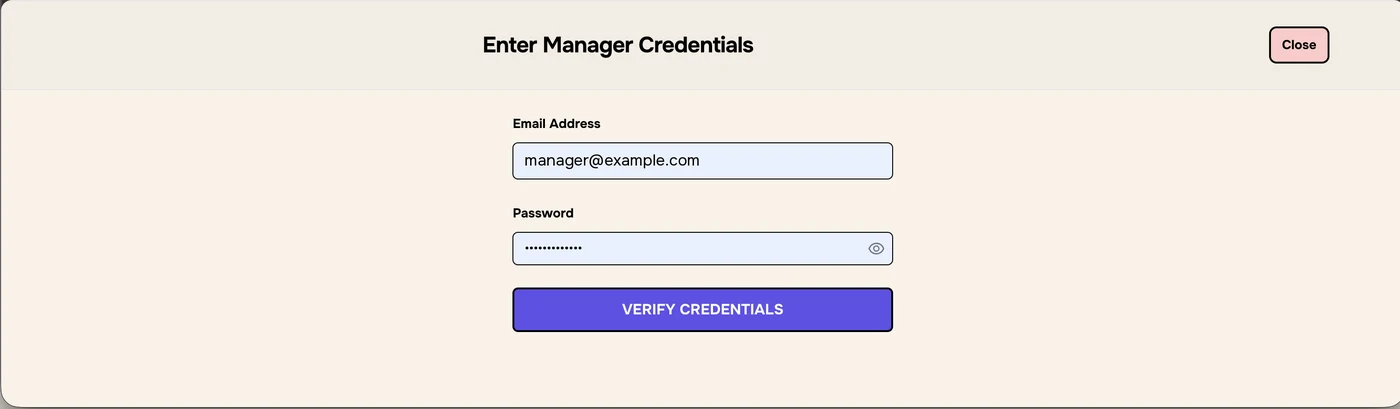
In Enter Manager Credentials, a manager enters their email address and password, then clicks VERIFY CREDENTIALS.
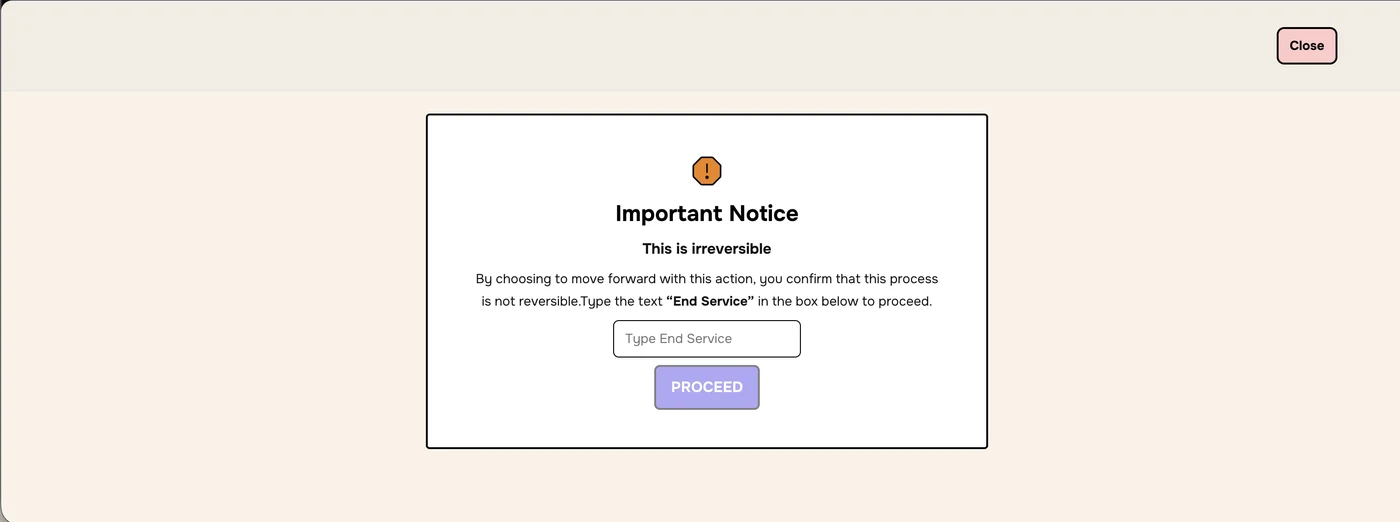
An Important Notice warns that this is irreversible. Type End Service in the box.
Click PROCEED. It stays greyed out until you type the words exactly. To stop, click Close.
Ending a service can’t be undoneCheck the dates and outcome with your manager first. The outcome can be changed later (step 5), but the service stays ended.
A manager approves. The email is an example.Type End Service, then Proceed.
4
Read the summary
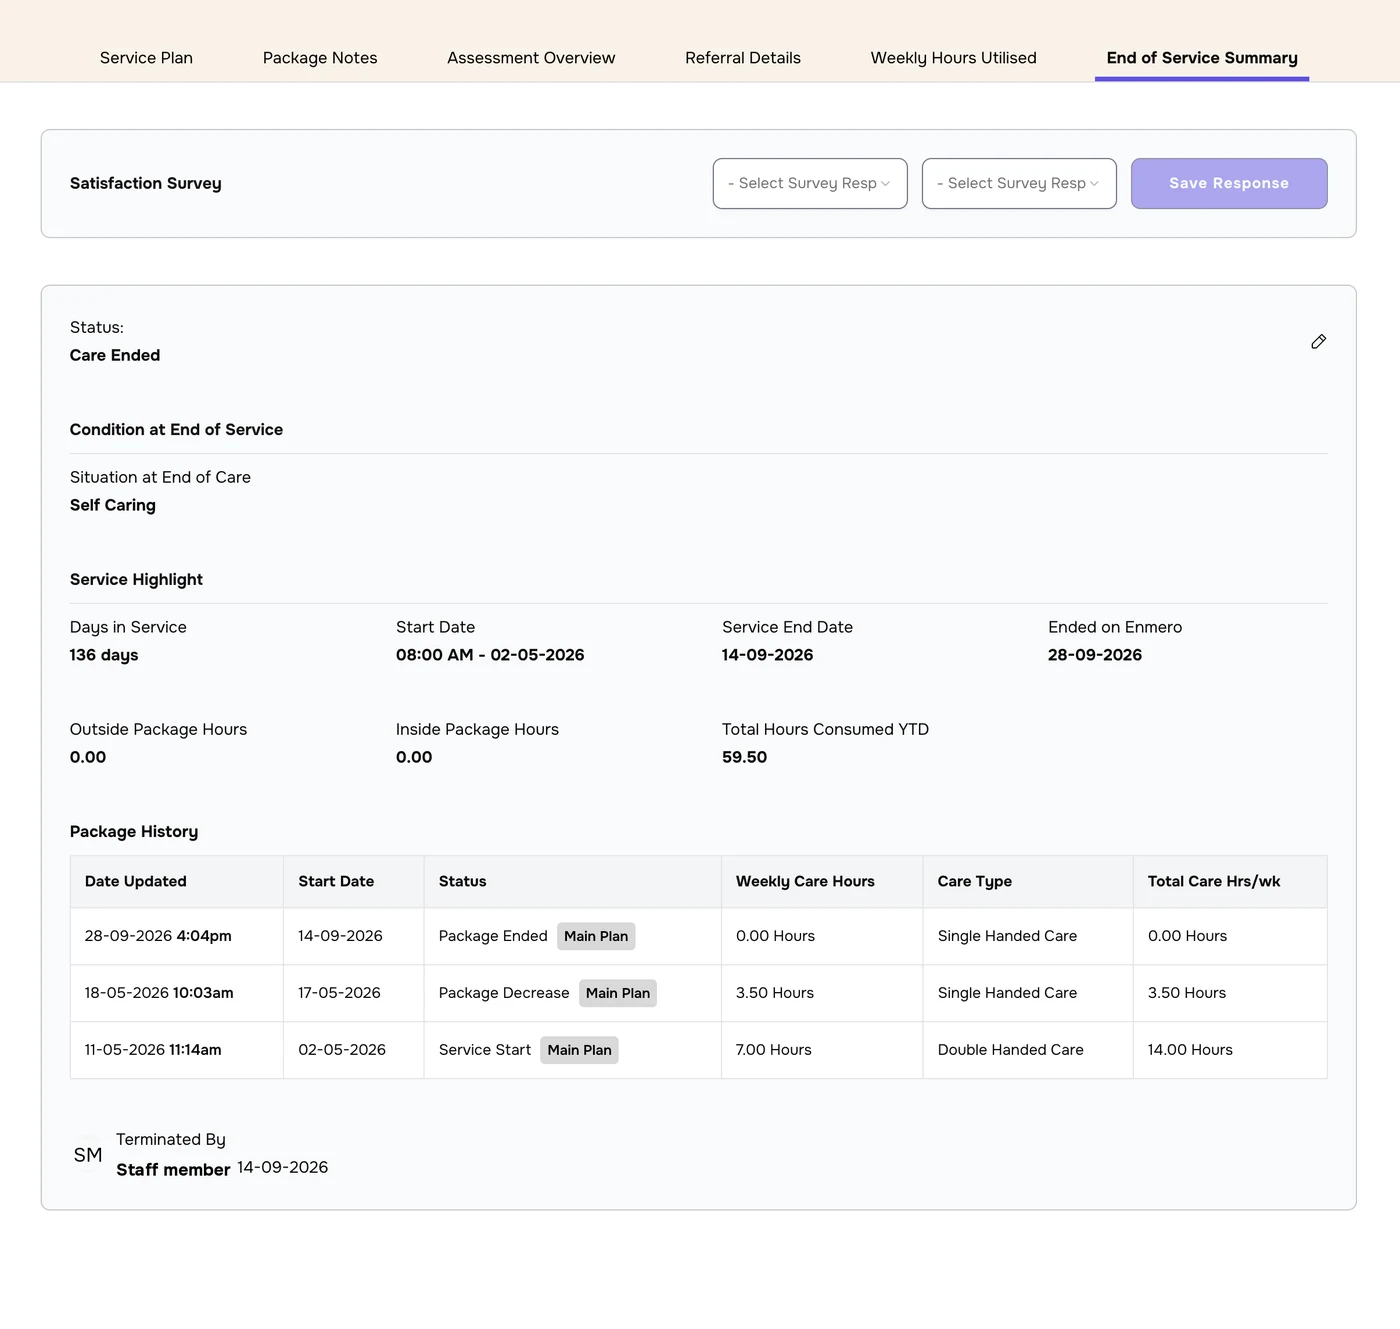
Once the service has ended, the tab shows:
Section
What it shows
Satisfaction Survey
Two survey responses to choose, then Save Response
Status
Care Ended or Failed Start
Condition at End of Service
The Situation at End of Care, for example Self Caring
Service Highlight
Days in Service, Start Date, Service End Date, Ended on Enmero (the day it was recorded), Outside and Inside Package Hours, and Total Hours Consumed YTD
Package History
Every change to the package: service start, increases, decreases and the end, with the hours and care type
Terminated By
Who ended the service, and when
An ended package. The name is replaced.
5
Change the status or outcome
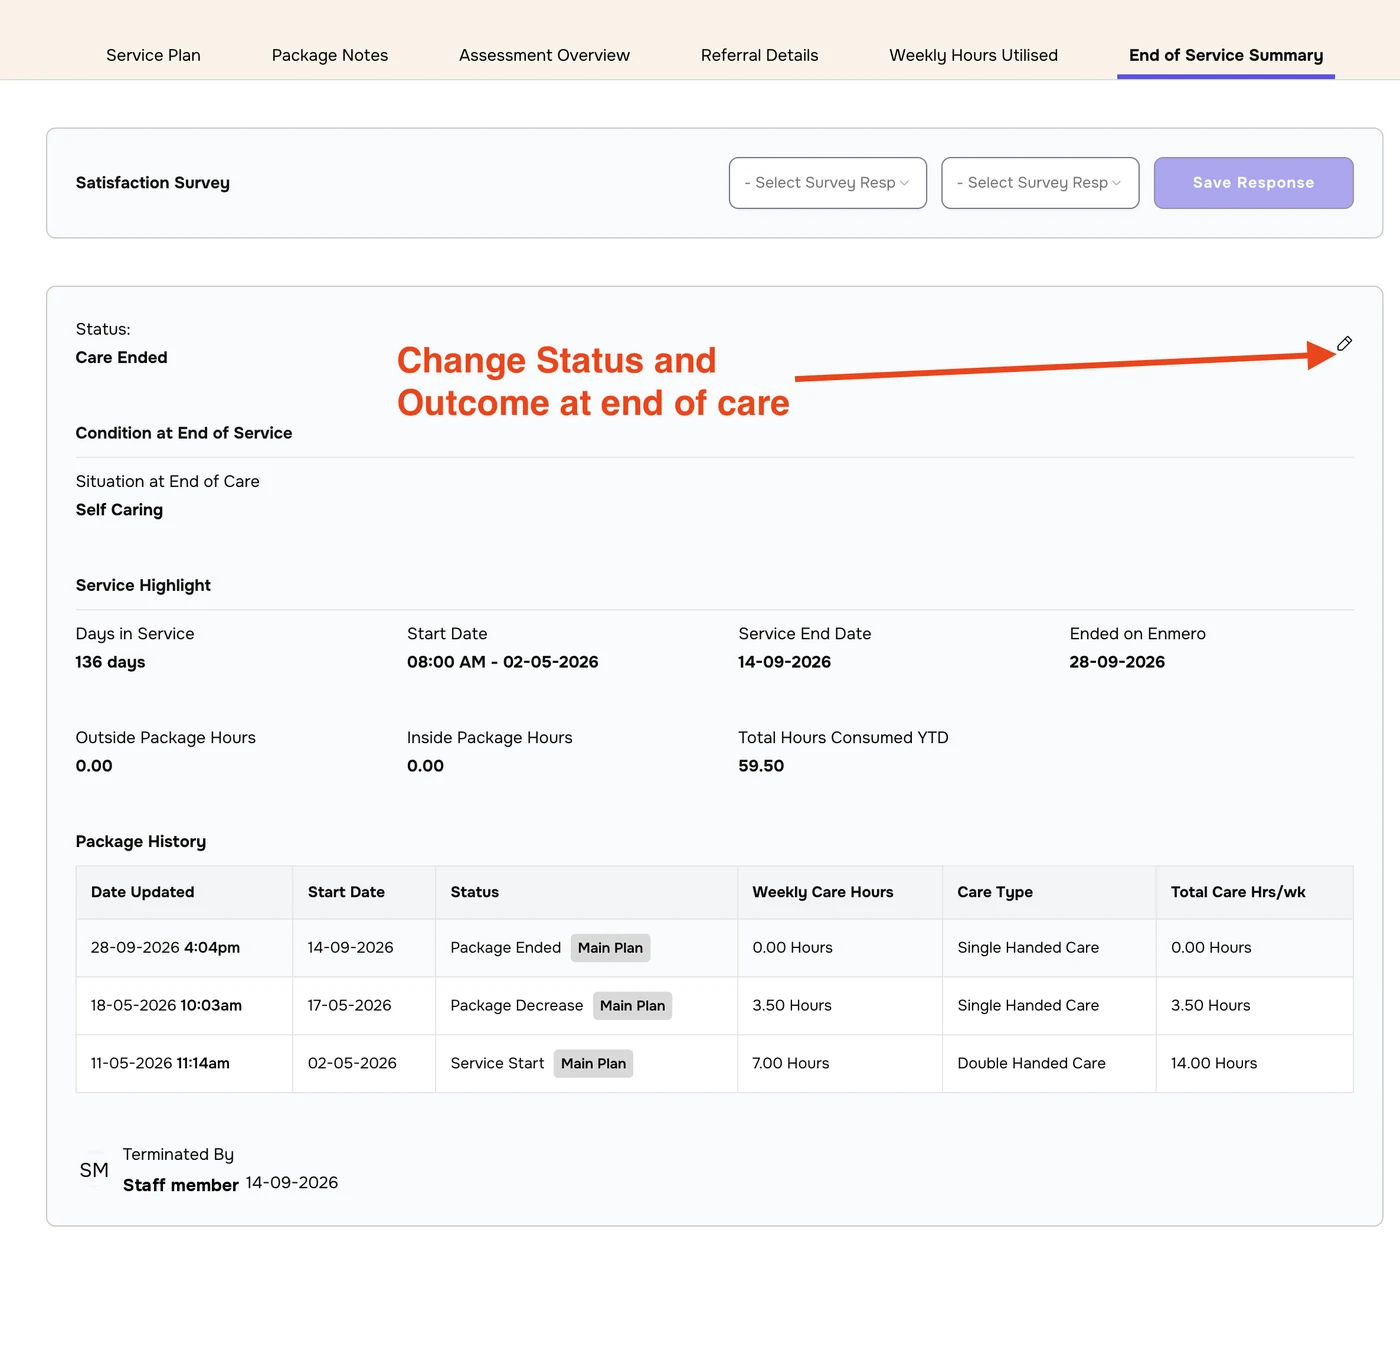
Click the pencil icon at the top right of the summary.
In Add Package Note, enter a Title and Note explaining the change, and upload an attachment (JPG, PNG or PDF, up to 5 MB). Click SAVE NOTE & CONTINUE.
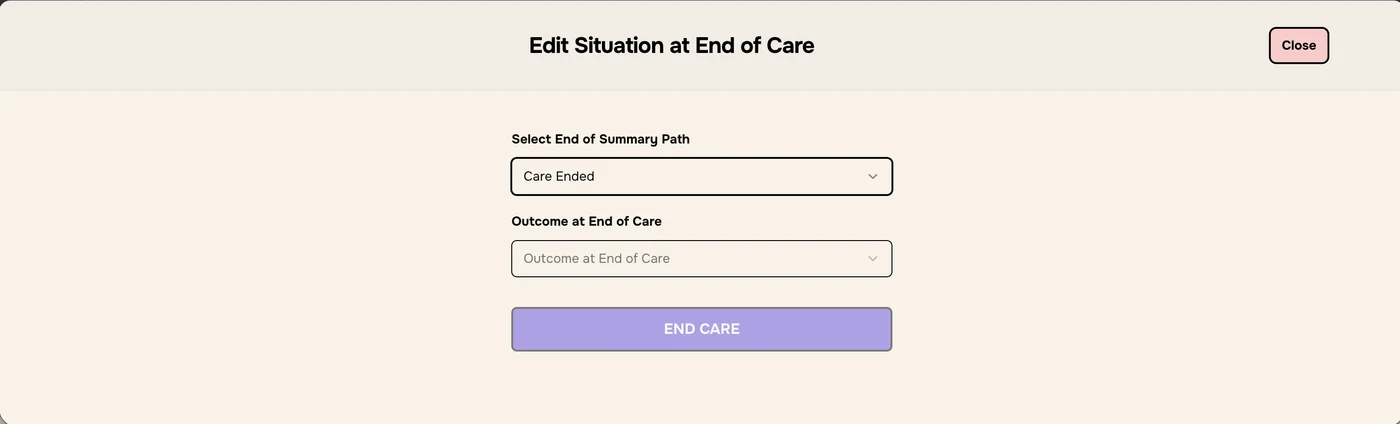
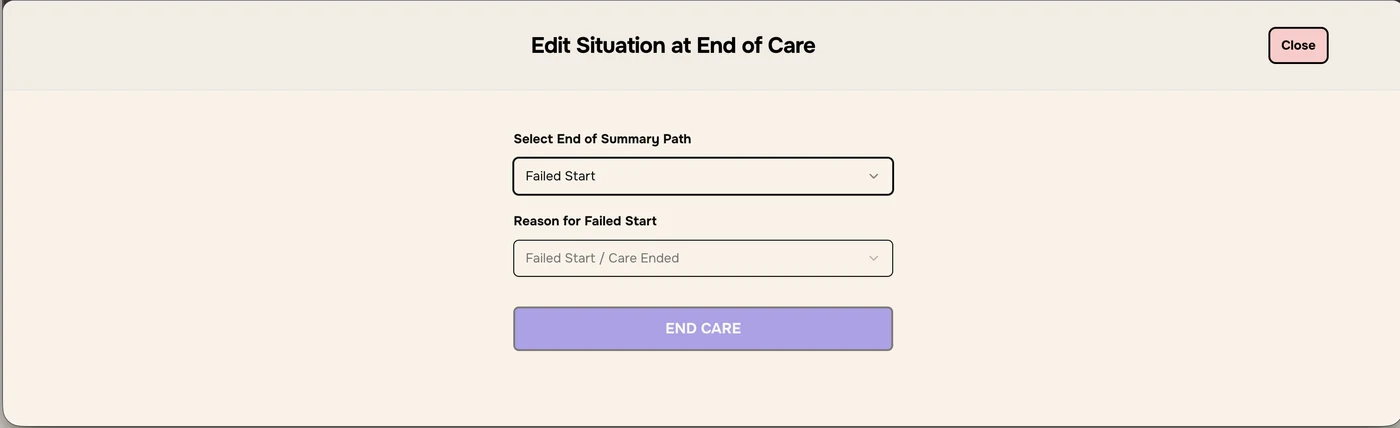
In Edit Situation at End of Care, choose the End of Summary Path: Care Ended or Failed Start.
Choose the Outcome at End of Care or Reason for Failed Start.
Click END CARE.
Click the pencil icon.Add a package note first.Choose the path.
Care Ended: choose the outcome.Failed Start: choose the reason.
The note is saved to Package Notes, so there’s a record of the change.
Troubleshooting
What does END POC mean?
End Package of Care. It’s another name for END CARE: ending the service user’s package of care.
END CARE stays greyed out
Choose the reason for ending, the outcome or failed start reason, and the End of Service Date.
Ending needs manager credentials
Only a manager can approve ending a service. Ask a manager to enter their email address and password.
PROCEED stays greyed out
Type End Service exactly, with capital letters and a space.
I chose the wrong outcome
Click the pencil icon on the summary, add a package note explaining why, and choose the correct outcome.
What’s the difference between Service End Date and Ended on Enmero?
Service End Date is when care actually ended. Ended on Enmero is the day it was recorded in Enmero.
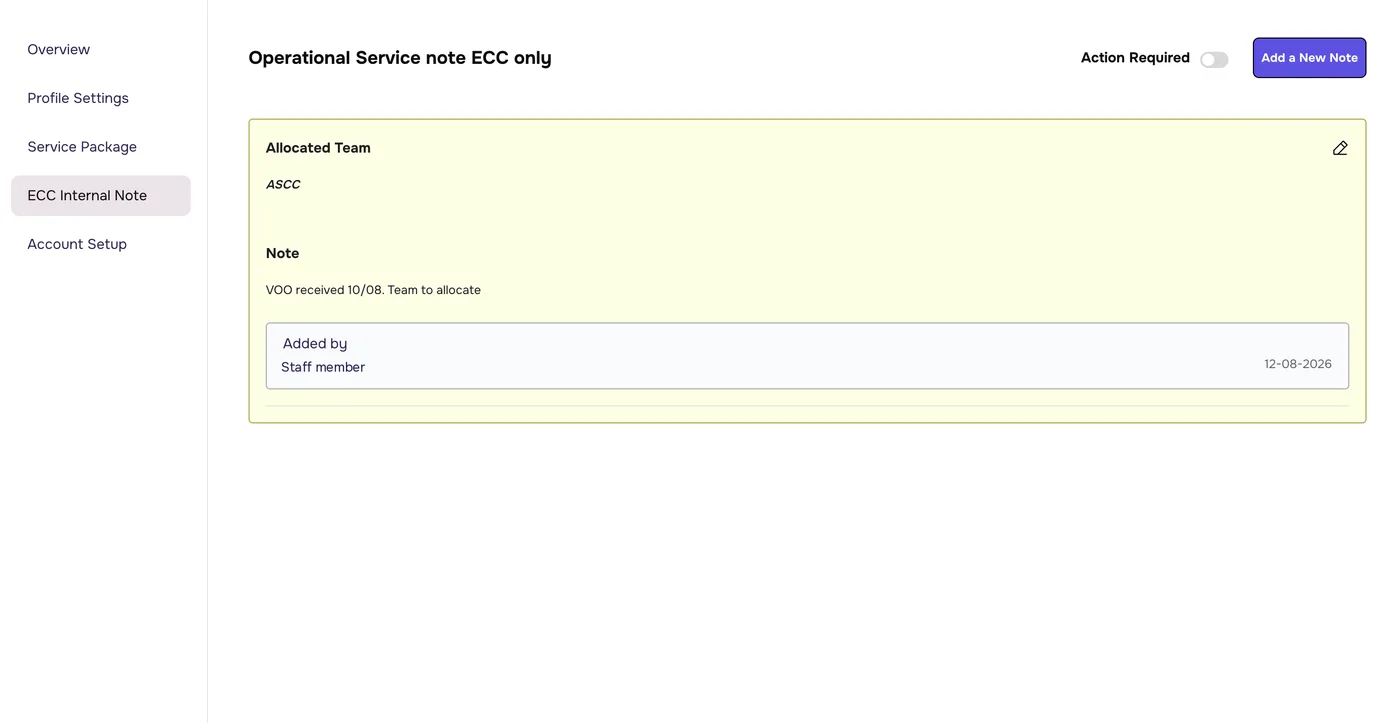
The profile’s ECC Internal Note page, titled “Operational Service note ECC only”, shows the latest internal note about the service user.
1
Read the note
The note card shows:
Allocated Team: the team responsible, for example ASCC.
Note: what was written, for example “VOO received 10/08. Team to allocate”.
Added by: who wrote it, and the date.
ECC notes are written specifically for ECC teams. They’re mainly used to track updates on a service user’s service. For changes and requests on a package, such as a package increase, use Package Notes instead.
The ECC Internal Note page. The staff name is replaced.
2
Add or edit a note
Click Add a New Note at the top right to add a note.
Click the pencil icon on the note card to edit it.
Switch on Action Required if someone needs to act.
The same notes open from the ECC Note icon in the service user table. The ECC internal notes guide goes through the Add New Note form and the filters.
Troubleshooting
Is this the same note as in the table?
Yes. The ECC Note icon in the service user table opens the same notes.
Use Add Service User Record when the service user is new to Enmero but their referral isn’t recent. For example, their package has already started, ended or failed to start. Onboarding them as a new referral wouldn’t fit.
Check they aren’t already in EnmeroEnmero matches service users by NHS number and Mosaic number. If they already have a profile, add the package from that profile instead.
2
Open Add Service User Record
In the menu on the left, go to Service › Service Users.
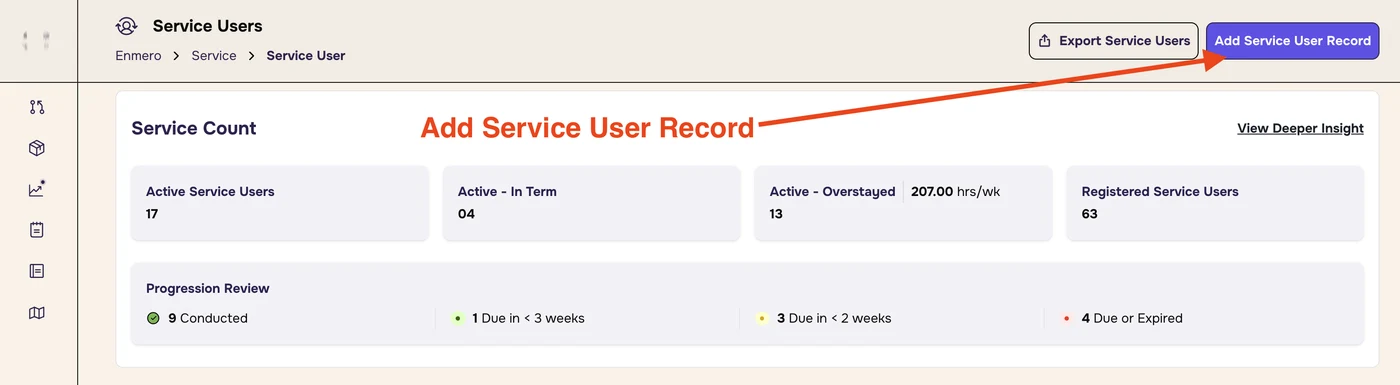
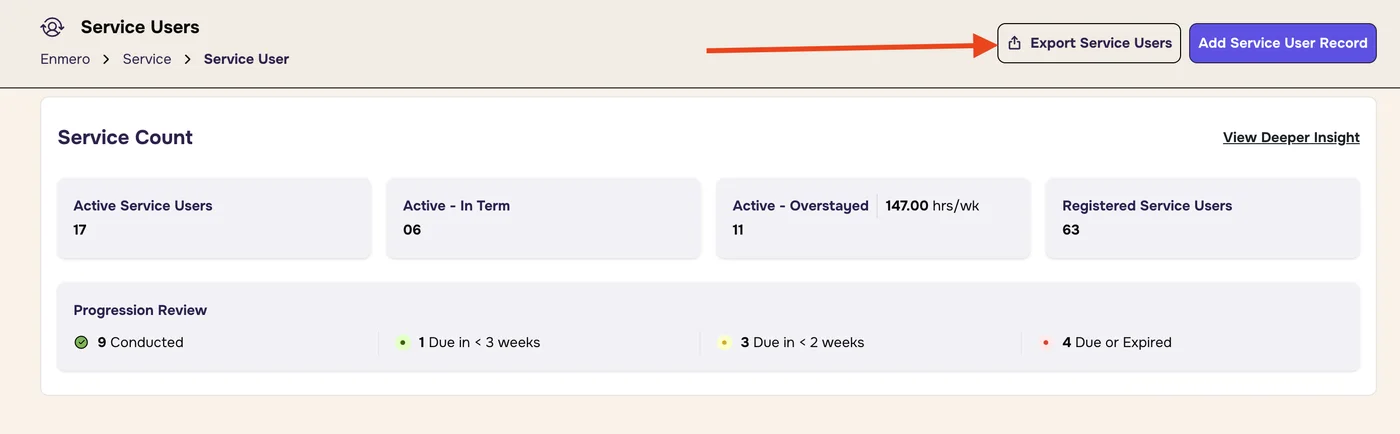
At the top right, next to Export Service Users, click Add Service User Record.
Add Service User Record is at the top right of the Service Users page.
An eight-stage form opens. Close at the top right leaves the form. From stage 2 onwards, the ← button goes back a stage.
3
Stages 1–3: person, address, referral
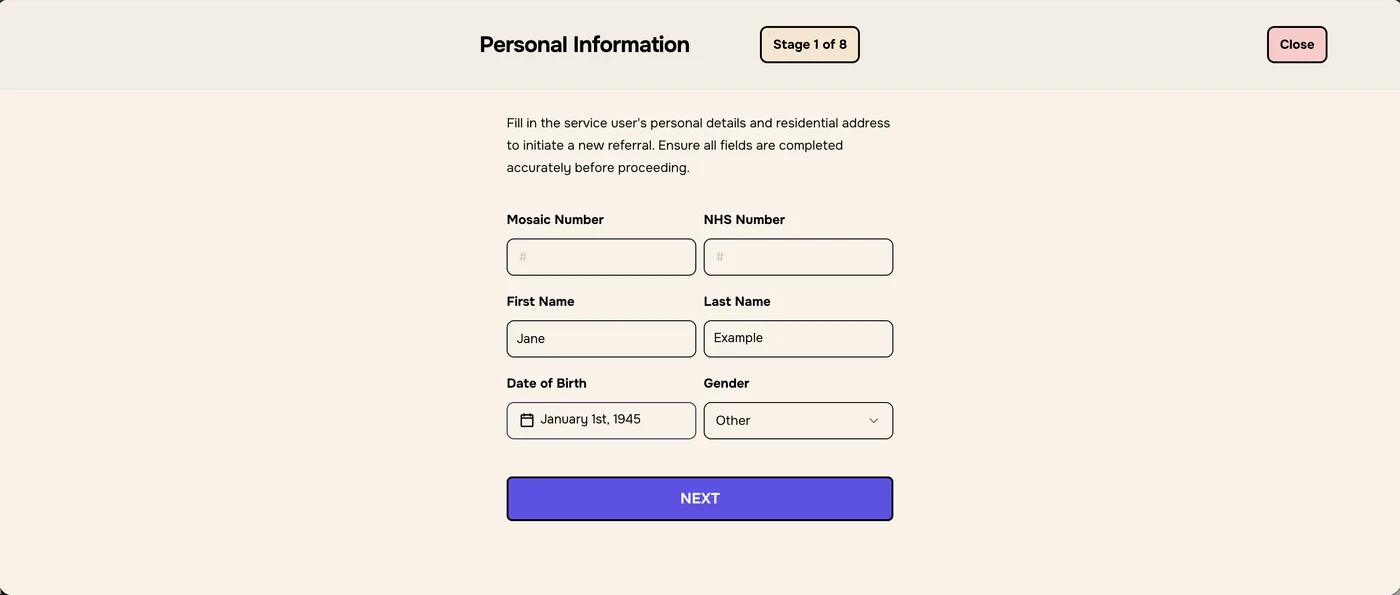
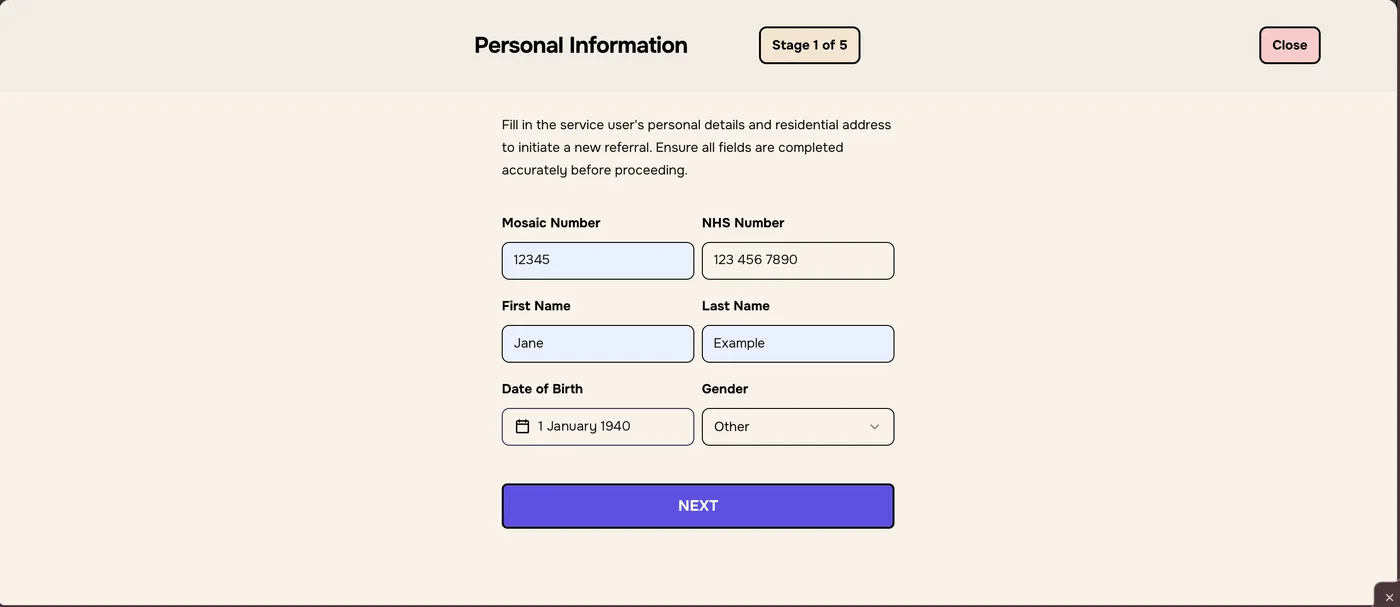
Stage 1: Personal Information
Enter the Mosaic Number and NHS Number.
Enter the First Name, Last Name, Date of Birth and Gender.
Click NEXT.
Stage 1 of 8. Example details shown.
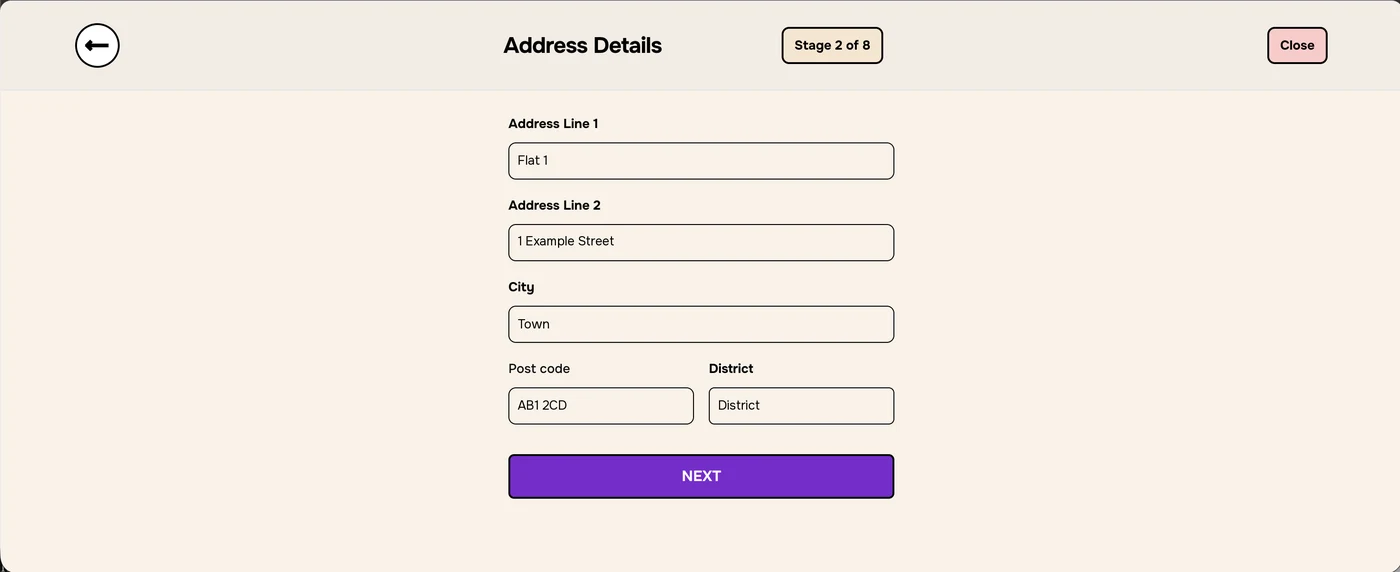
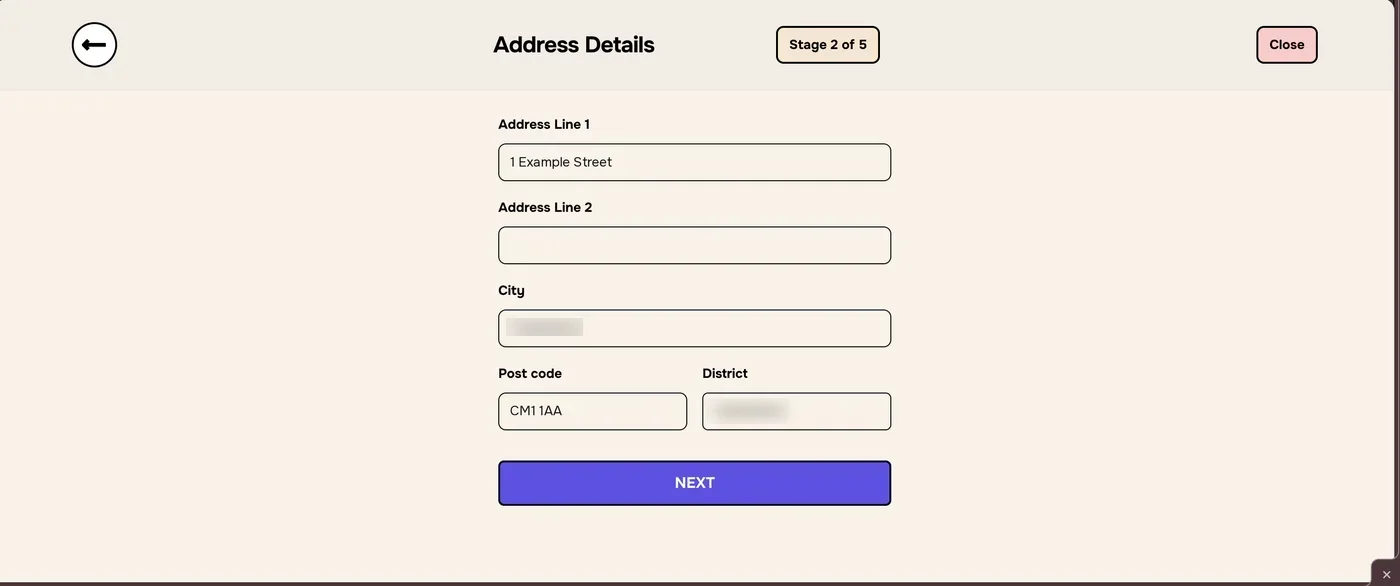
Stage 2: Address Details
Enter Address Line 1, Address Line 2, City, Post code and District.
Click NEXT.
Stage 2 of 8. The address is replaced with example text.
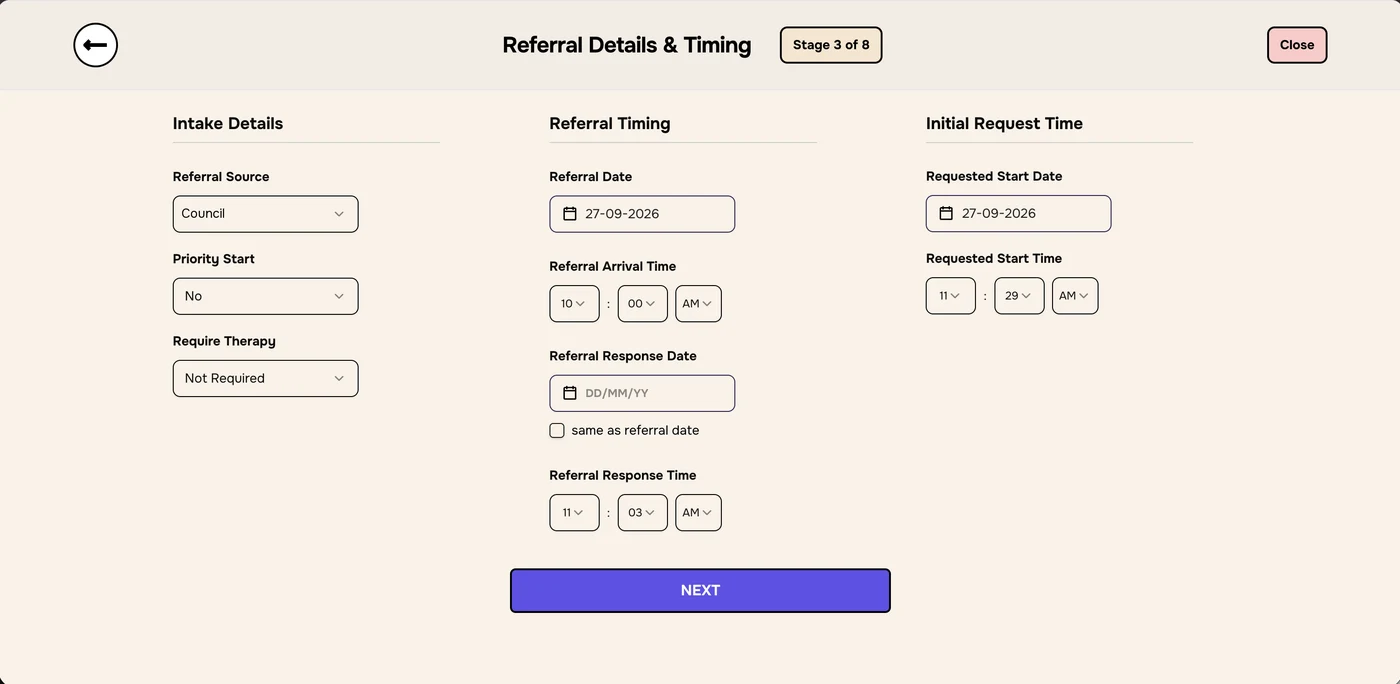
Stage 3: Referral Details & Timing
Intake Details: Referral Source, Priority Start and Require Therapy.
Referral Timing: Referral Date, Referral Arrival Time, Referral Response Date and Referral Response Time. Tick same as referral date if you responded on the same day.
Initial Request Time: the Requested Start Date and Requested Start Time.
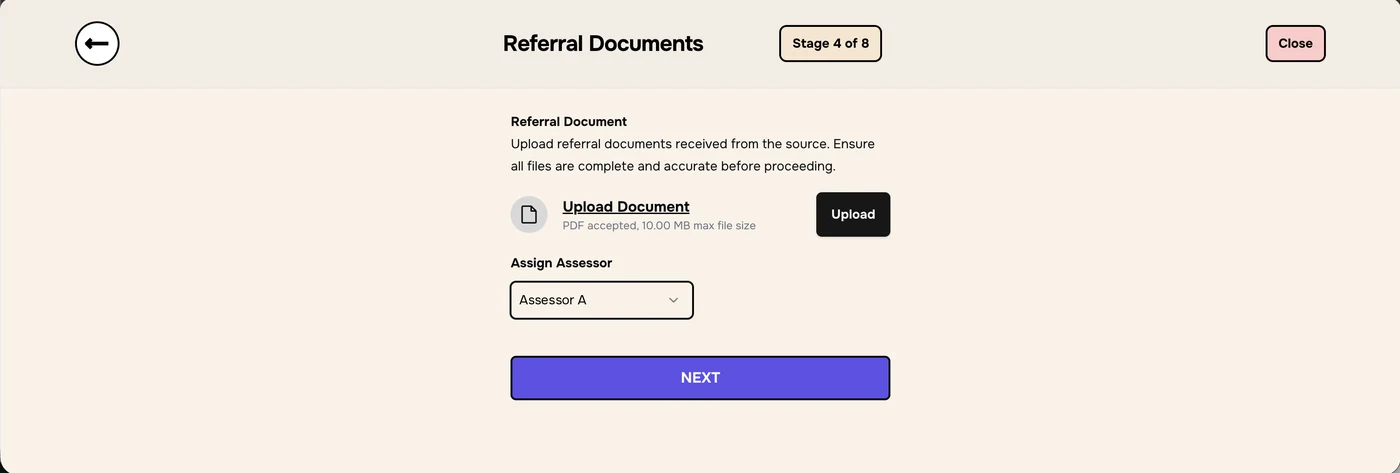
Click Upload Document, choose the referral document, then click Upload. Only PDFs of up to 10 MB are accepted.
Under Assign Assessor, choose the assessor.
Click NEXT.
Stage 4 of 8. The assessor’s name is replaced.
5
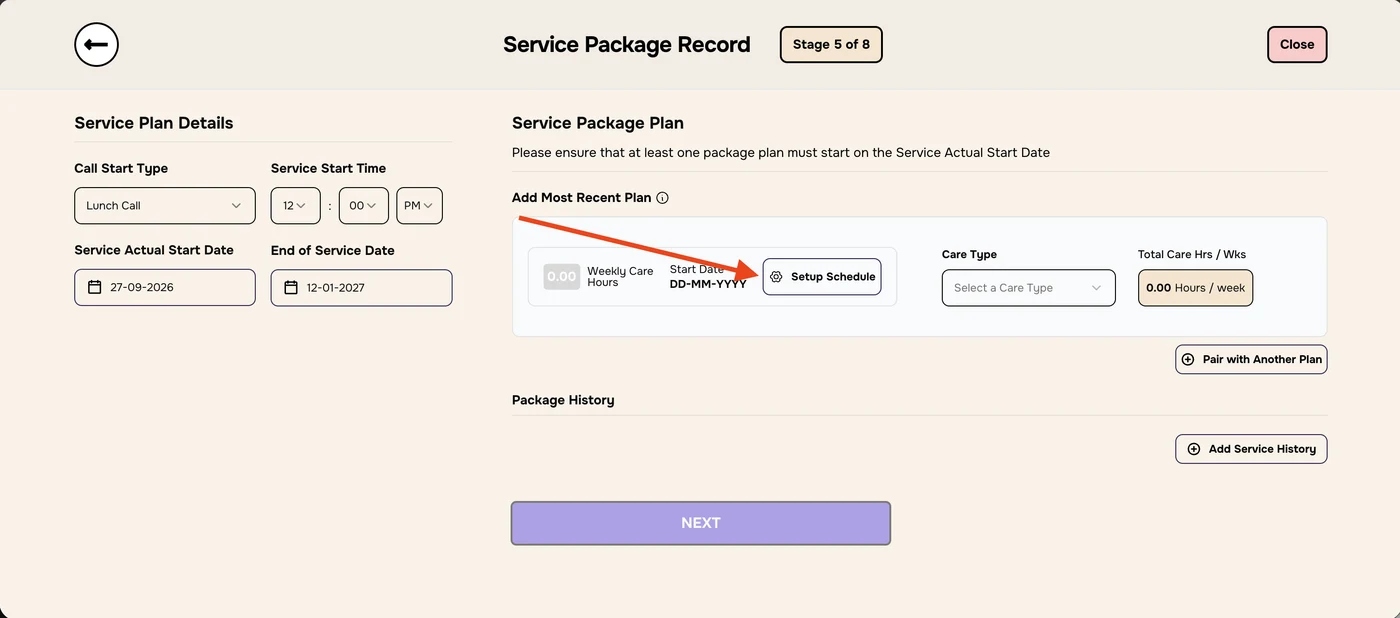
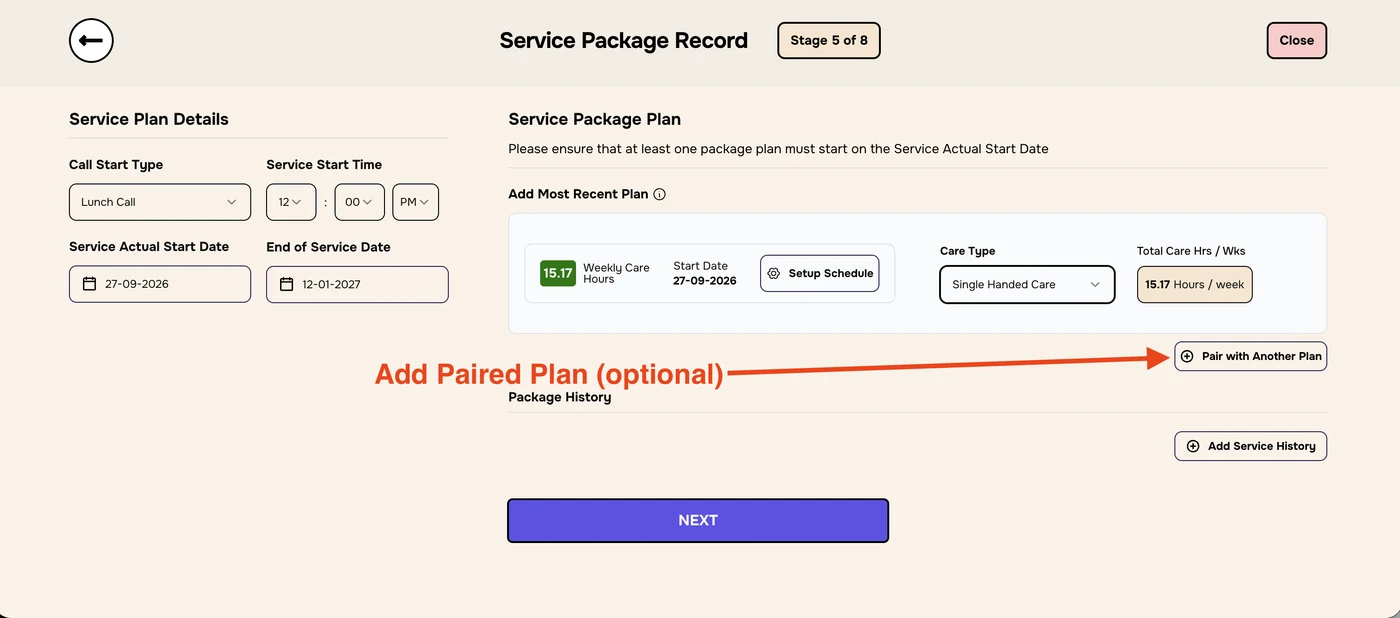
Stage 5: service package record
Service Plan Details
Choose the Call Start Type and Service Start Time.
Enter the Service Actual Start Date and the End of Service Date.
Add Most Recent Plan
At least one package plan must start on the Service Actual Start Date.
Click Setup Schedule.
Switch on each day care is delivered and enter the hours and minutes. Tick Use the same schedule all week if every day is the same.
Check the Effective Start Date: the date this schedule started. If you leave it empty, Enmero sets it from the latest active package.
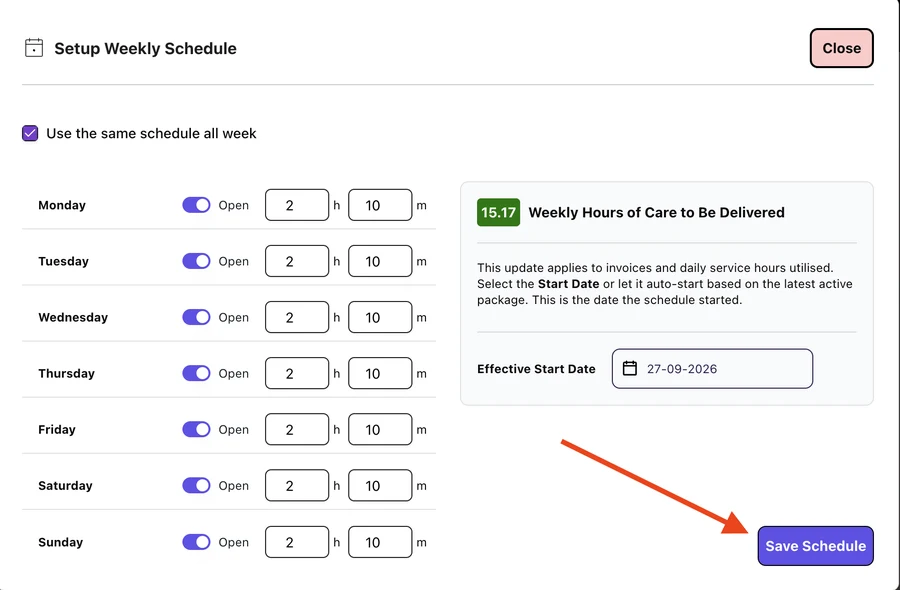
Click Save Schedule. For example, 2h 10m every day is 15.17 weekly care hours.
Choose the Care Type. Total Care Hrs / Wks updates.
Click Setup Schedule. NEXT stays greyed out until a plan is set.Set the hours, then Save Schedule.
This affects invoicesThe weekly hours you save apply to invoices and to the daily service hours utilised.
6
Stage 5: paired plan and history
Paired plan (optional)
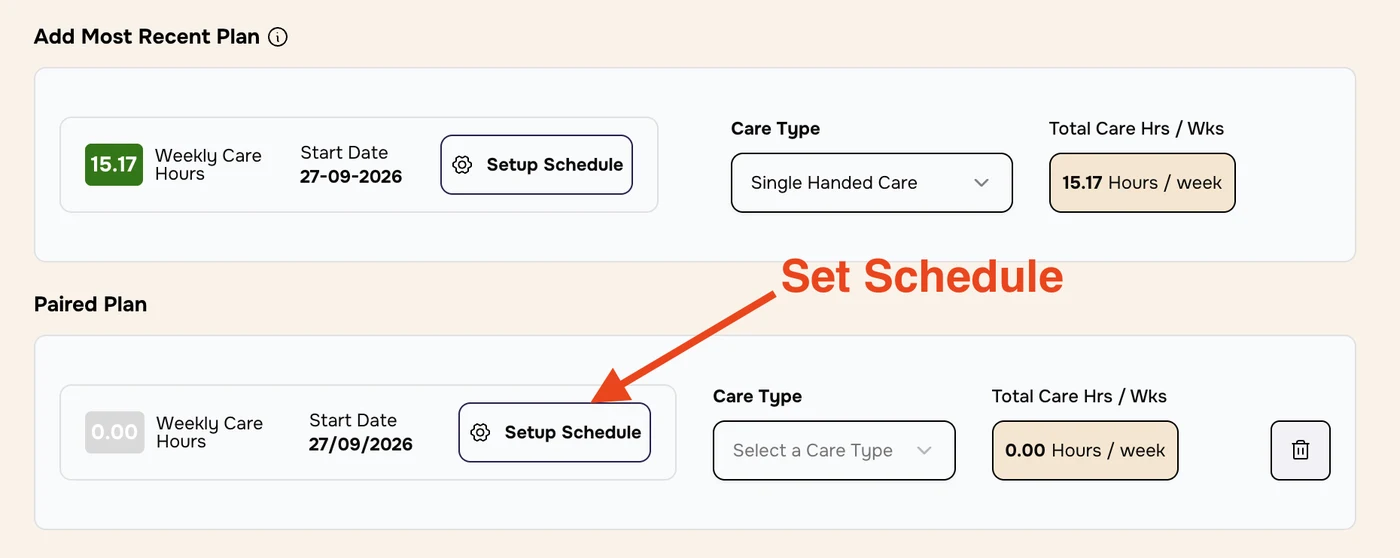
Click Pair with Another Plan. A Paired Plan box appears below the most recent plan.
Click its Setup Schedule and set its hours.
Choose its Care Type. To remove the paired plan, click the bin icon.
Pair with Another Plan is optional.
Set the paired plan’s schedule.Then choose its care type.
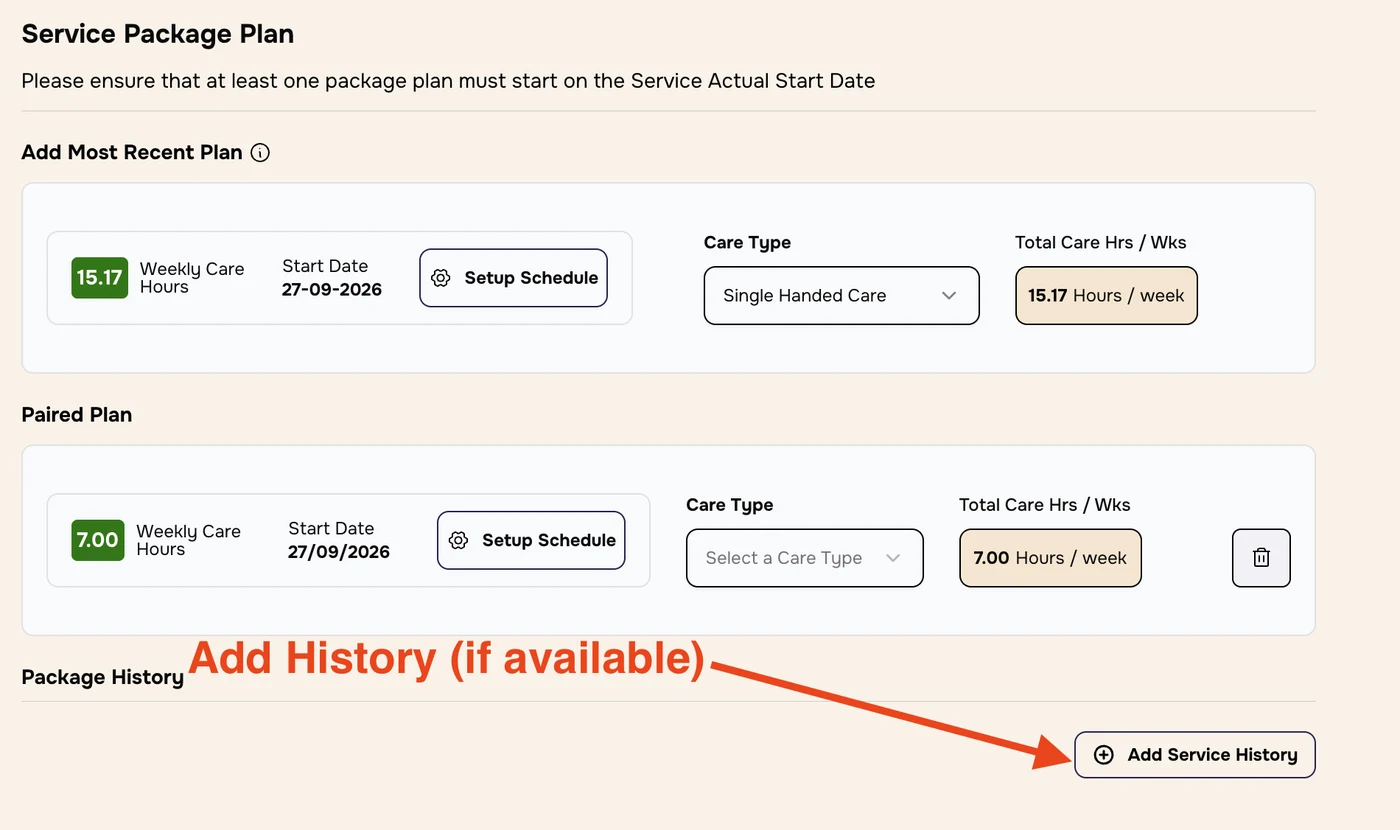
Package history (if available)
If the package had earlier plans, add each one:
Click Add Service History.
Enter the Weekly Care Hours, Start Date and Care Type. Total Care Hrs/wk is worked out for you.
To remove a row, click its bin icon.
Add Service History, if there is any.A Package History row.
Click NEXT.
7
Stage 6: VOO and RAG rating
If the progression review (VOO) has happened, tick Click if Progression Review (VOO) has been conducted. Then upload the completed VOO document, as a PDF of up to 10 MB.
Check the Date VOO Conducted. Enmero sets it to 3 weeks after the Service Actual Start Date. For example, a start date of 27-09-2026 gives 18-10-2026.
Choose a RAG Rating, for example Medium Risk.
Click NEXT.
Stage 6 of 8.
8
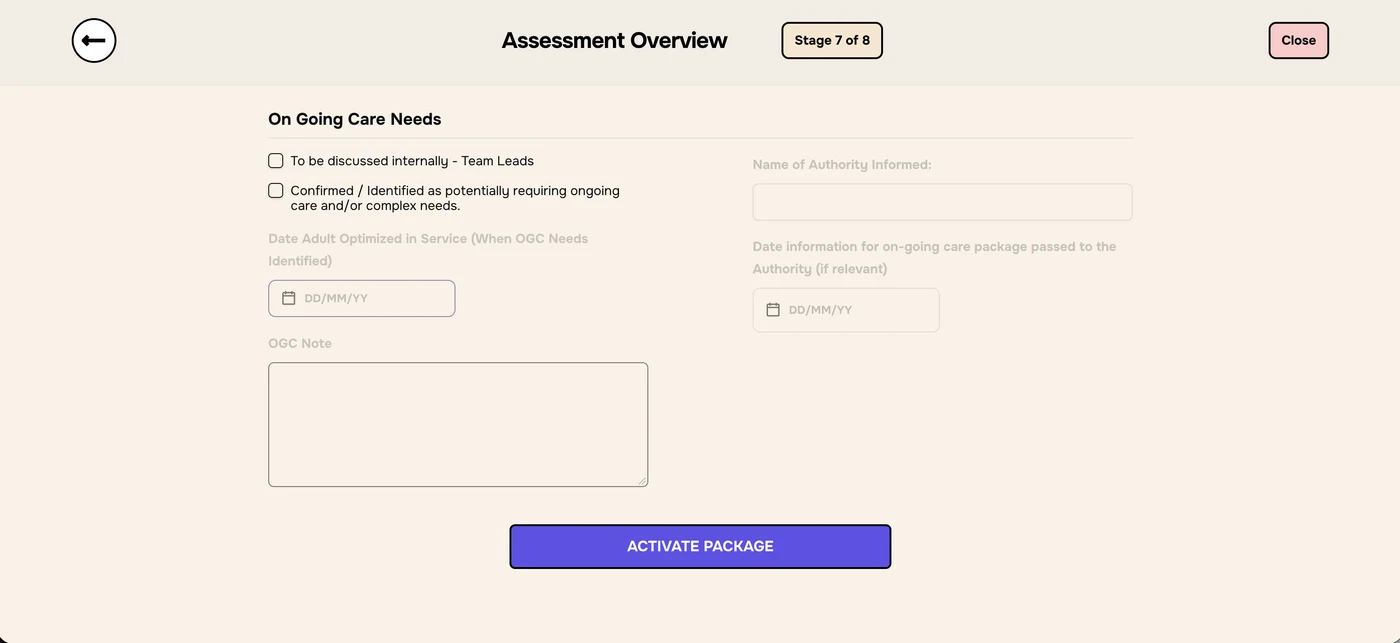
Stage 7: assessment overview
Fill in On Going Care Needs if they apply, as described in Add service package. Then click ACTIVATE PACKAGE to go on to the last stage.
Stage 7 of 8.
9
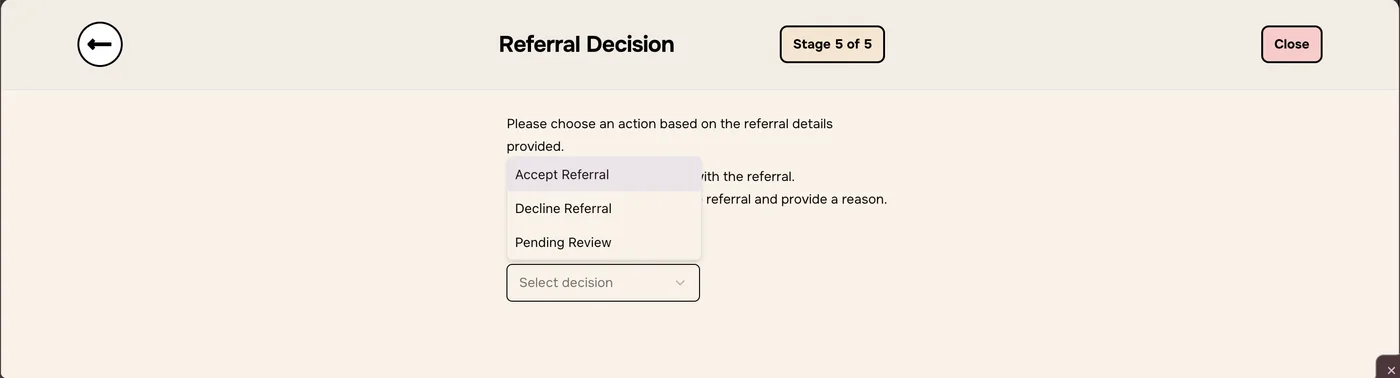
Stage 8: service summary
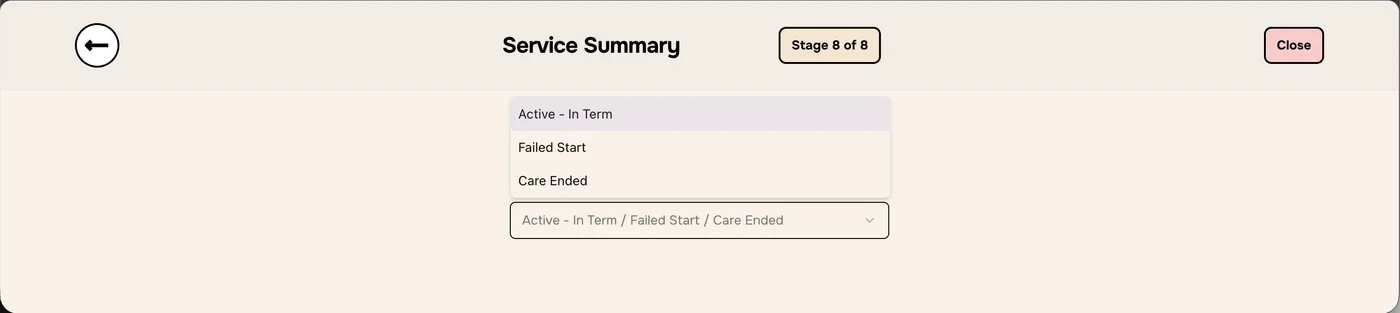
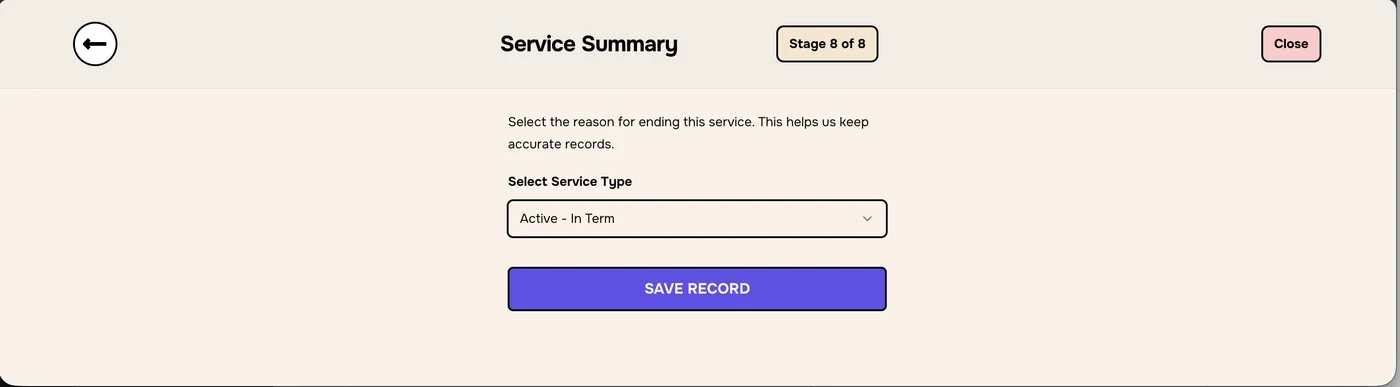
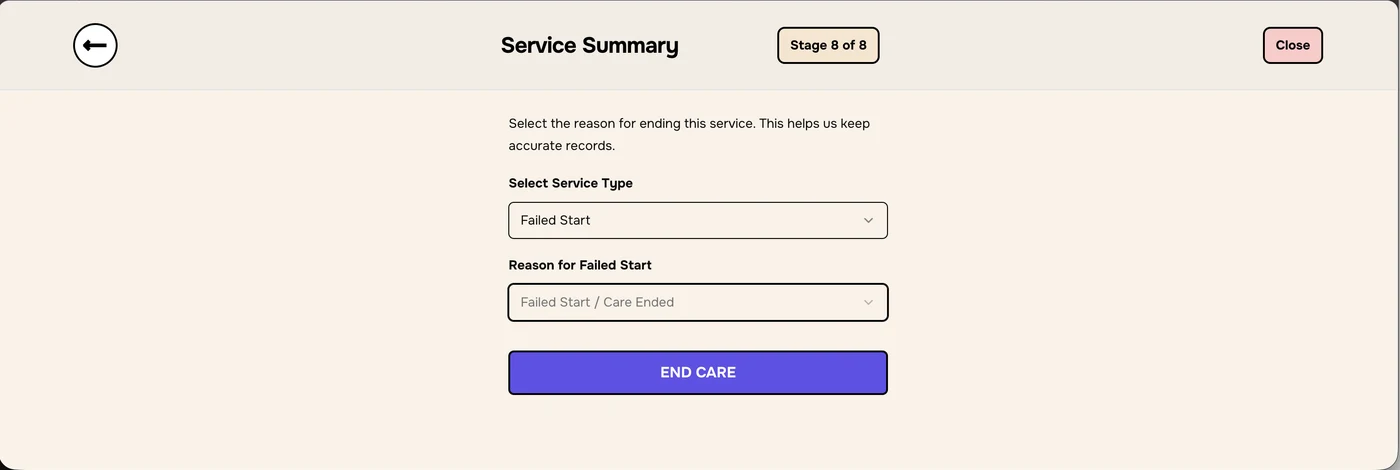
Under Select Service Type, choose the package’s status. The button you click next depends on your choice. END CARE is also called End Package of Care, or END POC.
Service type
Then
Button
Active - In Term
The package is still running. Nothing else to choose.
SAVE RECORD
Failed Start
Choose a Reason for Failed Start.
END CARE
Care Ended
Choose the Situation at End of Care.
END CARE
The three service types.Active - In Term: SAVE RECORD.
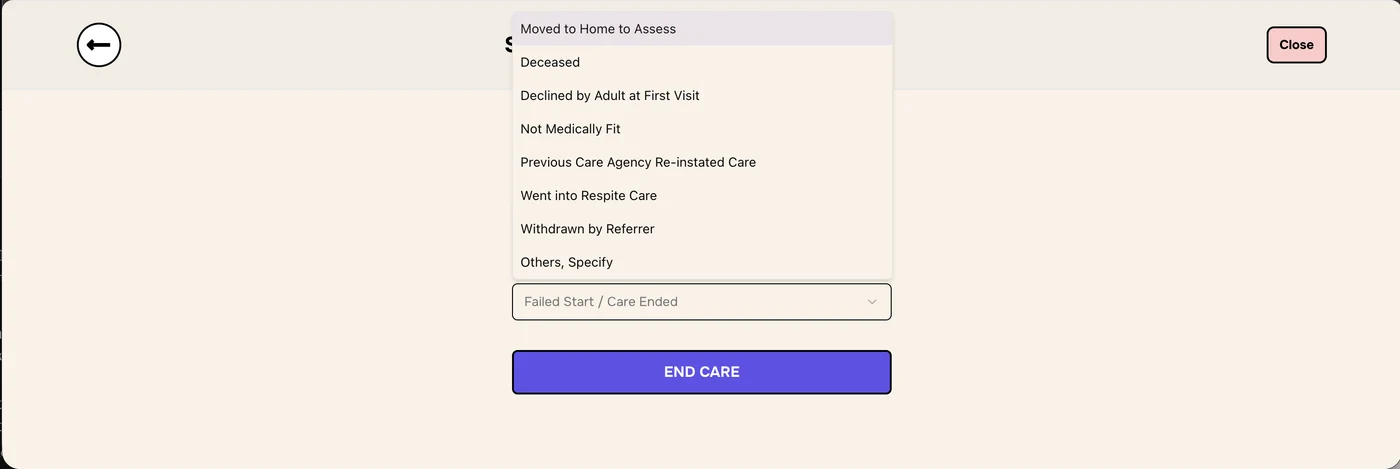
Reasons for failed start
Moved to Home to Assess
Deceased
Declined by Adult at First Visit
Not Medically Fit
Previous Care Agency Re-instated Care
Went into Respite Care
Withdrawn by Referrer
Others, Specify
Failed Start.The failed start reasons.
Situation at end of care
For Care Ended, the options are the same as in Add package record. They include Moved to Home to Assess, Admitted / Readmitted to Hospital, Residential Care and Self-Caring.
END CARE stays greyed out until you choose a situation.
The service user is already in Enmero, matched by NHS or Mosaic number. Open their profile and use Add package record or Add service package instead.
NEXT stays light purple on stage 5
Set up the most recent plan’s schedule and care type. At least one plan must start on the Service Actual Start Date. Complete or delete any paired plan or Package History row you added.
END CARE is greyed out
Choose a Reason for Failed Start, or a Situation at End of Care, first.
I can’t change the Date VOO Conducted
Enmero works it out from the Service Actual Start Date. Change the start date instead.
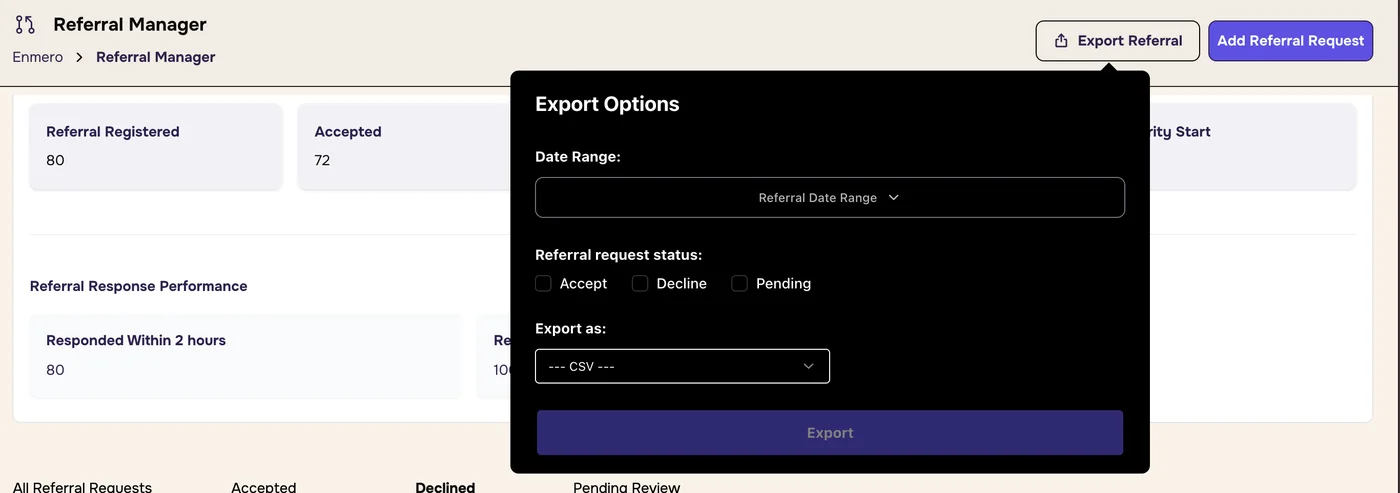
Download a list of service users as a CSV or Excel file, filtered by date and status. This is only available to users with export access.
1
Who can export
Restricted accessExporting service user details is only available to users who have been given export access. If you can’t see Export Service Users, or the export doesn’t work, ask the person who manages your organisation’s Enmero access.
Exported files contain service users’ personal details. Store and share them following your organisation’s data protection rules.
2
Open the export
Open Service › Service Users.
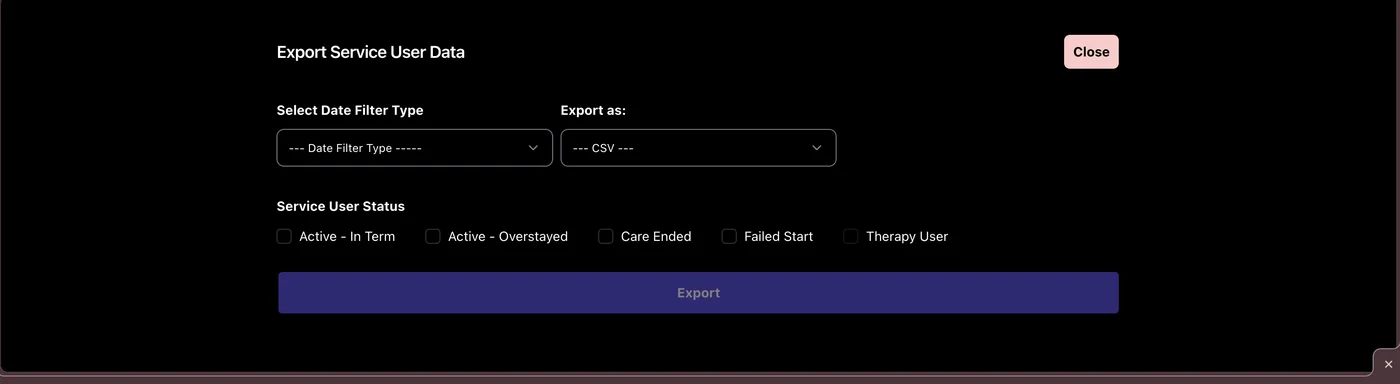
Click Export Service Users at the top right. The Export Service User Data window opens.
Click Export Service Users.The Export Service User Data window.
3
Choose the dates
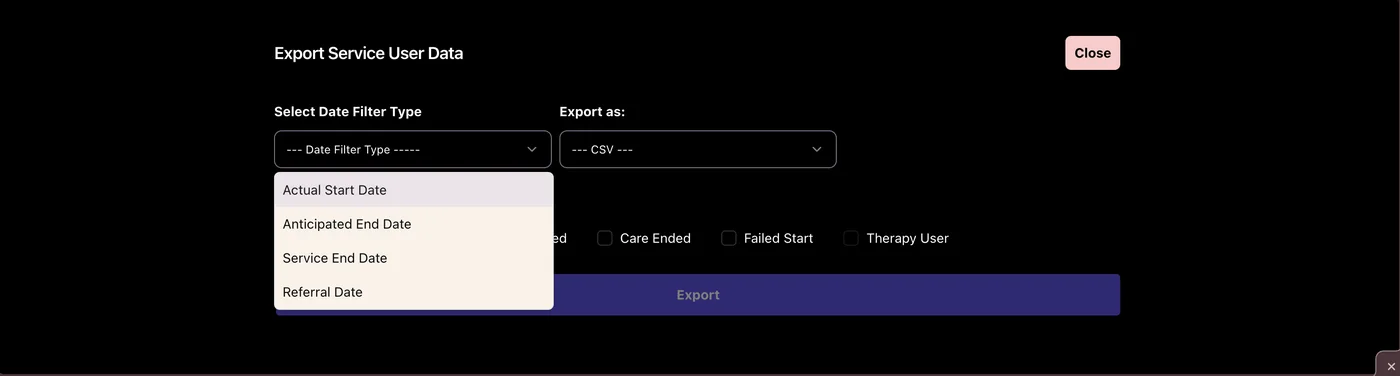
Open Select Date Filter Type and choose which date to filter by:
Actual Start Date: when care started.
Anticipated End Date: when care is expected to end.
Service End Date: when care ended.
Referral Date: when the referral was received.
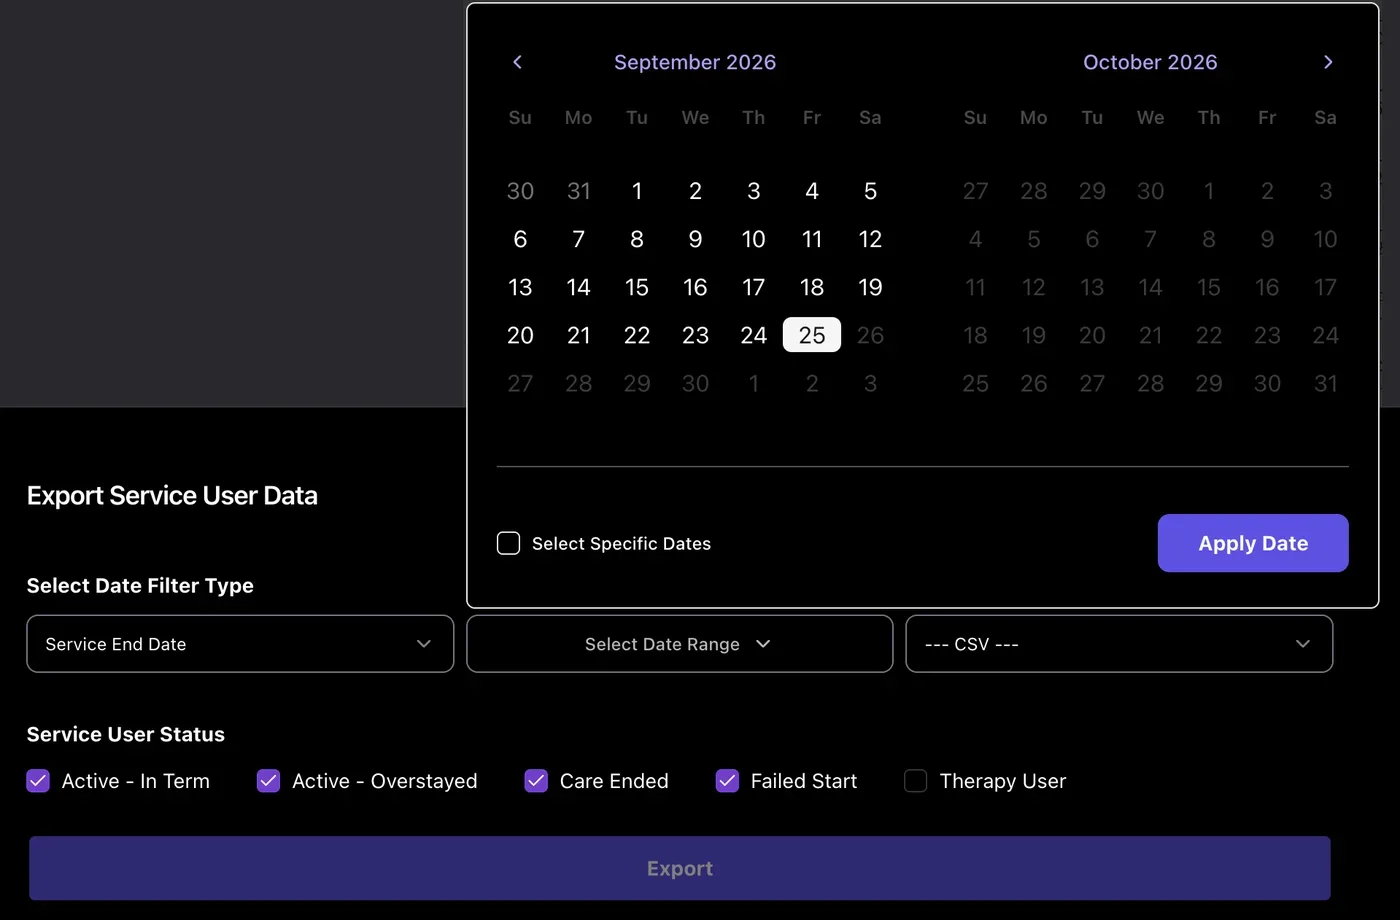
Click Select Date Range, which appears once you’ve chosen a filter type. In the calendar, click the first and last dates. Tick Select Specific Dates to pick individual days instead.
Click Apply Date.
The four date filter types.Pick the date range, then click Apply Date.
4
Choose statuses and file type
Under Service User Status, tick the service users to include: Active - In Term, Active - Overstayed, Care Ended, Failed Start and Therapy User. Tick as many as you need.
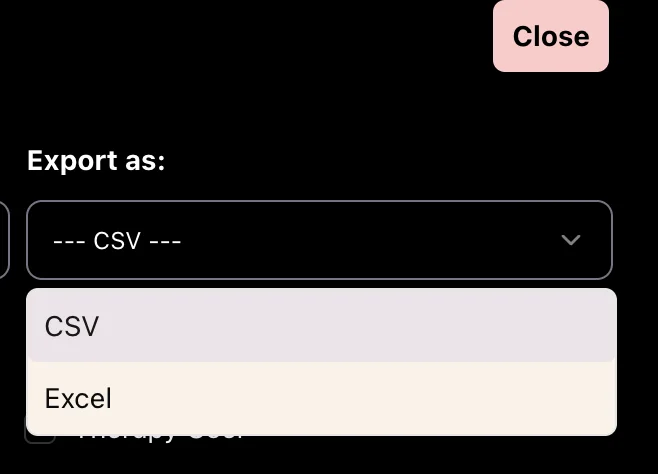
Under Export as, choose CSV or Excel. Both open in spreadsheet programs such as Excel.
Tick the statuses to include.Choose CSV or Excel.
5
Export and receive the file
Click Export. It stays greyed out until you’ve chosen dates and at least one status.
For shorter date ranges, the file downloads straight away.
Large exports can take longerDepending on the date range, an export can take a while. For large exports, the file may be sent to your email address instead of downloading, if your access level allows it. Check your inbox, including junk, before exporting again.
Troubleshooting
I can’t see Export Service Users
Exporting is restricted. Ask the person who manages your organisation’s Enmero access to give you export access.
The Export button is greyed out
Choose a date filter type, apply a date range and tick at least one status.
My export hasn’t downloaded
Large date ranges can take longer, and the file may be emailed to you instead. Check your inbox and junk folder. Try a shorter date range if you need it sooner.
CSV or Excel?
Both open in Excel. Choose Excel for formatting, or CSV for importing into other systems.
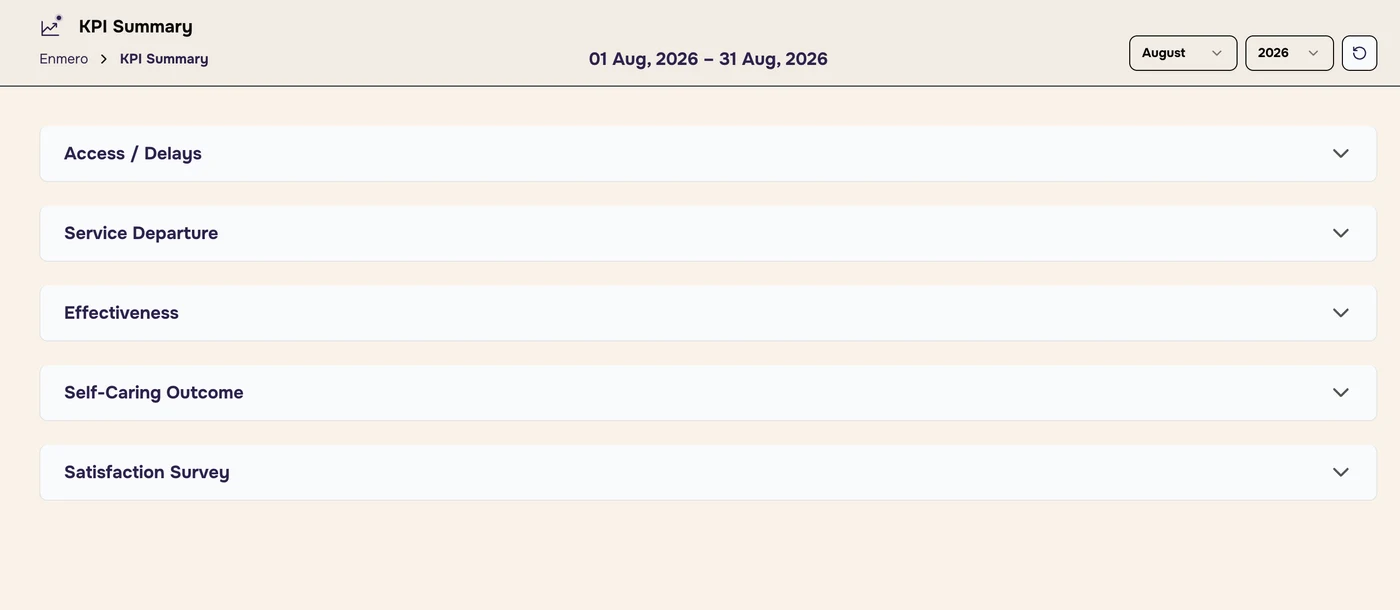
KPI Summary shows how your service is performing against its key performance indicators (KPIs) for a chosen month.
1
Open and choose a month
In the menu on the left, click KPI Summary.
At the top right, choose the month and year. The date range in the middle updates, for example 01 Aug, 2026 – 31 Aug, 2026.
Click the refresh button to reset the filters.
The KPIs are grouped into five sections: Access / Delays, Service Departure, Effectiveness, Self-Caring Outcome and Satisfaction Survey. Click a section to open or close it.
Choose the month, then open a section.
2
Read a KPI
Each KPI has a title, for example KPI 1A - % of Referrals Responded to Within 2 Hours, and two boxes:
Left box: the result as a percentage, and the KPI Target. The result is green when it meets the target and red when it’s below it.
Right box: the two numbers the percentage is worked out from.
Hover over the ⓘ icon next to a KPI title to see how it’s calculated.
3
Access / Delays and Service Departure
KPI
What it measures
Worked out from
KPI 1A
% of referrals responded to within 2 hours
Total Referrals and Responded ≤ 2 hours
KPI 1B
% of adults starting care within 24 hours of acceptance
Accepted Referrals and Started ≤ 24 hours
KPI 2
% of On Going Care (OGC) notifications submitted by the optimisation date
Referral Notifications and Submitted on time
KPI 2 uses the dates recorded in Assessment Overview. Record the date adult optimized and when the authority was told to keep it accurate.
Access / Delays and Service Departure open.
4
Effectiveness
KPI
What it measures
Worked out from
KPI 3A
Average reduction in adults’ planned care hours
Avg Original POC Hours and Avg planned hours reduced
KPI 3B
% of adults progressed to On Going Care in 42 days or less
Identified as appropriate for OGC and Progressed 42 days or less
KPI 3C
% of adults leaving as self-caring in 30 days or less
Self-Caring outcomes and Self-Caring ≤ 30 days
The Effectiveness KPIs.
5
Self-Caring Outcome and Satisfaction Survey
KPI
What it measures
Worked out from
KPI 4
Adults leaving reablement as self-caring or with informal care (no ongoing care)
Completed cases and Ongoing Care cases (Self-Caring and Informal Care)
KPI 6A
% of adults sent a satisfaction survey
Completed Reablement and Survey sent
KPI 6B
% of adults who responded to the survey
Completed Reablement and Responded to Survey
KPI 6C
% of respondents satisfied or above
Responded to Survey and Satisfied or above
KPI 4 uses the outcome chosen when a package ends. KPI 6 uses the Satisfaction Survey saved on the package’s End of Service Summary.
Self-Caring Outcome and Satisfaction Survey open.
Troubleshooting
A KPI looks wrong
KPIs are worked out from what’s recorded on each package. Check the dates, outcomes and survey responses on the packages for that month.
What do the colours mean?
Green means the result meets its target. Red means it’s below the target.
I can’t see a KPI
Click the section name to open it. Each section closes by default.
Dailies and Logs keeps a daily report for your service: planned and used hours, service user and package changes, and referrals. You can add reasons and send the report.
1
Open a daily report
In the menu on the left, click Dailies and Logs.
The list on the left shows one report per day, newest first, for example Dailies - 27-09-2026. Use Select Date Range to show other dates, or the refresh button to reset.
Click a day to open its report on the right. Each report shows when it was generated.
The badge on each day shows the hours status. underblock means fewer hours were used than the block hours.
A daily report. District names are blurred.
2
Weekly Planned Hours
Block Hours: the hours available each week.
Hours Utilized: the hours used this week, with the status.
Available Capacity Hours: the block hours not yet used.
Planned Hours: the planned hours for each district.
3
Daily Breakdown
Section
What it shows
Service Users Insight
Active Service User, Active - In Term, Active-Overstayers (with the hours they used), Failed Start and Care Ended
Service Package Insight
Package Ended (with the outcomes), Package Started, Package Increased, Package Decreased, and a Count by Care Type
Referrals
Referrals Received, Referrals Accepted and Referrals Declined
Some numbers have a box next to them for a reason or note, for example Awaiting onward pathway for overstayers, or the reason for a failed start or declined referral. Type in the box, or click the pencil icon to edit what’s there.
4
Send or export
Send Report: sends the daily report you have open.
Export Log: downloads the logs.
Dailies Setup: the report settings. This is usually set up by a manager.
Troubleshooting
I can’t find an older report
Use Select Date Range at the top of the list to choose the dates.
What does underblock mean?
Fewer hours were used than the block hours for the week.
A number in the report looks wrong
The report is built from the packages in Enmero. Check the packages, for example their start, end and outcome.
The main Referral Manager page is where you see every referral for your service: how many came in, how quickly they were answered, and the details of each one. This guide explains each part of the page.
1
Open Referral Manager
Click Referral Manager at the top of the menu on the left. It’s the icon with two linked circles.
Check the page title says Referral Manager, and the path under it says Enmero › Referral Manager.
Two buttons sit at the top right of the page:
Export Referral downloads a list of referrals. See .
Check your service firstReferral Manager shows referrals for the service you’re in, shown at the top left (for example Reablement Service). How to switch service.
2
Summary figures
The box at the top, Current Month Referral Count, gives you the totals for a period of time.
Choose the period
Click Today, This Week or This Month at the top right of the box. The one in use is outlined. This Month is selected when you open the page.
To pick your own dates, click the dates (for example 01 Sep, 2026 - 30 Sep, 2026) or the pencil icon next to them.
Referral counts
Figure
What it counts, for the dates shown
Referral Registered
All referrals received
Accepted
Referrals that were accepted
Declined
Referrals that were declined
Pending Review
Referrals still waiting for a decision
Priority Start
Referrals marked as a priority start
In the example below, 72 accepted + 8 declined + 0 pending review = 80 registered.
Referral Response Performance
Responded Within 2 hours: how many referrals got a response within 2 hours.
Response Rate: the percentage of referrals that got a response.
The summary figures for September 2026.
3
Referral tabs
Below the summary, four tabs choose which referrals the table shows. The open tab is underlined in purple.
Tab
Shows
All Referral Requests
Every referral, whatever its status
Accepted
Only accepted referrals
Declined
Only declined referrals, with the reason for each
Pending Review
Referrals still waiting for a decision
4
Search and filters
Search Referrals: type a service user’s name. This box only searches names, and only accepted and declined referrals. To search by NHS or Mosaic number, use global search.
Filters: use the boxes to the right to narrow the list. You can combine them.
Priority Start: filter by whether the referral is a priority start.
Referral Date Range: show referrals received between two dates.
Referral Source: where the referral came from, such as Hospital or Community.
District: the area the service user lives in.
Trusted Assessor: referrals assigned to one assessor.
To clear the search and all filters, click the circular arrow button at the end of the row.
The search box, filters and reset button sit above the table.
5
Read the referral table
Each row is one referral. The newest referrals are at the top.
Column
What it shows
Examples
Referral ID
The referral’s unique 10-digit number. Quote it when you ask about a referral.
10 digits
Service User Name
The person referred, plus any labels and icons (see )
Name, Name (H2A)
District
The area the service user lives in
The service user’s area
Referral Source
Where the referral came from
Hospital, Community
Referral Date / Time
When the referral was received, as day/month/year and time
18/09/26 02:20 PM
Priority Start
Whether it’s a priority start
Yes, No
Referral Status
The decision on the referral. Declined is underlined because you can click it.
Accepted, Declined
Trusted Assessor
The assessor assigned. Click an underlined name for their contact details.
A name, Unassigned Assessor, Failed Start, or “-”
In the Trusted Assessor column:
A name with a profile icon: an assessor is assigned.
Unassigned Assessor: the referral is accepted but no assessor is assigned yet.
Failed Start can appear here instead of a name.
- (a dash): usually a declined referral, which has no assessor.
6
Labels and icons next to names
Next to a service user’s name you may see one or more of these. Hover over an icon to see what it means.
You see
Meaning
What to do
i red icon
Data Incomplete: the service user’s NHS number or Mosaic number is missing
Add the missing NHS or Mosaic number
T dark blue icon
Therapy Service Users: the service user is marked as a therapy service user
Nothing, it’s for information
A name can have both icons, for example a therapy service user whose NHS or Mosaic number is missing.
Labels and icons next to names. We’ve replaced real names and blurred referral IDs.Hover the red icon: “Data Incomplete”.Hover the T icon: “Therapy Service Users”.
7
See why a referral was declined
Click the Declined tab, or find a declined referral in All Referral Requests.
In the Referral Status column, click Declined or the note icon beside it.
Click Declined or its note icon. We’ve replaced real names and blurred referral IDs.
The Reason for Decline Note opens. It shows:
the reason, for example “Inappropriate Referral—Not Suitable For Reablement (E.G., EOL)”
Updated by: who declined it
the date it was declined, on the right
Click Close to go back to the table.
The Reason for Decline Note. We’ve hidden the staff member’s name and photo.
8
Contact the assessor
In the Trusted Assessor column, click the assessor’s underlined name.
Their Contact Card opens with their email address and phone number. Click a copy icon to copy either one.
Showing … results on the left tells you which referrals you’re looking at and how many there are in total.
Click a page number, or the ‹ › arrows, to move through the pages.
Use Rows per page on the right to show more or fewer referrals on each page. In the example it’s set to 50.
10
Export referrals
Download a list of referrals as a file, for example to share in a report.
Click Export Referral at the top right. The Export Options box opens.
Date Range: click Referral Date Range and choose the dates to include.
Referral request status: tick Accept, Decline, Pending, or more than one.
Export as: choose the file type. CSV opens in Excel and other spreadsheet programs.
Click Export. The button stays greyed out until you’ve filled in the options.
The Export Options box.
Keep exports safeExported files contain service users’ personal details. Store and share them following your organisation’s data protection rules.
Troubleshooting
A referral I expected isn’t in the table
Check you’re on All Referral Requests, clear the filters with the circular arrow button, and check you’re in the right service. You can also use global search.
The summary figures don’t match what I expected
The figures only count referrals in the dates shown. Check whether Today, This Week or This Month is selected, or whether custom dates are set.
What does the red icon next to a name mean?
“Data Incomplete”: the service user’s NHS number or Mosaic number is missing. Add the missing number to fix it.
The Export button is greyed out
Choose a date range and tick at least one status first.
The assessor’s name isn’t underlined
It says Unassigned Assessor, Failed Start or “-”, so there’s no assessor Contact Card to open.
Record a new referral in 5 stages, make a decision on it, and for accepted referrals set up the service package and review date.
Service user detailsName, date of birth, gender and address
NHS and Mosaic numbersWithout them the referral shows as Data Incomplete
The referral documentAs a PDF, 10 MB or smaller
1
Start a new referral
Open Referral Manager and check you’re in the right service.
Click Add Referral Request at the top right of the page.
The referral form opens. It has 5 stages, and the box at the top shows where you are, for example Stage 1 of 5.
Click the ← arrow at the top left to go back a stage.
Click Close at the top right to leave the form.
The NEXT button stays light purple until you’ve filled in the stage.
2
Stage 1: Personal information
Enter the service user’s Mosaic Number and NHS Number.
Enter their First Name and Last Name.
Choose their Date of Birth from the calendar.
Choose their Gender.
Click NEXT.
Don’t skip the NHS or Mosaic numberIf either is missing, the referral shows the red iData Incomplete icon in Referral Manager.
Stage 1. The details shown are examples.
3
Stage 2: Address details
Enter the service user’s home address in Address Line 1. Use Address Line 2 if you need more room.
Enter the City, Post code and District.
Click NEXT.
Stage 2. The address shown is an example.
4
Stage 3: Referral details and timing
This stage has three columns.
Intake Details
Referral Source: where the referral came from, such as Hospital or Community.
Priority Start: set to No unless it’s a priority start.
Require Therapy: whether the service user needs therapy. Therapy service users show the T icon in Referral Manager.
Referral Timing
Referral Date and Referral Arrival Time: when the referral reached you.
Referral Response Date and Referral Response Time: when you responded. Same as referral date is ticked as standard, so the response date matches the referral date. Untick it to choose a different date.
Initial Request Time
Requested Start Date and Requested Start Time: when the referrer asked for the service to start.
Times are set with three boxes: hour (HH), minutes (MM) and AM or PM. When everything is filled in, click NEXT.
Why the times matterThe referral and response times feed the Responded Within 2 hours and Response Rate figures in Referral Manager, so enter them accurately.
Stage 3.
5
Stage 4: Referral documents
Click Upload and choose the referral document you received from the referrer. It must be a PDF of 10 MB or smaller.
Check the file is complete and correct.
Click NEXT.
Stage 4.
6
Stage 5: Referral decision
Open the Decision menu and choose one of three options.
The three decisions.
Accept the referral
Choose Accept Referral.
Under Assign Assessor, choose the trusted assessor.
Click ACTIVATE SERVICE PACKAGE. Next, set up the .
Before choosing an assessor.With an assessor chosen. Name replaced.
Decline the referral
Choose Decline Referral.
Under Provide Reason For Decline, choose the reason.
Click DECLINE REQUEST. The reason is saved and can be seen later in the Reason for Decline Note.
Declining a referral.
Not ready to decide?
Choose Pending Review. The referral is counted in the Pending Review figure and tab in Referral Manager until a decision is made.
7
Set up the service package
After you activate the service package, Add Service Package Details opens.
Actual Start Date: choose the date care actually starts. This is required. If you leave it empty you’ll see “Start date is required”.
Anticipated End Date: filled in by Enmero from the start date. You can’t edit it. Hover the ⓘ icon for details.
Call Start Type: choose the first call, for example Morning Call.
Actual Start Time: choose the hour, minutes and AM or PM.
Under Setup Package Plan, click Set Schedule to enter the care hours (next step).
Click Set Schedule to add the weekly hours.
8
Set the weekly schedule
The Setup Weekly Schedule box lists each day of the week. All days start as closed with 0 hours.
For each day care is delivered, switch the toggle on so it says Open.
Enter that day’s care time in hours (h) and minutes (m).
If every day is the same, tick Use the same schedule all week. Every day then uses the same hours.
Check the total in Weekly Hours of Care to Be Delivered. For example, 2 hours a day for 7 days is 14h.
Click SAVE SCHEDULE. To leave without saving, click X.
This affects invoicesThe weekly hours you save apply automatically to invoices and to the daily utilised service hours.
Before: every day closed, 0h.After: 2 hours every day, 14h a week.
Back on the package, the green box now shows the Weekly Care Hours, for example 14.00.
9
Choose the care type and add a paired plan
Care type
Open Care Type and choose Single Handed Care, Double Handed Care or Triple Handed Care, depending on how many carers attend each call.
Check Total Care Hrs / wk. It’s the weekly care hours multiplied by the number of carers. For example, 14 weekly hours with Double Handed Care is 28.00 hours a week.
The three care types.
Add a paired plan
If the service user needs a second plan running at the same time, for example a different care type for some calls:
Click Pair with Another Plan under the first plan.
A Secondary Package Plan appears. Set its schedule and care type in the same way.
To remove the secondary plan, click the bin icon at its top right.
Pair with Another Plan.The Secondary Package Plan.
When the package is complete, click NEXT.
10
VOO/Progression review and RAG rating
Check the VOO Due Date. Enmero sets it automatically to 3 weeks after the Actual Start Date, so you can’t edit it. To change it, change the Actual Start Date.
Under RAG Ratings, click Select rating and choose the service user’s rating.
Click Next.
The VOO due date is set for you.
Troubleshooting
The referral isn’t recent, or care has already started
A tour of the Enmero screen after you log in, so you know where everything is.
1
The main screen
Every Enmero page has the same frame around it: a bar across the top, and a menu down the left. The numbers on the picture match the list below.
12345678
The Enmero screen, showing Referral Manager.
1
ServiceThe service portal you’re working in, such as Reablement or Home to Assess. If you have access to more than one, click it to open Switch Service. How to switch.
2
Global searchSearches every service you have access to, by name, NHS or Mosaic number. How search works.
3
CapacityUtilized hours are the hours used this week. Block hours are the weekly hours in the block. The badge, such as “Under block”, shows how the two compare.
4
Your name and roleShows who is logged in and your role, for example ECC.
5
OrganisationThe organisation and location you’re viewing, for example your care provider and its location. Click the arrow to see other options.
6
MenuMoves you between the parts of Enmero. The page you’re on is highlighted.
7
Page title and actionsThe page name, the path back (for example Enmero › Referral Manager) and buttons for that page on the right.
8
Help & GuideOpens help from inside Enmero.
2
The menu
Click a name in the menu to open that part of Enmero. Service opens to show two more pages beneath it. Each one is a module in this Help Centre, with its own guides.
Referral ManagerReferral counts, response performance and all referral requests
Pages such as Referral Manager are laid out the same way from top to bottom:
Date range. Click Today, This Week or This Month, or click the pencil next to the dates to choose your own.
Summary figures. Totals for the dates you picked, such as Referral Registered, Accepted and Declined.
Tabs. Switch between lists, for example All Referral Requests, Accepted, Declined and Pending Review.
Search and filters. Type in the page’s own search box (it only searches this page; see Searching in Enmero) or pick a filter to narrow the list. Click the circular arrow button to clear all filters.
Table. The records that match. Use the buttons at the top right, such as Export Referral or Add Referral Request, to act on the page.
 Help Centre